Introduction to periodontal instruments
The re-establishment and maintenance of periodontal health are the main objectives of periodontal treatment. Local factors like plaque and calculus are the major factors for periodontal disease progression. Removal of these local factors to obtain a clean root surface is mandatory to achieve periodontal health. Periodontal instruments have been designed specifically to achieve this goal. Presently, there is a large range of instruments available for the removal of supra and subgingival calculus, including ultrasonic devices, sickles, hoes, chisels and curettes. A thorough knowledge of instruments is mandatory for their appropriate usage. The following discussion is focused on various aspects of periodontal instrument designs and their specific uses.
Parts of an instrument
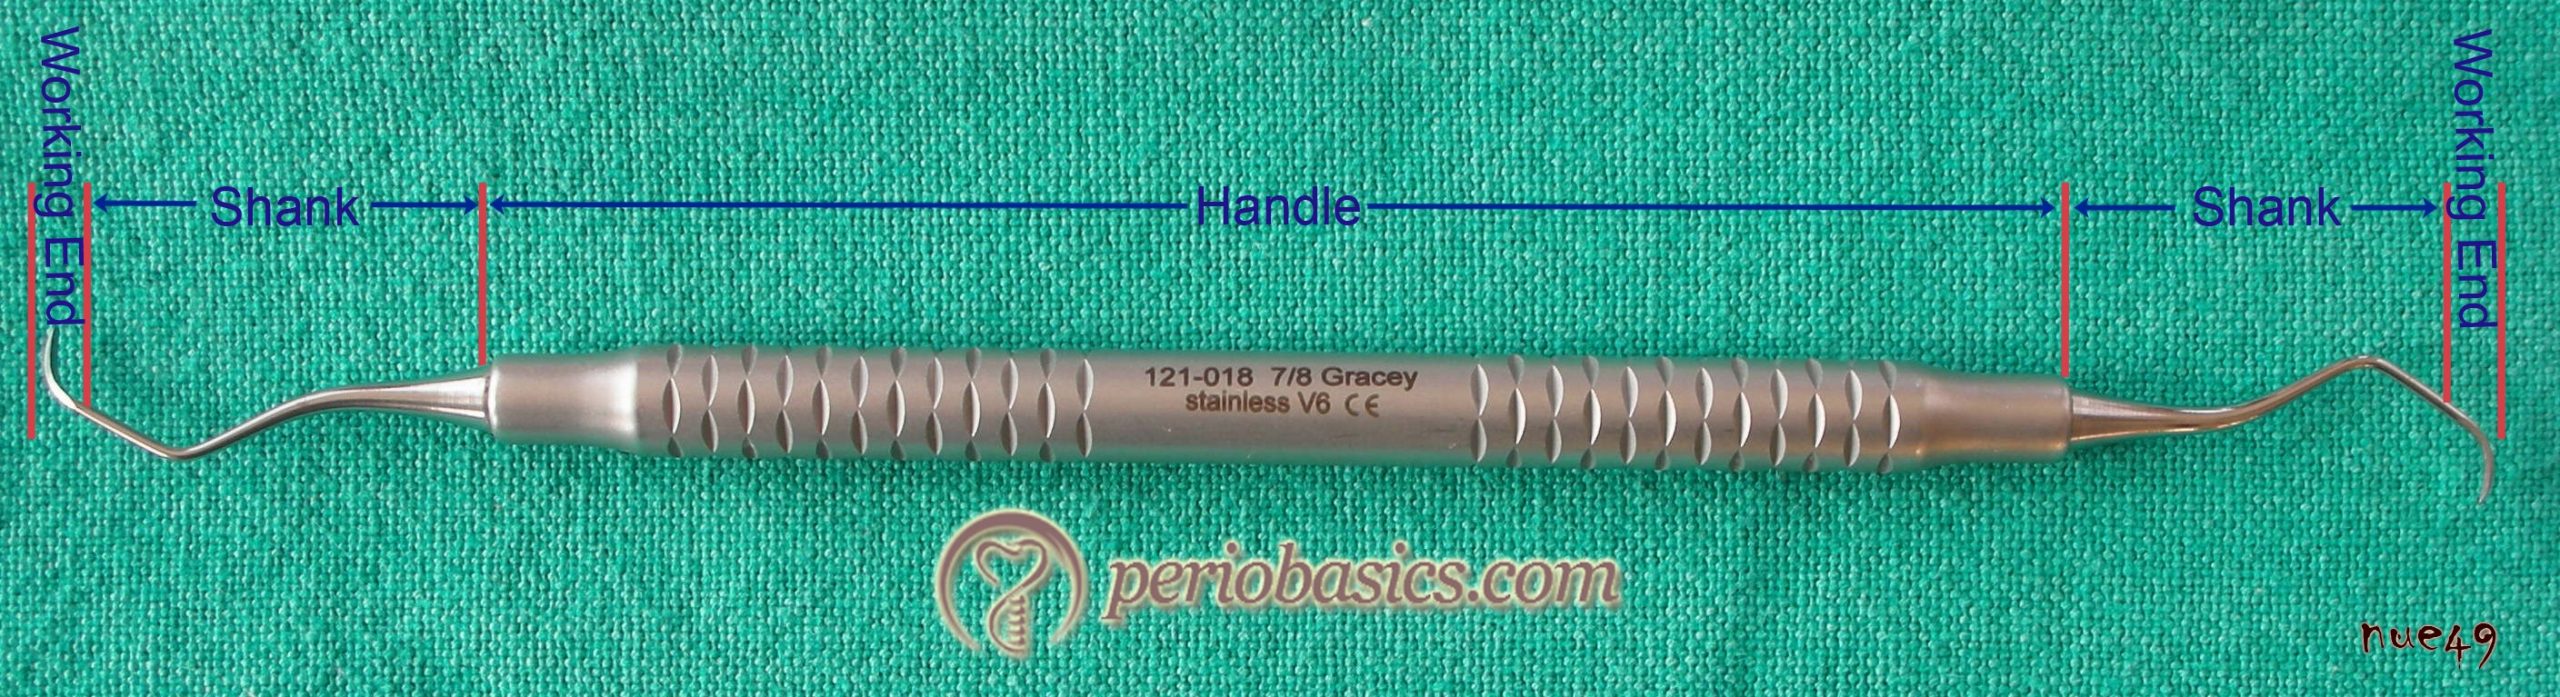
An instrument can be broadly divided into three parts: handle, shank, and working end. The handle of the instrument is used for grasping the instrument. Shank connects the handle to the working end and allows adaptation of the working end on the tooth surface. The working end does the work of the instrument. The instrument may be single-ended or double-ended. Double-ended instruments with working ends that are mirror images of each other have paired working-ends while instruments with two dissimilar working ends have unpaired working ends.
Following is the detailed description of these three parts of the instruments,
Handle:
The handle of the instrument is used for grasping the instrument. Presently, they are available in various weights, diameters, and textures.
Weight:
The weight of the handle is determined by its diameter and its core (solid or hollow). Hollow handles are more widely used because of better tactile perception and minimized muscle fatigue. Handles with small diameter, heavy solid metal core and smooth, flat texture are generally avoided.
Hollow handles: increase tactile transfer and minimize fatigue
Solid handles: reduce tactile transfer and increase fatigue
Diameter:
Small handles decrease control and increase muscle fatigue, whereas large handles maximize control and reduce muscle fatigue, but restrict movement in areas where access is limited.
Texture:
Serrated knurled handles maximize control and decrease hand fatigue, whereas smooth handles decrease control and increase muscle fatigue.
Shank:
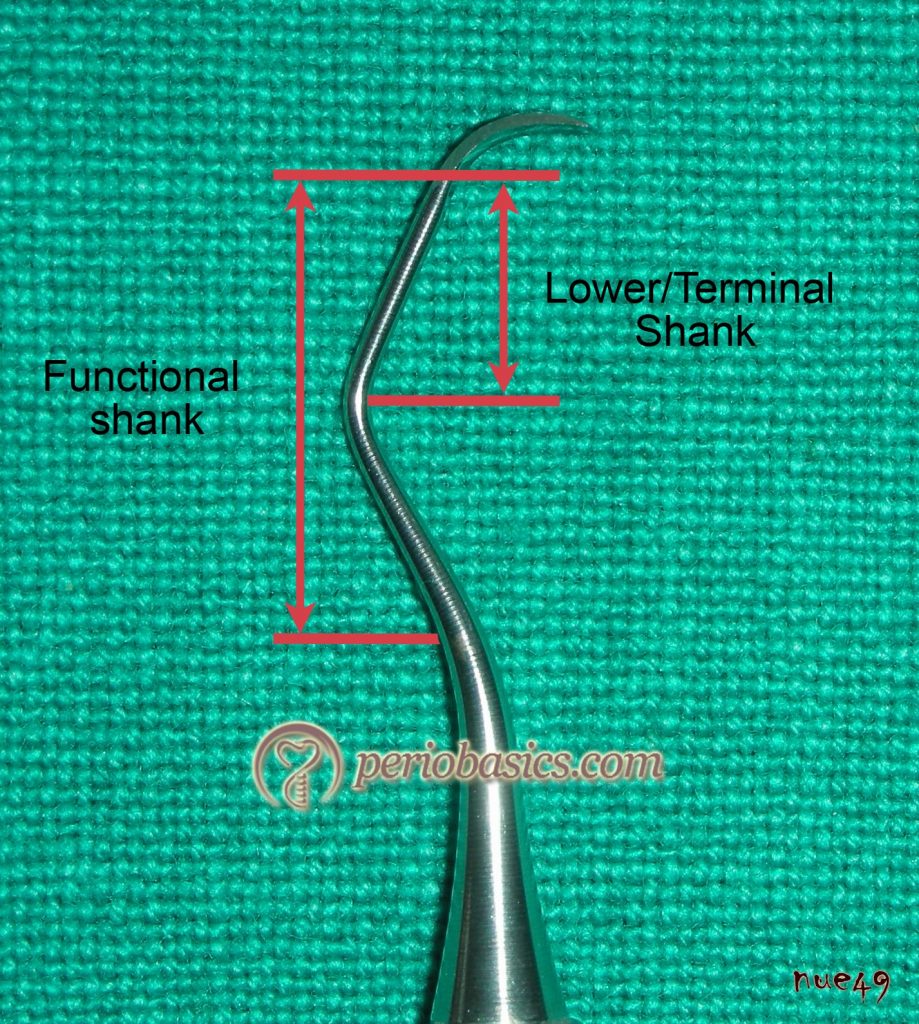
As already stated, shank connects the handle to the working end of the instrument. Shank can be functional or terminal as described in the following figure. The functional shank extends from the working end to the shank bend closest to instrument handle. It can be short, long or intermediate. The terminal shank extends between the blade and 1st bend. Long functional shank is needed to reach the tooth surfaces of posterior teeth or root surfaces of teeth with subgingival periodontal pockets whereas short functional shanks are used to remove supragingival calculus deposits or to reach the surface of anterior teeth. Shank can be rigid, moderately rigid or flexible.
Working end:
The working end or blade is made up of several components such as the face, cutting edge, back and toe. A rounded working end is called toe whereas a pointed working end is called, the tip.
Classification of periodontal instruments
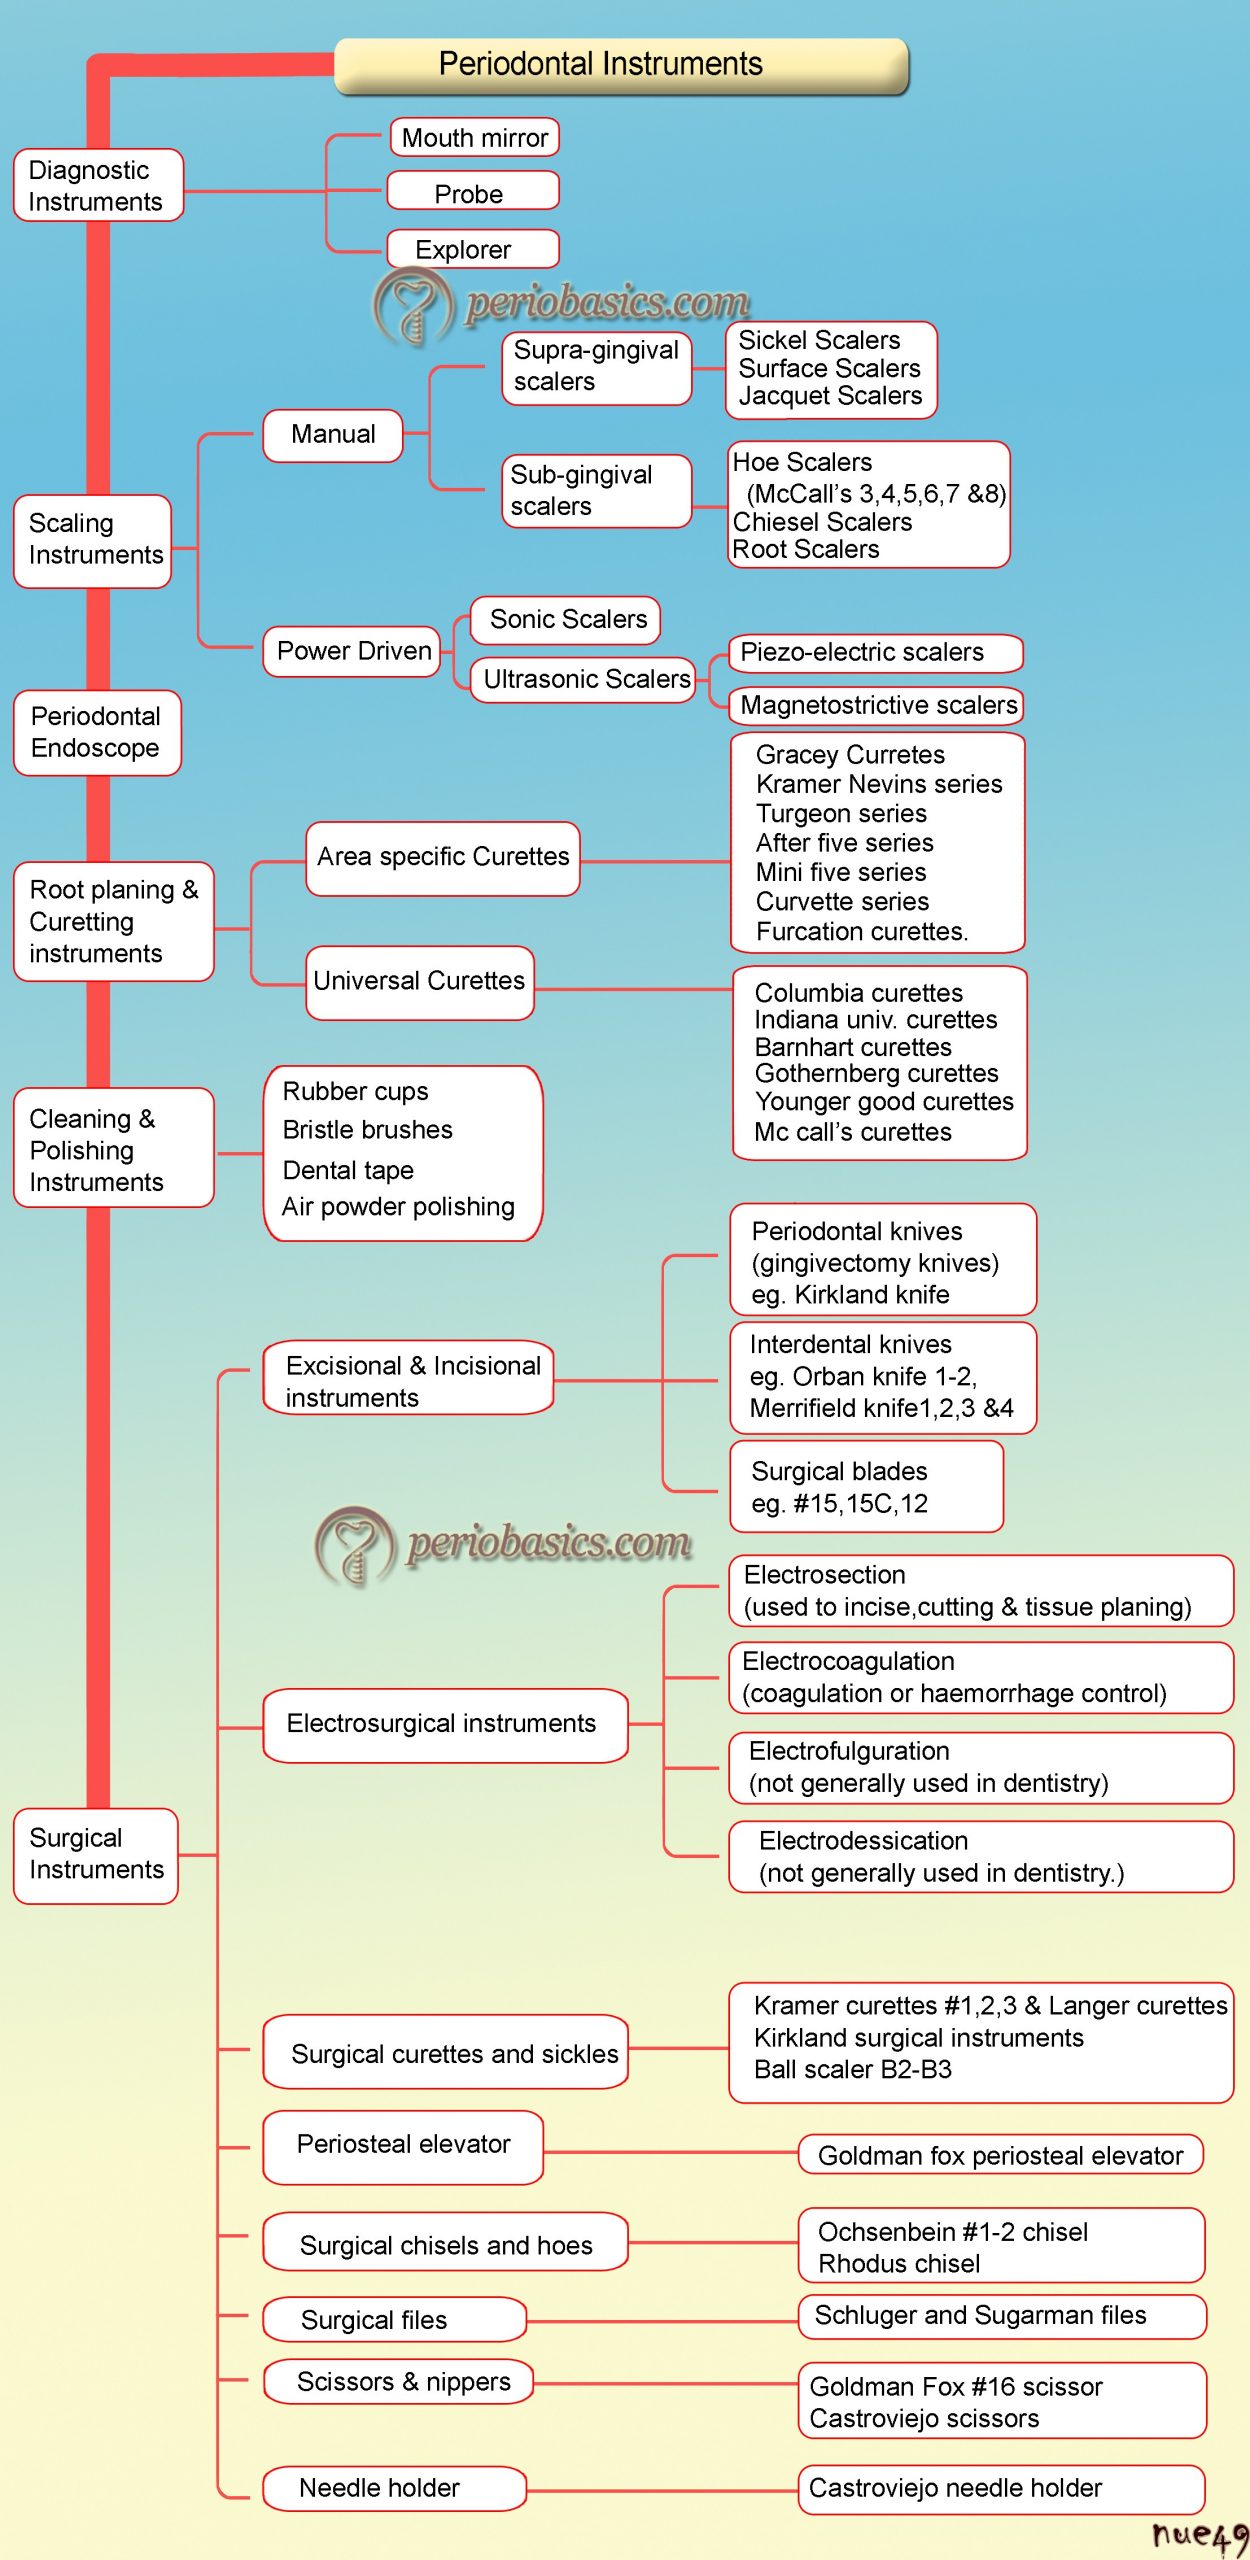
Periodontal instruments can be divided into following categories,
Diagnostic instruments.
Periodontal endoscope.
Scaling instruments.
Root planing and curetting instruments.
Cleaning and polishing instruments.
Surgical instruments.
Lasers
Diagnostic Instruments
Mouth mirror:
Mouth mirror has been used by the dentists and professionals working in the oral health field for many years to assist in viewing inside a patient’s oral cavity. Mouth mirror or dental mirror consists of a small, cylindrical, metal shaft with a metal disk attached at the end of it, which holds the mirror. There are basically four types of mouth mirrors: the plane mirror/flat surface mirror, the front surface mirror, the concave mirror, and the double-sided mirror. A mirror may be designed for a single, disposable use or for repeated use.
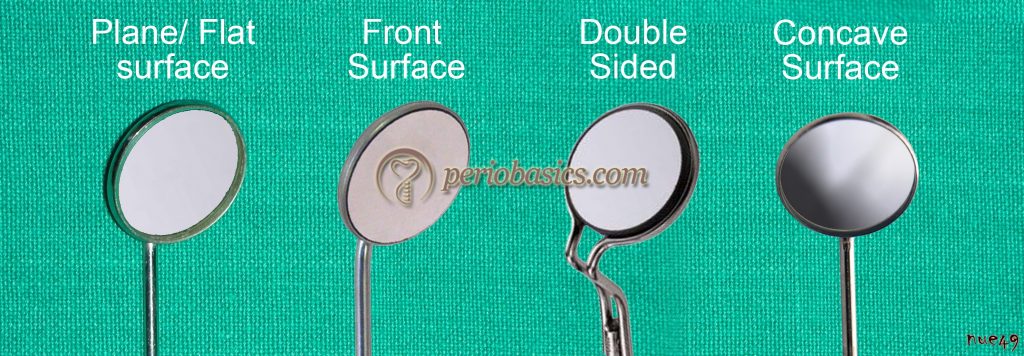
Plane mirror/flat surface mirror:
Like a regular mirror, the reflecting surface of this mouth mirror is present on the back surface of the mirror glass. The problem with this mirror is the formation of the double image known as ‘ghost image”. It is formed due to double reflecting surfaces. Hence, a clear image of the object is not seen during the indirect vision.
Front Surface mirror:
To overcome the problem associated with a plane mirror, the reflecting …….. Contents available in the book …….. Contents available in the book …. …….. Contents available in the book …. …….. Contents available in the book ….
Periobasics: A Textbook of Periodontics and Implantology
The book is usually delivered within one week anywhere in India and within three weeks anywhere throughout the world.
India Users:
International Users:
Concave mirror:
In this mirror, the reflecting surface is on the front surface of the mirror lens of which is concave. So, the image produced is larger in size as compared to its original size. It is used to see the enlarged image of the areas where normal mirror does not display complete details. It is not recommended for routine use because magnification distorts the image.
Double-sided mirror:
It is used to retract the cheek or tongue. At the same time, the opposite side of the mirror can be used to view the indirect image.
Sizes of Mouth Mirrors:
Size 1 -16 mm
Size 2 -18 mm
Size 3 – 20 mm
Size 4 – 22 mm
Size 5 – 24 mm
Most commonly used mouth mirrors are Size 4/ No.4 and Size 5/ No.5. The small size mirror usually Size 2/ No.2 allows the dentist to access the areas in the mouth which are difficult to view by direct vision, such as the back teeth.
How to use a mouth mirror:
Mouth mirror should be used with a light grip in order to prevent muscular or skeletal strain in the hands. It is also comfortable to the patient. The fogging of the mirror can be avoided by placing the reflective surface under warm water. Mouth mirrors can also serve as effective teaching tools about proper tooth care for young children and adults.
Uses of mouth mirror:
Indirect vision.
Retraction.
Indirect illumination.
Transillumination.
Periodontal probes
Periodontal probing is the gold standard for periodontal assessment. It is used to accurately locate, assess, and measure the sulcus and pocket depth. The rationale behind periodontal probing is to detect and measure loss or gain of attachment levels to determine the extent of previous or ongoing periodontal disease activity and to assess the efficacy of the treatment done. Presently, various periodontal probes are available which vary in their markings, color coding, diameter, material, and angle.

Historical aspect:
Periodontal probes have been used for last many years for the diagnosis of periodontal diseases. “Probe” is a Latin word which means “to test”. Diagnosis of diseases and its importance in treatment planning goes back to the time of Hippocrates, who tried to systematically diagnose and treat various pathological conditions. The periodontal probe was first described as a periodontal diagnostic instrument by John W Riggs in 1982 1.
The diagnosis of pyorrhoea by measuring pocket depths using a periodontal probe was described by F V Simonton in 1925 2. He emphasized that the presence of pyorrhoea and its extent could only be determined by the presence and depths of periodontal pockets. The basic shape of the periodontal probe is same, as was originally described.
The first systematic classification of periodontal probes was given by B L Pihlstrom in 1992 3, who classified …….. Contents available in the book …….. Contents available in the book …. …….. Contents available in the book …. …….. Contents available in the book ….
Generations of periodontal probes:
As already stated periodontal probes have been classified into five generations,
First generation
Second generation
Third generation
Fourth generation
Fifth generation
Following is the detailed description regarding these generations of periodontal probes,
First generation periodontal probes:
The first generation periodontal probes are the conventional or manual probes, made up of stainless steel or plastic. They have no pressure or force measuring device attached to them, which can measure the pressure or force applied by the examiner during probing. The working end of these probes is either round, tapered, flat, or rectangular with smooth rounded ends. Calibrations in millimeters are made at various intervals, facilitating measurement of periodontal pocket depths. The working end of the probe may be curved to facilitate probing into the furcation areas. The diameter of the probe is important because if it is more, it is difficult to insert it into the periodontal pocket and it may not reach the bottom of the pocket; and if it is too thin, it may penetrate the junctional epithelium, giving a false reading.
Charles H M Williams in 1936 5, introduced a graduated periodontal probe known as William’s probe. This probe is considered as the prototype for first generation periodontal probes. It is a stainless steel probe with …….. Contents available in the book …….. Contents available in the book …. …….. Contents available in the book …. …….. Contents available in the book ….
Another periodontal probe is Goldman fox probe having similar markings as that of William’s, but with a flat tip. The Glickman probe has a round tip with a longer shank. Merritt A and B probes have a round tip with a single bend in the shank. The University of Michigan ‘o’ probe has round fine narrow diameter at the tip with markings at 3, 6 and 8 mm. The University of North Carolina probe (UNC-15) has color coding for every mm marking and is longer in length (15 mm). It is preferred for clinical trials where the conventional probe is required.
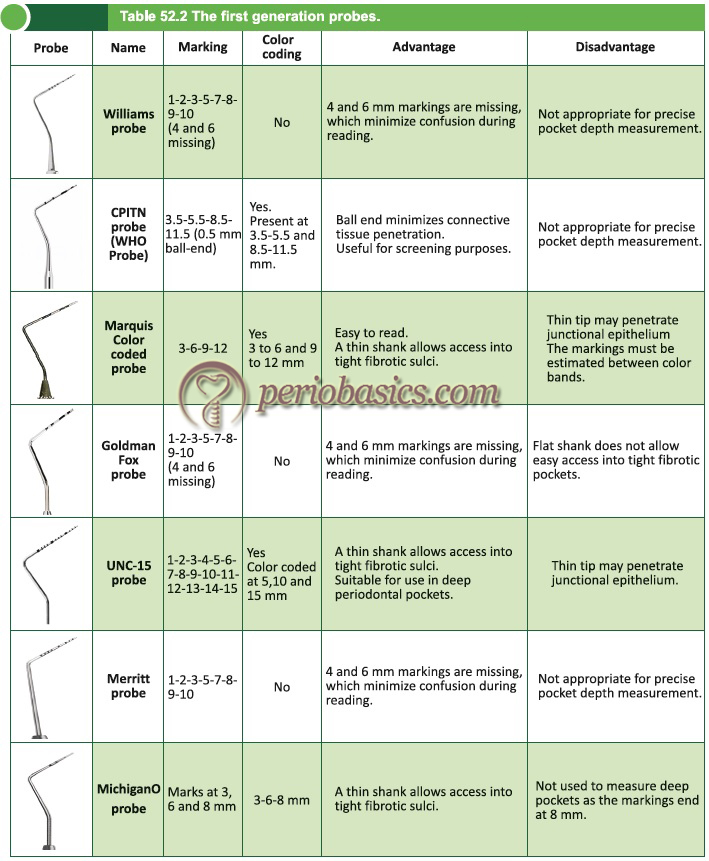
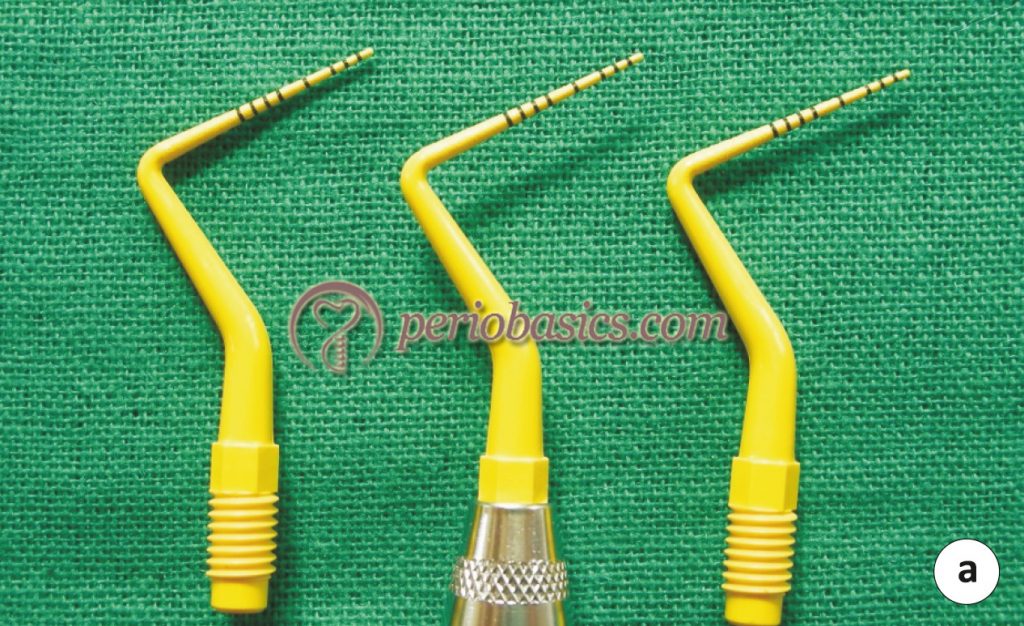
The Community Periodontal Index of Treatment Need (CPITN) is widely used for screening and monitoring the periodontal findings in patients. It was designed by Professors George S Beagrie and Jukka Ainamo in 1978. This index is widely used in epidemiological studies. A specific probe, i.e. CPITN probe (CPITN-E/ CPITN-C) has been designed for recording the periodontal findings while recording this index which has been recommended by WHO 6. The probes have a ball tip of 0.5 mm, with a black band between 3.5 mm and 5.5 mm, as well as black rings at 8.5 mm and 11.5 mm. The weight of the probe is …….. Contents available in the book …….. Contents available in the book …. …….. Contents available in the book …. …….. Contents available in the book ….
Marques color-coded probe 7 is another probe that has been designed to facilitate easy read out of pocket depth. It has markings at 3-3-3-3/ 3-3-2-3/ 2-2-2-2 mm intervals. It is available in both straight and curved designs and has the slimmest tip. The LL-20 probe (Hu-Friedy) has a tip of 0.5 mm diameter and rounded end marked in increments up to 20 mm. To facilitate reading there are thick black markings at 4, 9, 14 and 19 mm 8. For probing around implants color-coded polymeric probes have been designed to minimize the possibility of scratching the metal surface.
Naber’s probe is a curved probe, used for detecting and measuring horizontal periodontal furcation involvement in multirooted teeth. It has a curved working end, a blunt tip and is double ended. The examples of non-calibrated, double ended smooth surface Naber’s furcation probe are 1N and 2N. Variations of these include Naber’s 3N furcation probe which is graduated with markings at 1, 2, 3, 4, 5, 6, 7, 8, 9, 10 mm and color coded probe which has markings at 3, 6, 9, 12 mm.
Second generation periodontal probes:
There is no standardization of pressure applied in first-generation probes. It has been shown that the pressure applied during probing affects the readings obtained, which may cause an error in readings depending on the pressure applied during probing by same or different operators 9, 10. To overcome this problem second-generation probes were developed to standardize and quantify the pressure used during probing. These probes are pressure-sensitive, allowing for improved standardization of probing pressure. It has been shown that probing pressure should not exceed 0.2 N/mm2 (9, 10). These probes can be easily used in clinical practice without the requirement of computerization of the operatory.
The prototype for these probes is true pressure-sensitive probe (TPS), introduced by Frank Hunter in 1994. These probes have a disposable probing head and a hemispheric probe tip with a diameter of 0.5 mm. This probe was designed to deliver the same 20 grams of force every time it was used 4. A rim surrounding the side of the ball tip helps in detection of the cementoenamel junction, calculus or root surface irregularities. Controlled probing force to the probe tip was provided using a parallelogram. A visual sliding scale is present with two marks, which, when meet indicate force application of 20 gms.
Historically, Gabathuler and Hassell (1971) probably designed the 1st pressure sensitive probe with a constant force application. Another pressure sensitive probe holder was designed by Armitage in 1977 to determine how a constant probing pressure of 25 pounds affected the connective tissue attachment 11. Similarly, a pressure sensitive probe …….. Contents available in the book …….. Contents available in the book …. …….. Contents available in the book …. …….. Contents available in the book ….
Tromp et al. in 1979 13 introduced a pressure-sensitive probe in which a torque spring was attached to a loose probe head that could rotate in a point bearing. By doing this they achieved a constant force application of about 15 gms, which was independent of the force applied by the operator. Vitek et al. in 1979 14, introduces a leaf spring force-controlled periodontal probe. This device delivered a force within 0.5 grams to Michigan ‘O’ probe tip with a terminal diameter of 0.35 ± 0.05 mm.
Polson in 1980 15 introduced electronic pressure sensitive probe. This is also known as Vine Valley Probe (Vine Valley Research, NY USA). In this probe design a handpiece and control base was provided which allowed …….. Contents available in the book …….. Contents available in the book …. …….. Contents available in the book …. …….. Contents available in the book ….
Third-generation periodontal probes:
The limitations of second-generation probes included errors in constant pressure application, errors in readings, errors in the calculation of attachment loss as well as there was no automated recording system available to store the data obtained. Third-generation probes refer to automated probing systems, where along with a constant pressure application the data is stored by the computer. With these probes, the examiner related errors are eliminated.
Foster-Miller (Alabama) probe:
This probe was devised by Jeffcoat et al. in 1986 16. It is considered as the prototype for third generation periodontal probes. Working at the university of Alabama, they were able to build a device capable of providing controlled probing pressure and measuring the pocket depth along with the detection of cementoenamel junction (CEJ); from which clinical attachment loss is automatically determined. The components of the probe included: a pneumatic cylinder, a linear variable differential transducer (LVDT), a force transducer, an accelerator, and a probe tip.
The detection of the CEJ is done by moving the ball tip of the probe on the root surface at a controlled speed and preset pressure. When it reaches the CEJ there is an abrupt change in the acceleration which is indicated by the …….. Contents available in the book …….. Contents available in the book …. …….. Contents available in the book …. …….. Contents available in the book ….
Florida Probe:
The Florida Probe was developed following the criteria defined by the National Institute of Dental and Craniofacial Research for overcoming limitations of conventional probing. These criteria are 17,
- Easy to use.
- Non-invasive.
- Constant and standardized force.
- Light-weight.
- Easy access to any location around all teeth.
- A guidance system to ensure proper angulation.
- Complete sterilization of all portions entering mouth.
- No biohazard from material or electric shock.
- Direct electronic reading and digital output.
It was developed by Gibbs et al. in 1988 18. The components of this probe include, a probe handpiece and sleeve; a displacement transducer; a foot switch; and a computer interface/personal computer. The hemispheric probe tip has a diameter of 0.45 mm, and the sleeve has a diameter of 0.97 mm. This probing system provides a constant pressure of 15 grams and a precision of 0.2 mm, providing a highly accurate periodontal examination. The Florida probe has three variants: the pocket probe, the disk probe, and a stent-based model (Florida Probe Corp., Gainesville, FL). The latter two …….. Contents available in the book …….. Contents available in the book …. …….. Contents available in the book …. …….. Contents available in the book ….
Toronto automated probe:
McCulloch and Birek in 1991 20 at the University of Toronto, described a probe that, like the Florida disk probe, used the occlusal/incisal surface to measure gingival attachment levels (relative attachment loss). This probe was incorporated with a tilt sensor device in its handle which could identify changes in the angulation of the probe. The sulcus probing was done with a 0.5-mm nickel-titanium wire that is extended under air pressure.
Probing forces of 0.1 N to 0.9 N, corresponding to the probing pressures of 0.51 N/mm2 to 4.58 N/mm2, can be generated by an electric torque motor contained in the length gauge 9. Advantages of this automated probing system include an incorporated electronic guidance system to improve precision in probe angulation and it allows the estimation of the biophysical integrity of the dentogingival junction by measuring intrapocket probing velocity 21. Disadvantages of this probing system are errors in probe positioning, difficulty in recording the pocket depths around second and third molars and to reproduce readings, patients have to position their heads in the same place 17.
Interprobe:
It is also known as the Perio Probe. This probing system uses fiber optic technology. Goodson and Kondon (1988) 22 used this technology in their controlled-force Accutek probe. Components of this probing system include a probe tip (disposable) which is attached to an optical encoder transducer element, a control unit, memory cards for recording the data and a foot switch. A fiber bundle transmits light to the transducer and reflected light to a signal processor. Probing depth is computed by comparison of the reflected light signal with the reference obtained from the zero position 9. A friction clutch mechanism is used to apply a controlled probing force at 0.4 N (4.16 N/mm2).
The interprobe is calibrated for a constant 0.3 N (1.26 N/mm2) probing force and uses a 0.55 mm diameter plastic filament. This plastic filament with a rounded tip extends from a plastic sheath and …….. Contents available in the book …….. Contents available in the book …. …….. Contents available in the book …. …….. Contents available in the book ….
Periobasics: A Textbook of Periodontics and Implantology
The book is usually delivered within one week anywhere in India and within three weeks anywhere throughout the world.
India Users:
International Users:
Peri Probe Comp:
The Peri Probe Comp, a computerized electronic probe with a controlled pressure of 0.45 N in 2 mm pockets to 0.25 N in 13 mm pockets. The components of this probing system include a handpiece with a disposable probe sleeve unit and a small ball shaped 0.5 mm diameter end. The handpiece contains a closed in spring, which controls the probing pressure. The unit is connected to a computer which records the data obtained by probing 8.
| The generations of periodontal probes, their advantages and disadvantages. | |
|---|---|
| First Generation probes | |
| Advantages | Disadvantages |
| · These are easily available and inexpensive. · Tactile sensation is percieved and easily navigated by the operator. · Color coding allows precise reading. · Can be used even in the presence of subgingival calculus. | · Probing force cannot be measured. · Heavy in weight. · Inter-examiner variation is high. · No computer capturing of data. · Errors may occur during the reading. · An assistant is required to record the readings. |
| Second Generation probes | |
| · Constant pressure application. · Less inter-examiner variation. · Comfortable to the patient. | · Penetration into inflamed connective tissue may occur. · An assistant is required to record the readings. |
| Third Generation probes | |
| · Constant pressure application. · Errors during data recording are minimal. · Computerized storage of data. · Printouts can be obtained. | · Penetration into inflamed connective tissue may occur. · Less tactile sensitivity. |
| Fourth Generation probes | |
| · Allows three-dimensional measurement of pocket. · Sequential probe positions can be measured. · Computerized storage of data. · Printouts can be obtained. | · Penetration into inflamed connective tissue may occur. · Less tactile sensitivity. |
| Fourth Generation probes | |
| · Allows three-dimensional measurement of pocket. · Sequential probe positions can be measured. · Computerized storage of data. · Printouts can be obtained. | · Under development. |
| Fifth Generation probes | |
| · Non-invasive. · Accurate measurement of pocket depth. · Ultrasound waves accurately detect various periodontal structures, like the upper boundary of periodontal ligament and other soft tissue structures. · Provides information regarding the condition of the gingival tissues. · Computerized storage of data. · Printouts can be obtained. | · Technique sensitive. · Expensive. · Operator training required for interpreting the images obtained. |
Fourth generation periodontal probes:
The fourth generation periodontal probes utilize 3D technology with the aim of obtaining a precise and continuous reading of the base of the sulcus or pocket. These probes are currently under development. These probes are aimed at recording sequential probe positions along the gingival sulcus. The 3D visualization can provide us quite accurate information about the periodontal pocket.
Fifth generation periodontal probes:
In addition to 3D technology, these probes are designed to utilize ultrasound waves. These are non-invasive probes. The advantage of using ultrasound waves is an accurate measurement of attachment levels without penetrating the junctional epithelium. The major disadvantage of conven-tional probes is the overestimation of pocket depth due to penetration of probe tip into the connective tissue, especially in inflammation. The only available fifth-generation probe is Ultra Sonographic (US) probe (Visual Programs, Inc, www.usprobe.com).
Ultra Sonographic (US) probe:
The US Probe mapping system is a non-invasive periodontal probing technique which measures periodontal pocket depth with the identification of junctional epithelial attachment and CEJ. It uses the same technology as used by NASA to detect cracks in airplanes. Ultrasound probe works somewhat like a sonogram. This probe was devised by Hinders et al. (1999) 23 at the NASA Langley Research Center. Here, a very narrow beam of high-frequency (10-15 MHz) ultrasonic waves is …….. Contents available in the book …….. Contents available in the book …. …….. Contents available in the book …. …….. Contents available in the book …..
Components:
The components of this probe include a transducer, which is housed within a contra-angled handpiece at the base of the hollow conical tip, computer to record and display the data, separate electron box for water pressure control, and a foot pedal. The hollow conical tip focuses the acoustic beam into periodontal tissue and the transducer emits and receives sound waves.
Working:
While probing, the tip of the probe is kept vertically parallel to the long axis of the tooth and placed gently on the gingival margin until slight blanching of gingiva is visualized. Now the probe is activated with foot paddle to introduce a small stream of water into the sulcus along with a thin beam of ultrasound waves. The ultrasonic beam entering the tissues is either absorbed, reflected, or scattered. The reflected portion of the beam is received by the machine and used for reconstruction of the ultrasonic image. The transducer installed in the handpiece records the echoes and the computer analyzes the data obtained. As the examiner passes the probe tip across the gingival margin, computer records incoming data which employs …….. Contents available in the book …….. Contents available in the book …. …….. Contents available in the book …. …….. Contents available in the book ….
Explorers
Dental explorers are diagnostic instruments used to conduct a tactile examination and appraisal of pits and fissures, carious lesions, smoothness of root surfaces, presence of calculus on the root surface and margins of the restoration. Explorers have a sharp pointed end, which enhances the tactile sensation. The pointed working end that is referred to as the “explorer tip” is 1-2 mm in length. Explorers are made up of flexible metal which helps in better tactile sensation when the instrument is moved on the tooth surface. Only light exploratory strokes are applied to evaluate the surface smoothness. The side of the working end of explorer is used after periodontal debridement to evaluate calculus removal and root surface texture. There are various types of explorers available, having their own advantages and disadvantages. Following is the description of each design with its use,
Straight explorer:
It is one of the most commonly used explorers. It has a straight working end with a pointed tip. It is used to diagnose dental caries and irregular restorations margins. It is not recommended for subgingival use because the pointed tip of the explorer can injure the soft tissue at the base of sulcus/pocket. The examples of straight explorer include No. 6, No. 6A, No. 6L and 6XL explorers.
Shepherd hook explorer:
The name “Shepherd hook” is derived from a long stick with a curved end which was used by the shepherd to catch the sheep. It is one of the most commonly used explores and is used to diagnose …….. Contents available in the book …….. Contents available in the book …. …….. Contents available in the book …. …….. Contents available in the book ….
Curved explorers:
Curved explorers are used to detect the presence of calculus on the root surface. These are used with a light stroke and moved on the root surface in the horizontal direction. Care must be taken not to injure the soft tissue while using them subgingivally. The examples of curved explorers are No. 3 and No. 3A explorers.
Orban type explorer:
This is also a commonly used explore. It is designed in such a way that the tip of the explore is at an angle of 90⁰ to the lower shank. The advantage of this design is that when inserted into the sulcus/pocket, the back of the tip comes in contact with the soft tissue rather than the tip, preventing soft tissue injury. The disadvantage of this design is the difficulty in assessing the line angles and contact areas of teeth. The examples of Orban type explorers are No. 17 and No. 20 F explorers.
11/12 type explorers:
The 11/12 explorer is a universal assessment/diagnostic periodontal instrument. It has an excellent subgingival adaptation. This explorer has been specifically designed to examine the proximal areas and deep periodontal pockets. It is circular in cross-section. The design of the shank is complex, which helps in assessment of the root surface in anterior as well as …….. Contents available in the book …….. Contents available in the book …. …….. Contents available in the book …. …….. Contents available in the book …..
Pigtail and Cowhorn explorers:
The name pigtail or cow horn is because of the shape of the shank of the instrument that is used to examine teeth for calculus, caries, and restoration margins. It is used to explore the smoothness of the root surface only in shallow pockets because its curved lower shank causes considerable displacement of the soft tissue away from the root surface. Examples of pigtail or cow horn explorers include 3CH, 3ML and 2A explorers.
Periodontal endoscope
Endoscopy has been used extensively in medicine, allowing visualization and access to various parts of the body through minimally invasive surgical techniques. The components of an endoscopic unit include fiber-optic bundles, electronic video technology and fostered smaller-bore (viewing tubes) endoscopes of 2 mm or less, proving access into smaller cavities and anatomical spaces of the body.
Periodontal endoscope, Perioscopy (Dental View, Irvine, CA) provides a …….. Contents available in the book …….. Contents available in the book …. …….. Contents available in the book …. …….. Contents available in the book ….
It consists of a small bore with 0.99 mm diameter and 24x to 48x magnification, a powerful illuminating source, and an effective irrigation system to allow optimal visualization during minimally invasive periodontal surgical treatment. The fiber-optic is carried to the subgingival area in a sterile sheath called as “explorer”. This sheath consists of two tubes: one isolating the fiber-optic from the oral environment and the other which delivers water to the end of fiber or camera lens.

Indication for use of periodontal endoscope:
The site/sites which do not respond to traditional non-surgical periodontal therapy.
In cases where gingiva is chronically inflamed in spite of proper periodontal therapy.
In cases of suspected subgingival pathology.
In cases of root fracture, perforation or resorption.
Litigation cases which require documentation.
Scaling instruments
These instruments are used to remove plaque and calculus from the tooth surface. Scaling instruments can be divided into two types: manual and power-driven instruments. The manual instruments include sickle scalers, curettes, files, hoes, and chisels. The power-driven instruments include sonic and ultrasonic scalers. Ultrasonic scalers can further of two types: piezoelectric and magnetostrictive. In the following section, we shall discuss in detail various design features and usage of these instruments.
Manual instruments
Sickle scalers:
These are mainly used for supra-gingival scaling. They are designed for the removal of moderate to heavy deposits. A sickle scaler has two cutting edges which are formed by the junction of the facial surface with the two lateral surfaces converging to a pointed tip. This design gives a triangular shape to the working end …….. Contents available in the book …….. Contents available in the book …. …….. Contents available in the book …. …….. Contents available in the book ….
Sickle scaler with straight blade:
It has two cutting edges on a straight blade ending in a sharp point. It is also known as Jacquette scaler. It is primarily used for scaling of broad facial and lingual surfaces and can also be used for scaling of interproximal areas.
Sickle scaler with curved blade:
It has two cutting edges on a curved blade ending in a sharp point. It is primarily used for scaling of interproximal areas. Presently, various types of sickle scales are available which include: university of South Carolina sickle scaler, Turner sickle scaler, Jacquette sickle scaler, Indiana university sickle scaler, U15/30 sickle scaler, Morse sickle scaler, 204 sickle scaler etc.
Sickle scalers of the same design can be obtained in different sizes to be used in subgingival areas. Based on size the working end, U15/30 and Indiana university sickle scalers are larger in size. Jacquette sickle scaler No.1, 2 and 3 have medium size. Curved 204 sickle scalers are available in large, medium and small sizes.

Curettes:
Curettes are an instrument of choice for subgingival scaling. Details about the types, design, and usage of curettes have been discussed later in Root planing and Curetting instruments.
Hoe scaler:
The hoe scaler has a straight, beveled cutting edge at a right angle (90 degree) to the shank. The terminal end of the blade is bent to a 99-100 degree angle, and the tip is beveled at a 45ᵒ angle to …….. Contents available in the book …….. Contents available in the book …. …….. Contents available in the book …. …….. Contents available in the book ….
File scaler:
The file scalers are similar to the hoe scalers in design. These consist of miniature hoe blades which are designs on a pad which is attached to the shank. Each blade is bent at an angle of 90-105 degree from the shank. These are available with four working ends to adapt to all surfaces of the teeth. As with hoe scalers, file scalers are available with lon-ger, more angled shanks to adapt to the posterior tooth surfaces and shorter less angled shanks which adapt to anterior teeth.

Chisel scaler:
These are double ended instruments, that have been designed for scaling of proximal areas and are primarily used in the anterior areas of the mouth due to their limited adaptation. They have a straight (45 degree) beveled, single cutting edge on a straight or curved shank. The instrument is used with a push stroke on subgingival calculus. The instrument should be used only to remove heavy tenacious calculus on the interproximal surfaces of the lower anterior teeth. It should not be used for scaling and root planing procedure. To avoid trauma to the soft tissue, the instrument should be used only in the horizontal direction. The instrument is stabilized against the tooth surface and is used with a push motion.

Root planing and Curetting instruments
These instruments are used for scaling and root planing in subgingival areas where scalers are not used because of their large size. These are broadly classified as universal and area specific curettes.
Universal curettes:
These are paired instruments having two cutting edges, designed to adapt to various areas in the dentition by altering the adaptation, figure rest, fulcrum, and hand position. The face of the blade is …….. Contents available in the book …….. Contents available in the book …. …….. Contents available in the book …. …….. Contents available in the book ….
Design:
The Universal Curette blade has two parallel cutting edges that meet at a rounded toe. The curette has two cutting edges which are formed at the junction of the lateral surfaces with the facial surface. The facial surface of the blade is positioned at a 90-degree angle to the terminal shank.

As the universal curettes have two parallel cutting edges at the working end, both of them are used for scaling and root planing. While selecting the universal curette for a particular task, the operator should consider the design of the curette, especially the design and rigidity of shank and the dimensions of the working end. As the name indicates (universal), according to their design, these curettes can be used in both anterior and posterior areas of the dentition.
Area-specific curettes:
These curettes have been designed to work on specific areas of dentition. The example of these curettes includes Gracey curettes, Kramer Nevins series, Turgeon series, Hu-friedy after …….. Contents available in the book …….. Contents available in the book …. …….. Contents available in the book …. …….. Contents available in the book ….
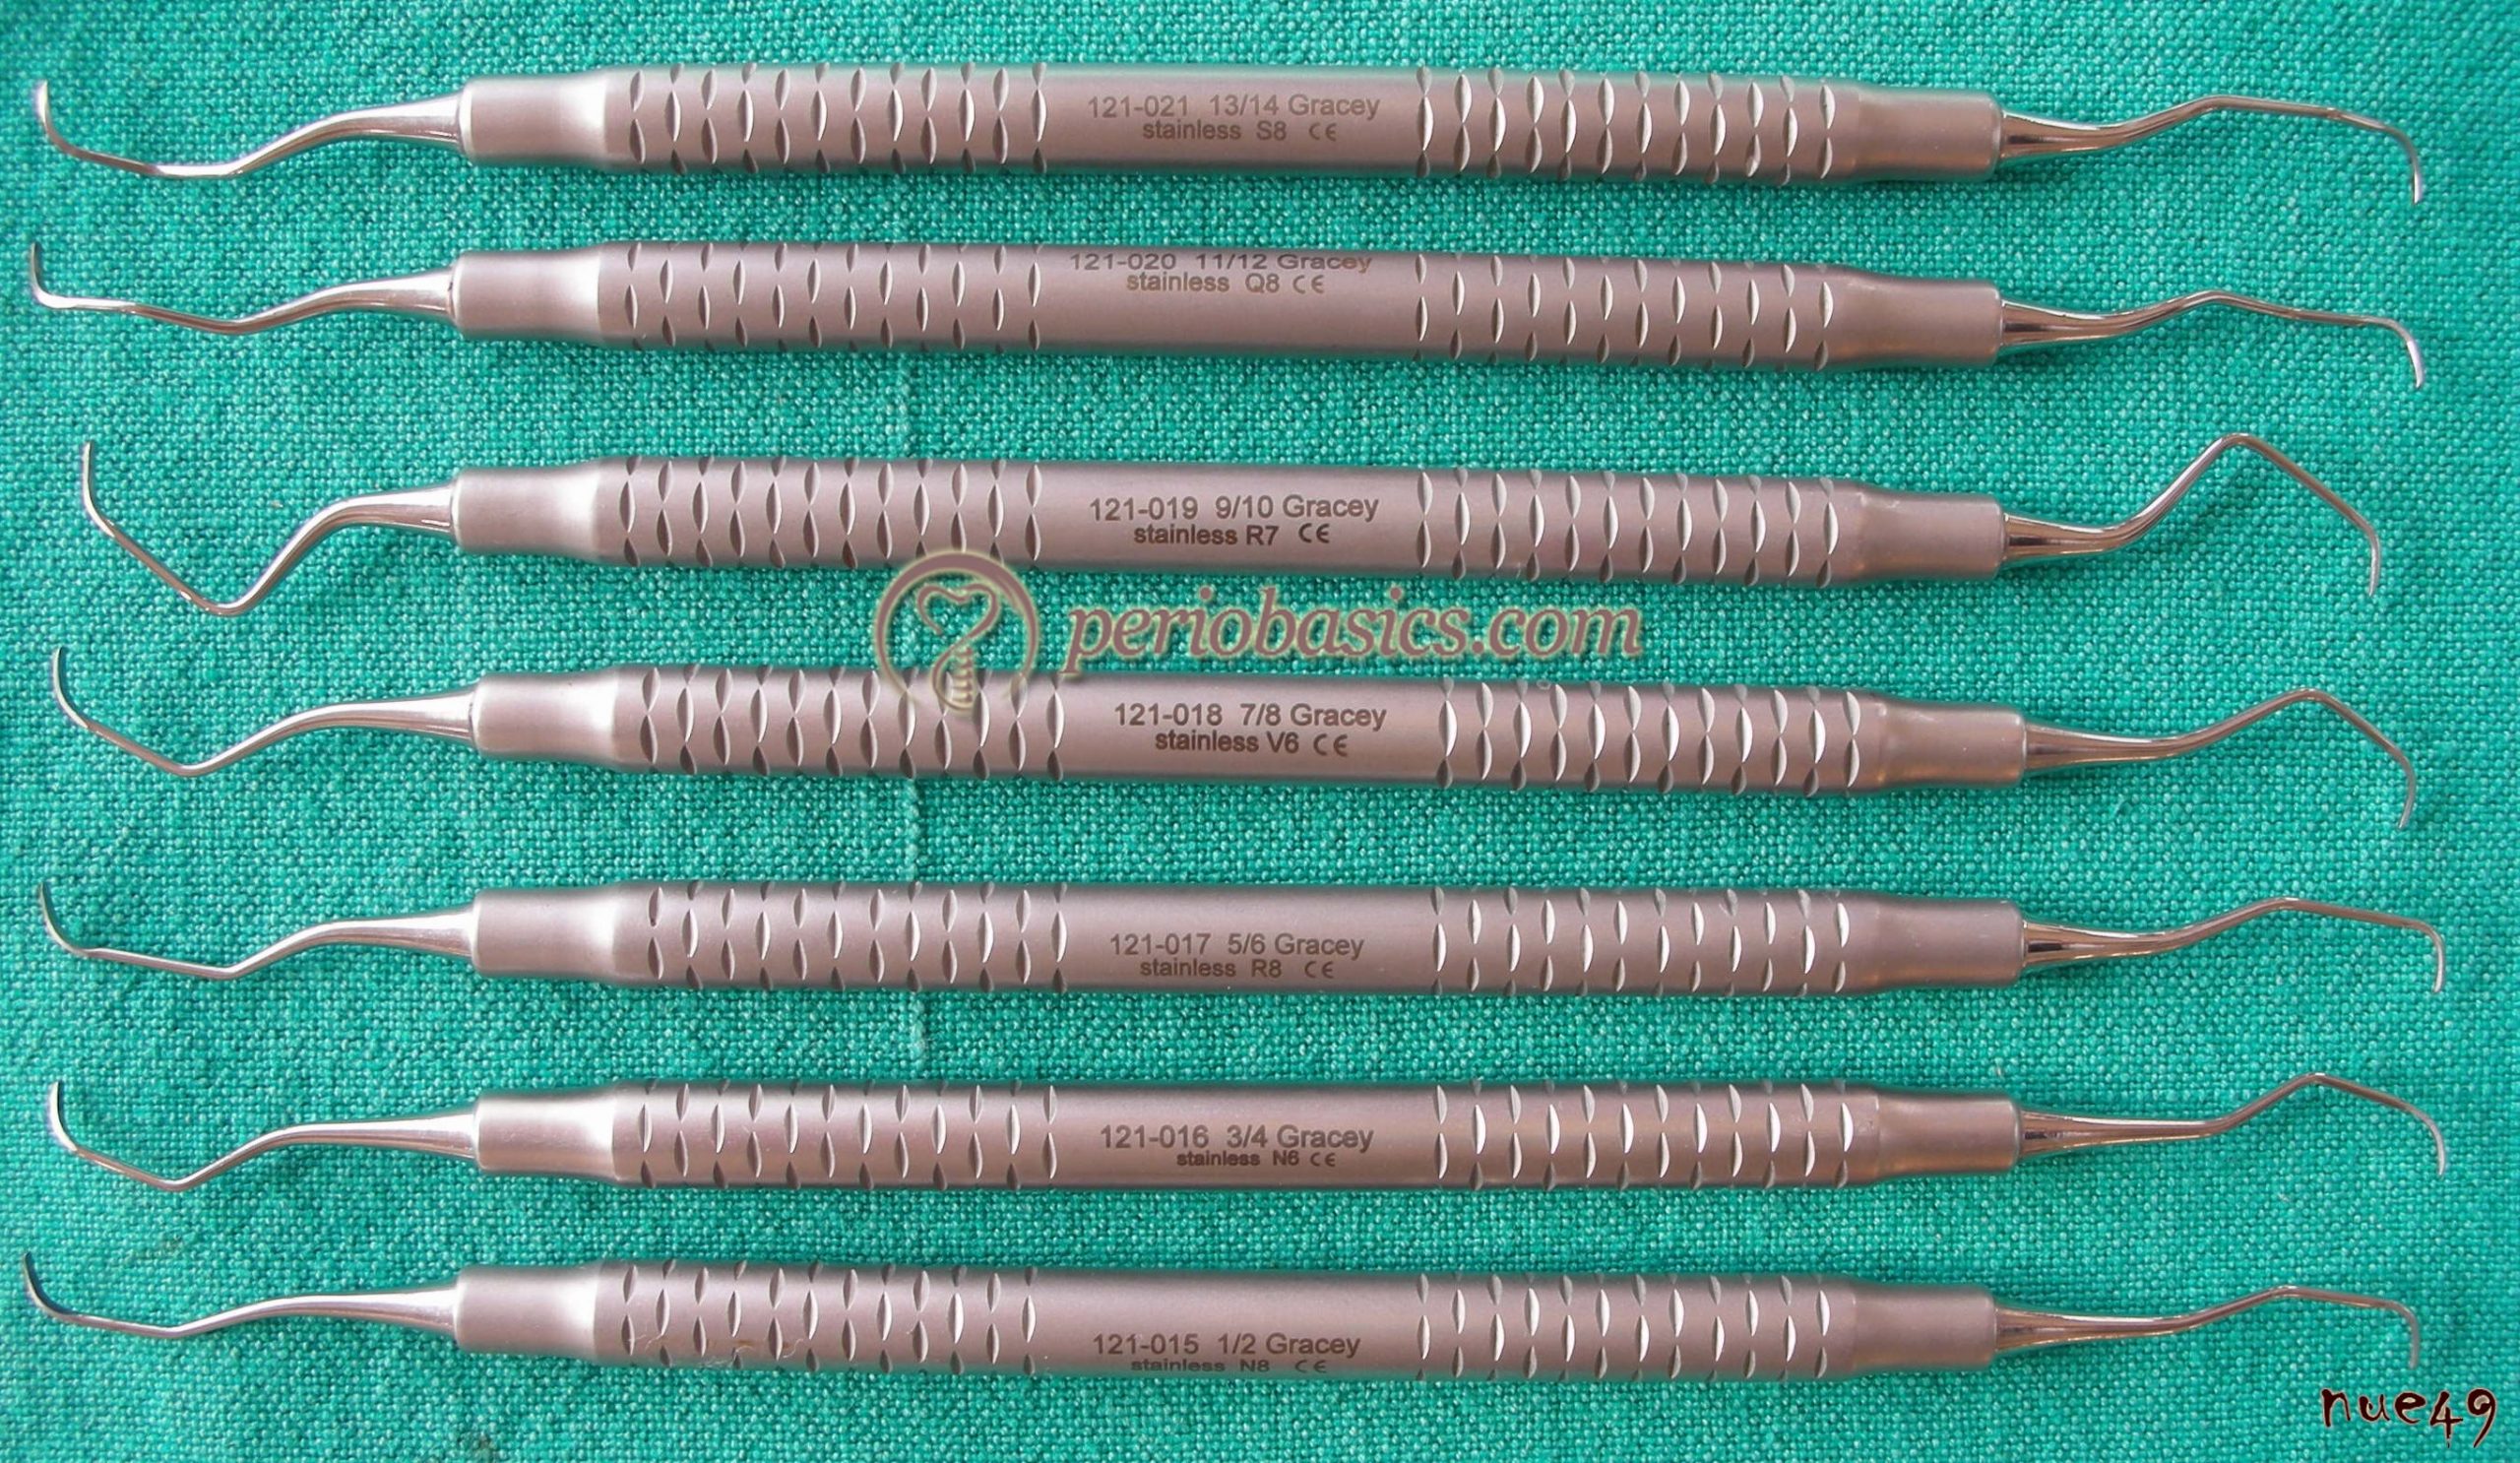
Gracey curettes:
History of Gracey curettes:
In 1940’s Dr. Clayton Gracey, a dentist and educator at the University of Michigan, invented Gracey curettes. He wanted to provide dentists the instruments that could reach the deepest and least accessible periodontal pockets easily without traumatic stretching of the gingiva. Because of different shapes and positions of teeth in the arch, it was not possible with the help of a single instrument. These curettes have a distinctive offset face of the blade, making a single cutting edge. Gracey and Hugo Friedman (Founder of Hu-Fredy), together developed a series of 14 area-specific curettes that are single-ended and are named after the designer and maker Dr. Gracey, hence Gracey curettes 1/2, 3/4, 5/6, 7/8, 9/10, 11/12, 13/14.
Presently, Gracey curettes are available as double-ended instruments with multiple handle choices. The shank of these curettes has been designed in such a way that while instrumentation, clinician maintains a neutral position of the hand, wrist, and forearm by decreasing wrist flexion. The maintenance of a neutral wrist position is critical in the prevention of carpal tunnel syndrome 25. Gracey Curettes 1/2, 3/4, 5/6 are used on the anterior sextants of teeth. 7/8 and 9/10 are used on the buccal and lingual portions of posterior teeth. 11/12 and 15/16 are used on the mesial portions of posterior teeth. 13/14 and 17/18 are used on the distal portions of posterior teeth.

Design:
Each Gracey blade is offset at 70˚. This creates one cutting edge which is referred to as the lower edge. These are also available as rigid and extra rigid curettes in which shank diameter is wider and the blade width is same as that of standard Gracey curettes. Different usages of standard, rigid and extra rigid curettes are as follows,
Uses of standard curettes:
1. For light to moderate calculus removal.
2. For fine scaling and root planing.
3. As a finishing curette.
Uses of rigid curettes:
1. For moderate to heavy calculus removal.
2. For root planing.
3. For recall scaling appointments.
Uses of extra rigid curettes:
1. For tenacious calculus removal.
2. For gross scaling and root planing.
3. For initial debridement.
Gracey curette 1/2 and 3/4: Used for the removal of subgingival plaque, calculus, and root planing in the upper and lower anterior areas.
Gracey curette 5/6: Used for of subgingival plaque, calculus and root planing in anterior teeth and premolars.
Gracey curette 7/8 and 9/10: Used for of subgingival plaque, calculus and root planing in posterior teeth: facial and lingual
Gracey curettes 11/12: Used for the removal of subgingival plaque, calculus and root planing of the mesial surfaces in the premolar and molar areas.
Gracey curettes 13/14: Used for the removal of subgingival plaque, calculus and root planing of the distal surfaces in the premolar and molar areas.
Since the introduction of Gracey curettes, a lot of modifications have been made and designs like 15/16 and 17/18 to access molars with correct angulations, after five curettes with a longer terminal shank and thinned blade, mini five curettes with after five features and a shorter blade, micro mini five and biogent curettes have been introduced.
15/16 and 17/18 curettes: The design of the 15/16 curette is a modification 11/12 curette. This curette has been designed for mesial surfaces of the difficult to reach posterior teeth. The curette has been designed in such a way that it permits an intraoral fulcrum close to the working area while instrumenting the molar teeth. The Gracey 17/18 is …….. Contents available in the book …….. Contents available in the book …. …….. Contents available in the book …. …….. Contents available in the book ….
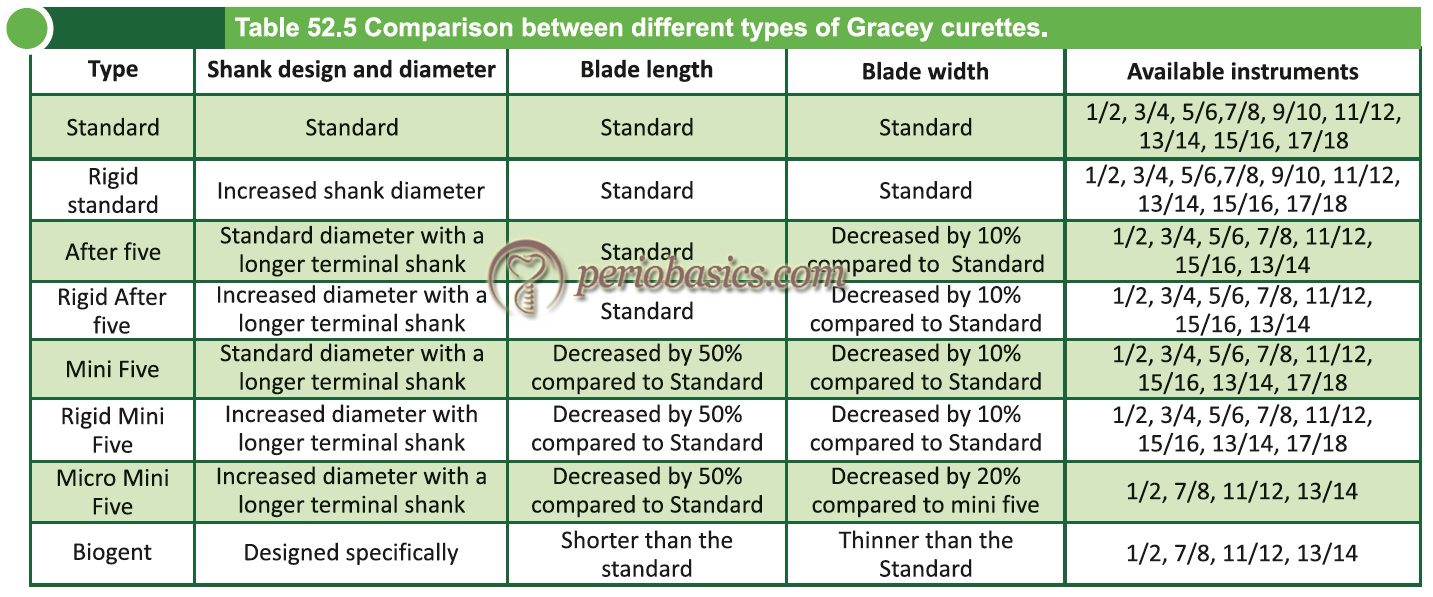
After Five Gracey curettes:
In these curettes, the terminal shank is 3 mm longer than standard Gracey curettes which allow better access to deep pockets and areas with the recession. The blade of the curette is 10% thinner than standard Gracey curettes to allow for less tissue distention, when accessing deeper pockets. The main advantage of these curettes is superior access to root contours and pockets 5mm or more in depth. These are available in all standard Gracey numbers except # 9-10.

Mini Five Gracey curettes:
In mini five Gracey curettes, the terminal shank is 3 mm longer than standard Gracey and the blade is 50% shorter and 10% thinner. It is used for scaling in deep, narrow pockets. These are available in all standard Gracey numbers except # 9-10.
Micro Mini Five Gracey Curettes:
These have an extended terminal shank with 20% thinner blade as compared to mini five Gracey curettes which helps in reducing tissue distension and ease gingival insertion to access deep periodontal pockets.
Biogent Curettes:
These are recent advances in curette design where a shorter and thinner blade has been designed. There are different angulation between the shank and the working end, providing more tissue friendly approach and enhanced pocket access.
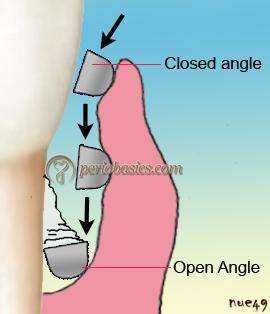
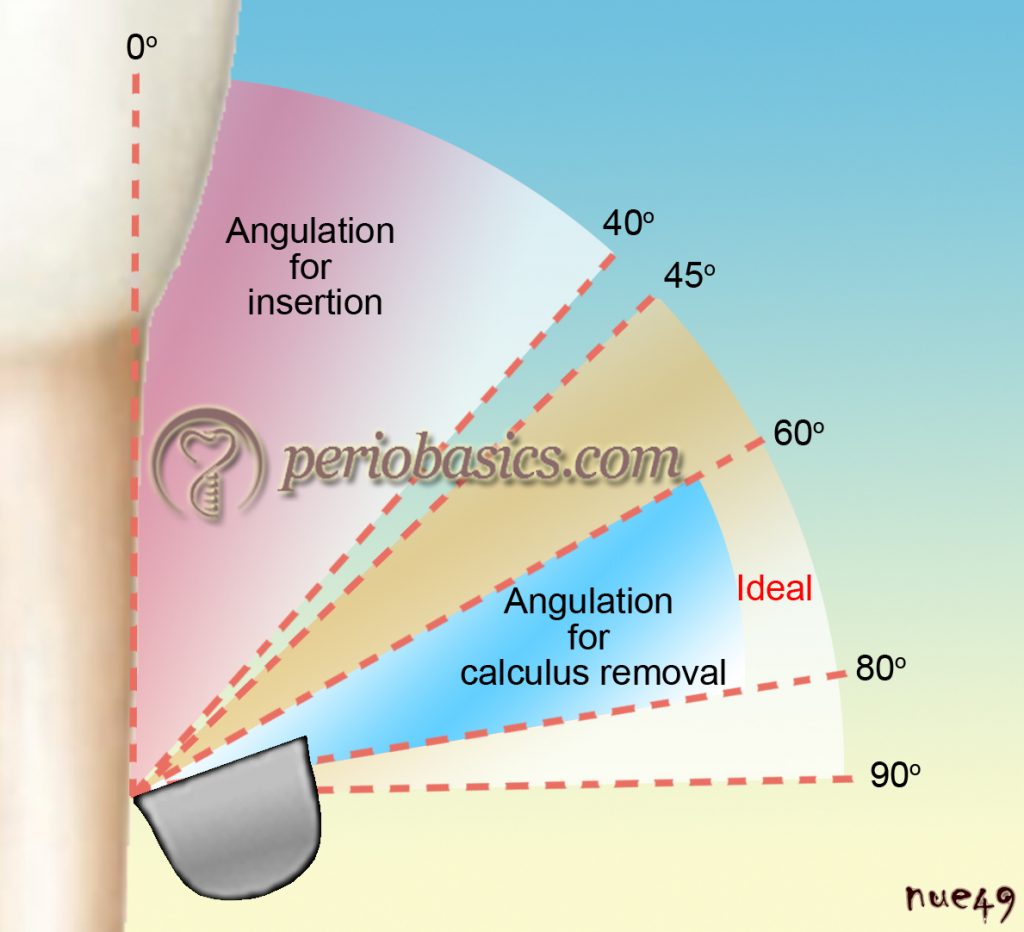
How to use curettes:
The curette is inserted into the pocket keeping the face of the curette almost parallel to the tooth surface i.e. closed angle position. After reaching the base of the pocket, the face of the curette is positioned in angulation for calculus removal, which is 60⁰ to 80⁰. The blade of a Gracey curette is adapted with the lower …….. Contents available in the book …….. Contents available in the book …. …….. Contents available in the book …. …….. Contents available in the book ….
Gracey curvettes:
These are a series of four mini-bladed curettes, in which the blade length is 50% shorter than that of the conventional Gracey curettes with the blade curved slightly upwards. It allows better adaptation on the root surface, especially on the anterior teeth and the line angles. In the anterior instruments, the shank is relatively straighter. Because of their design, curvettes are precisely balanced, which further improves their efficacy. It should be noted that because of the design of the blade while using posterior curvetts (#11/12 and #13/14), they may cause “grooving” into the proximal root surfaces of the posterior teeth. The list of curvettes with their indicated areas of usage has been given in following table,
| Various curvettes with their indicated areas of usage | |
|---|---|
| Instrument | Area of use |
| Curvette sub-zero | Anterior teeth and premolars (facial and lingual surfaces) |
| Curvette 1/2 | Anterior teeth and premolars (interproximal surfaces) |
| Curvette 11/12 | Mesial surface of molars |
| Curvette 13/14 | Distal surface of molars |
Langer curettes:
These were designed in consultation with Dr. Burton Langer. These have combined features of Gracey shank and universal curette blade design. Because of the universal blade design both cutting edges of the blade are used, allowing their use on both mesial and distal surfaces. These are sets of four instruments,
1/2 Langer: Mandibular posterior
3/4 Langer: Maxillary posterior
5/6 Langer: Anterior teeth
17/18 Langer: Posterior teeth
The 1/2 Langer curette is used in mandibular posterior areas. The shank is similar to Gracey 11/12 curette. The shank should be kept less parallel to the tooth surface while scaling with the universal blade. The 3/4 Langer curette has shank similar to Gracey 13/14 curette which allows its usage in maxillary posterior teeth. The 5/6 Langer curette has a similar shank as that of Gracey 5/6 curette and is suitable for scaling of anterior teeth and premolars. 17/18 Langer curettes have a shank design similar to Gracey 17/18 curette allowing its usage in second and third molar areas.

The shank of Langer curettes is heavier than a finishing Gracey, but less rigid than the rigid Gracey curettes. Langer curettes are available in rigid or flexible shanks. Other modifications available are extended shank (After Five) and mini-bladed (Mini Five) versions of Langer curettes.
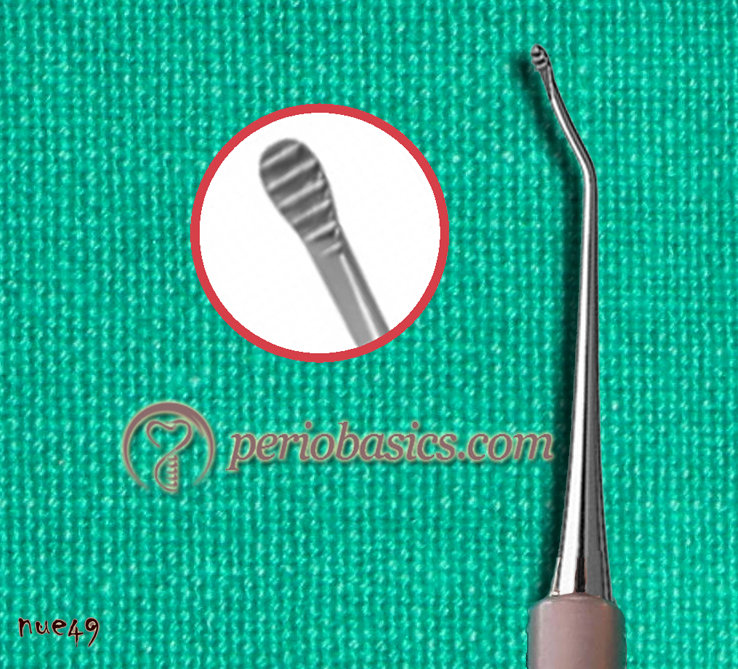
Quetin furcation curettes:
Furcation curettes are specifically designed for the removal of calculus and plaque in the furcation areas. These are small hoe-like instruments used to access into the ceiling or the floor of the furcation, as well as the depressions of the roots inside furcations. Their main advantage is that they remove burnished calculus without removing much root surface.
Hirschfeld files:
These are helpful in breaking up heavy calculus, especially sheet-like burnished calculus (Figure 52.20). After the application of curettes or diamond files, the root surface should be smoothened.
Cleaning and polishing instruments
These instruments are used to clean and polish the tooth surface after scaling. The rationale for polishing is to leave a smooth, slippery clean tooth surface that is minimally plaque retentive and to make the ongoing plaque control easier. Cleaning is the process of removing plaque biofilm and extrinsic stain from tooth surfaces that remain after scaling, using a latex-free cup and/or bristle brush with the help of a slow speed contra angle handpiece. Polishing is the process of achieving a smooth, mirror-like …….. Contents available in the book …….. Contents available in the book …. …….. Contents available in the book …. …….. Contents available in the book ….
Periobasics: A Textbook of Periodontics and Implantology
The book is usually delivered within one week anywhere in India and within three weeks anywhere throughout the world.
India Users:
International Users:
Rubber cups:
These are routinely used for polishing of the tooth surface after scaling. These are made up of a rubber shell with a hollow interior. The rubber shell may or may not be webbed. These are attached to a contra-angle micro motor handpiece, used at low speed on the tooth surface. A fine paste should be used during polishing. It should not feel gritty when rubbed between thumb and finger. A medium or coarse paste can scour (scratch) the tooth surface and make it rougher which is not desired. The production of frictional heat should be minimized which can lead to pulp inflammation and if severe, can result in subsequent pulp necrosis.
The precautions while using rubber cups are,
- Only low speed (less than 3,000rpm) should be used while using rubber cups so that heat production is minimized.
- Light pressure should be exerted at all times during polishing.
- It should be used for a few seconds on a particular tooth surface.
- Plenty of paste should be used so that it does not dry on the tooth surface.

Bristle brushes:
The bristle brushes are available in natural and nylon bristles. These are attached to a wheel or cup-shaped attachment, which can attach to a contra-angle handpiece. These are also used with polishing pastes. While using these brushes, it is important to keep them away from the cementum or dentin surface because of their stiffness which may damage these structures.
Dental tapes:
Dental tape is used for polishing interproximal tooth surfaces. It is made up of materials like spun silk, nylon, or teflon. It is used with polishing paste to polish interproximal areas. A piece of tape, 12-18” long is sufficient …….. Contents available in the book …….. Contents available in the book …. …….. Contents available in the book …. …….. Contents available in the book ….
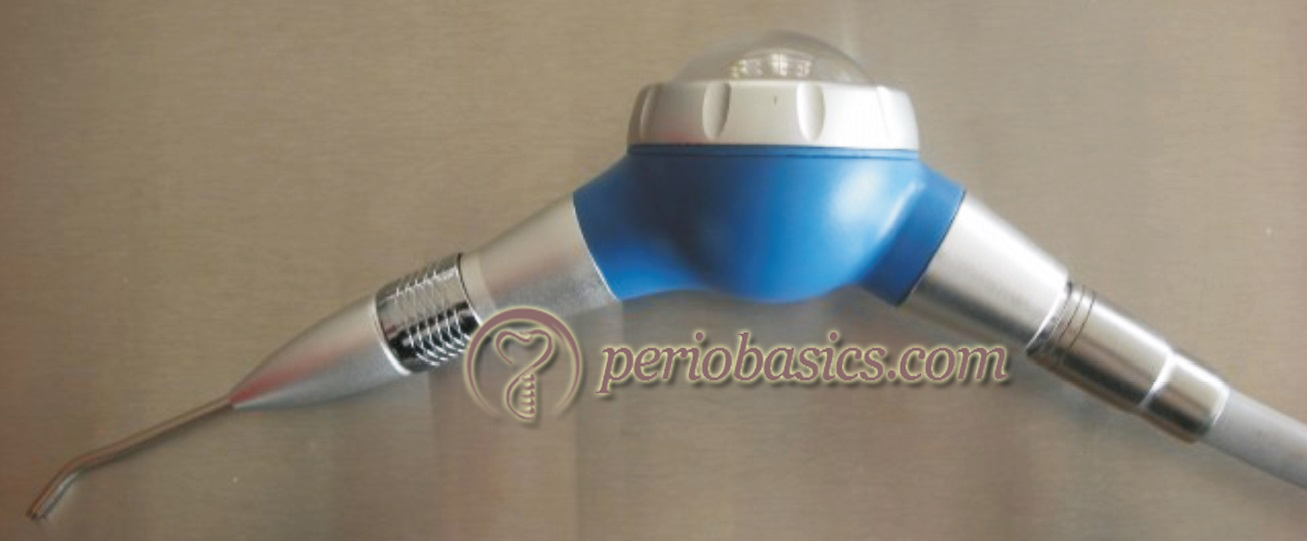
Air-powder polishing:
In this process, the cleaning and polishing of the dentition are achieved by a device that mixes air and water pressure with an abrasive agent such as sodium bicarbonate powder, aluminum trihydroxide, calcium sodium phosphosilicate powder, or calcium carbonate powder to remove extrinsic stain remaining after scaling.
Prophy-jet is a commercially available device which uses air-powder polishing for the removal of extrinsic stains and cleaning. Various studies have been done to evaluate the effectiveness and loss of tooth structure. Studies have shown a significant loss of tooth substance when this procedure was done on cementum and dentine 26, 27. Along with this, studies have demonstrated that restorations such as amalgam, composite, cements, and other non-metallic materials can be roughened with the use of these air abrasives 28-30. This system can be safely used on titanium implants surfaces 31, 32.
It is important not to direct the air polishing stream at the soft tissue or into the sulcus. Tissue emphysema has been reportedly caused when the air/water/powder stream was directed at the soft tissues or into the sulcus. Also, a direct contact of the prophy powder with surfaces and marginal areas of dental restorations should be avoided.
Contraindications:
- It is not recommended for patients on a sodium-restricted diet.
- Patients who have a severe respiratory illness.
- Patients with known allergies to the components of abrasive powers used for air polishing.
- On restorations like gold, composites and cements.
- Areas with thin or deficient enamel, dentin or cementum.
- Areas with hypersensitivity.
- Areas with caries susceptibility such as white spots and demineralized enamel.
Surgical instruments
Various instruments are used during periodontal surgical procedures. These are broadly classified as follows,
- Excisional and incisional instruments.
- Periosteal elevators.
- Electrosurgical instruments.
- Surgical curettes and sickles.
- Surgical chisels, hoes and files.
- Scissors and nippers.
- Hemostats and tissue forceps.
- Needle holders.
Excisional and incisional instruments:
These include periodontal knives, interdental knives, and surgical blades.
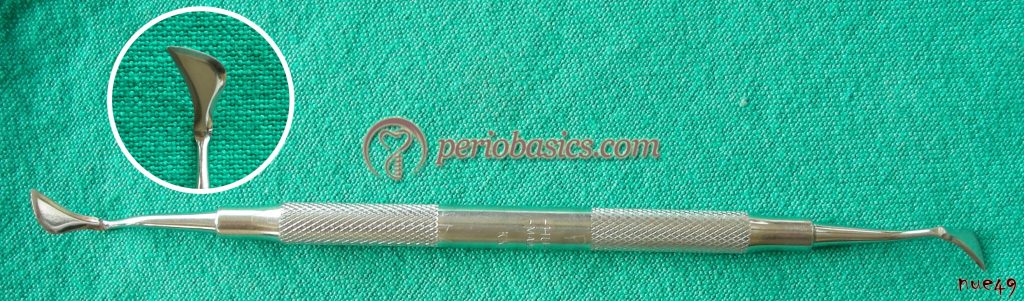
Kirkland Knife (gingivectomy knives):
These are single-ended or double-ended instruments with a kidney-shaped margin of the cutting edge. These are used for initial bevel incision for gingivectomy or gingivoplasty procedures.
Interdental knives:
These are single-ended or double-ended spear-shaped periodontal knives. These have cutting edges on both sides of the blade which is used in the interdental areas. The examples of the knives include Orban’s knife #1-2, Merrifield knife # 1, 2, 3, 4 and Waerhaug knife.

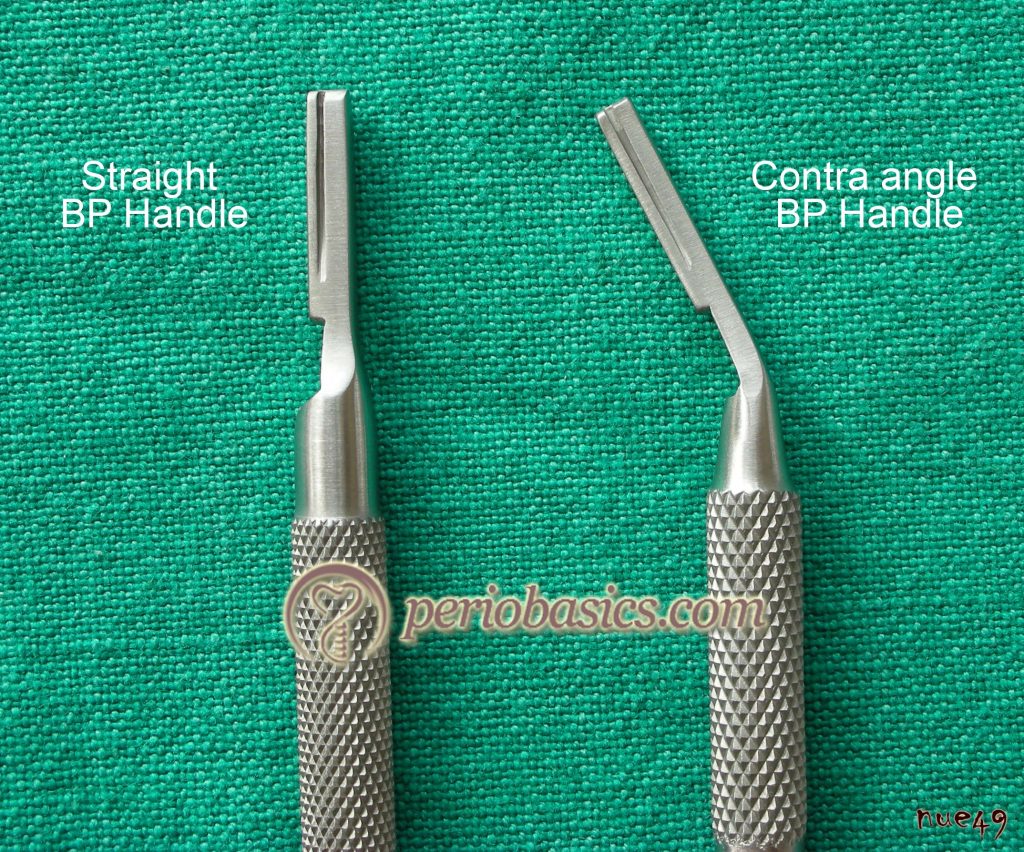
Surgical blades:
These are used to put the incision during periodontal surgical procedures. Most commonly used surgical blades during periodontal surgery are 12D, 15 and 15C. These are mounted on Bard-Parker handles carefully before use.
12D blade: It is a double-edged blade, sharpened along both sides of the crescent-shaped curve. It is made up of carbon steel and is used for cutting gingival tissue and making surgical incisions.
15 blade: It has a small curved cutting edge and is the most popular blade shape ideal for making short and precise incisions.
15C blade: This blade has a longer cutting edge than the traditional No.15 blade. Because of longer, more extended cutting edge, the 15C provides additional reach for carrying out periodontal procedures.

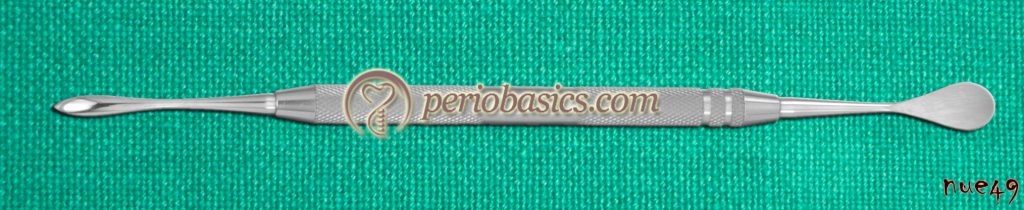
Periosteal elevators:
Periosteal elevators are used to reflect the full thickness flap during periodontal surgery. The purpose of flap elevation is to get access to the underlying bony defects. Various periosteal elevators have been designed, out of which the most commonly used in periodontal surgical procedures are Goldman-Fox 14, Glickman 24G, Woodson and Prichard periosteal elevators.
Electrosurgical instruments:
Electrosurgery equipment uses a high-frequency electric current to cut the tissue. The electrode attachment used will depend on the extent of the tissue removal required. One advantage of using the electrosurgery is coagulation and the control of bleeding. A detailed description of electrosurgery has been given in “Electrosurgery in periodontal therapy”.
Surgical curettes and sickles:
The surgical curettes and sickles have a wide and heavier blade which makes them suitable for removal of granulation tissue, fibrous interdental tissue, and tenacious subgingival deposits during …….. Contents available in the book …….. Contents available in the book …. …….. Contents available in the book …. …….. Contents available in the book ….
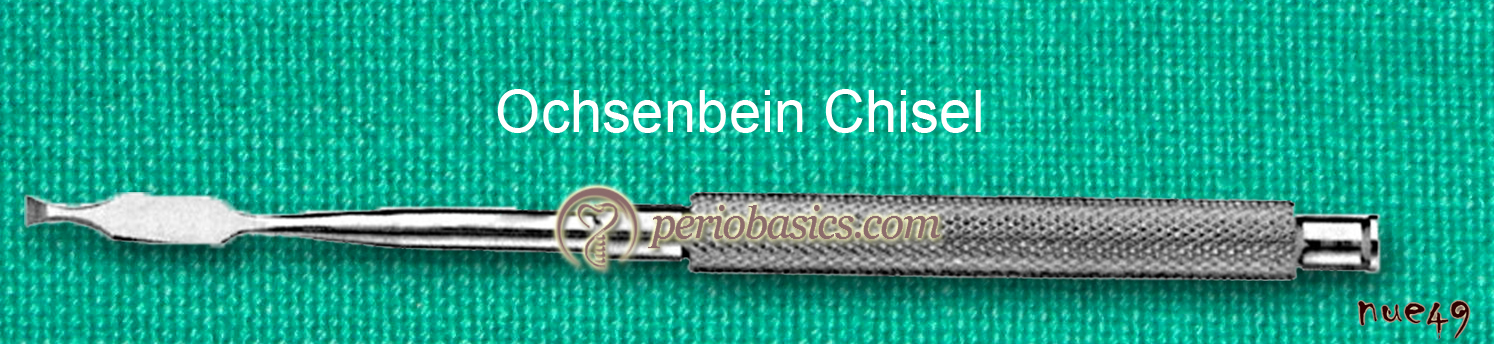
Surgical chisels, hoes and files:
Chisels:
Use of the periodontal chisel scaler is extremely limited. It is used solely for the removal of heavy supragingival calculus deposits that bridge open interproximal spaces of anterior teeth.
Hoes:
The use of periodontal hoe scalers is usually limited to the removal of large ledges of calculus located supragingivally and slightly subgingivally. For example, the calculus that rings the tooth on the facial, lingual, and distal surfaces of teeth that have no adjacent posterior teeth, can be removed with the hoe.
Files:
Periodontal files are strong instruments used to crush large calculus deposits and to smooth the tooth surface at the cementoenamel junction when the dentist is root planing.
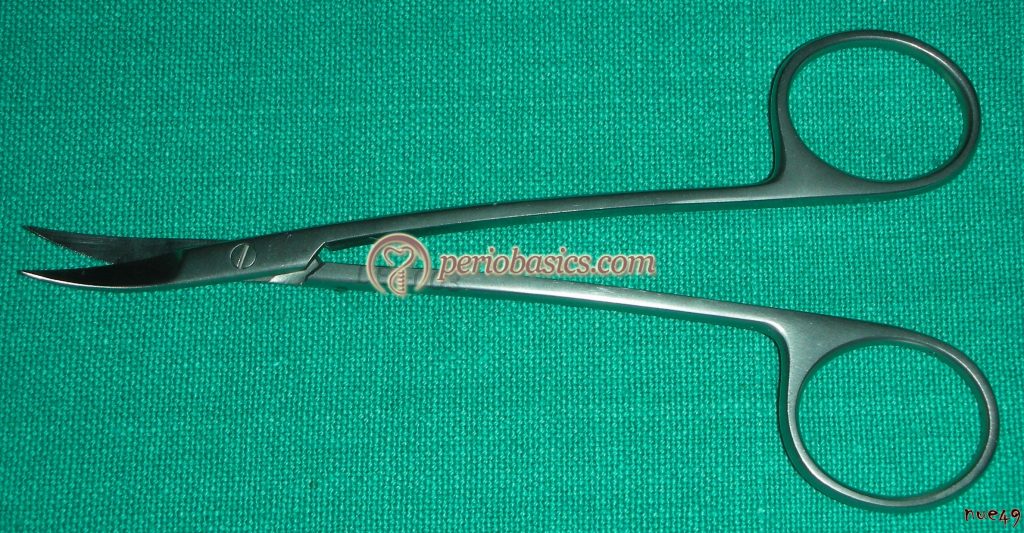
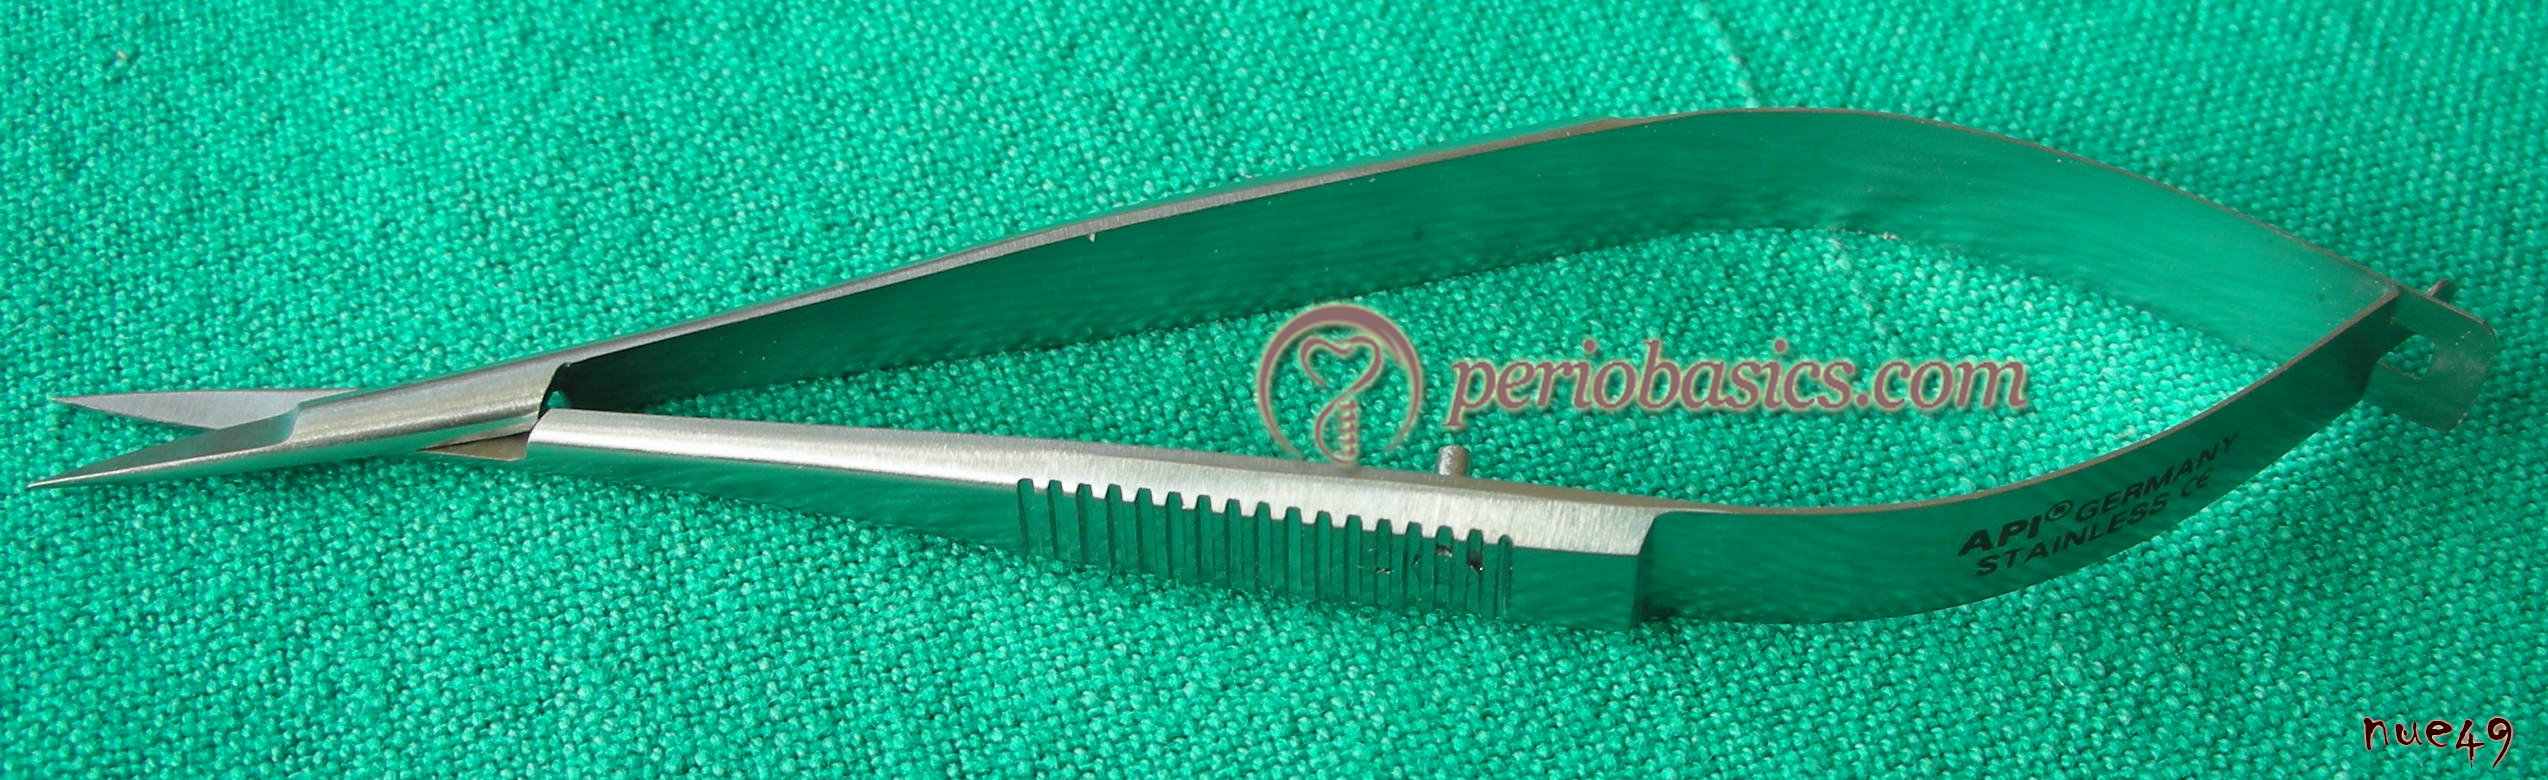
Scissors and nippers:
These are used to remove tabs of tissues during gingivectomy, to trim the margins of the periodontal flap, to remove muscle attachments during mucogingival surgeries and to enlarge the incision during periodontal abscess drainage. Various types of designs are available and selection depends on individual preference. Examples include Goldman-Fox #16n scissor which has a curved, beveled blade with serrations.
Hemostats and tissue forceps:
A hemostat is a surgical tool used in many surgical procedures to control bleeding. Tissue forceps are used for grasping, holding, and manipulating flap during periodontal surgical procedures.
Needle holders:
These are used to hold the needle during suturing of the flap. In addition to regular needle holders, Castroviejo needle holders are used in delicate and precise suturing in periodontal surgical procedures, especially root coverage procedures.

Dental implant maintenance instruments
These are probes and scalers made up of plastic or non-metallic materials specially designed for the maintenance of dental implants. The special material enables optimum cleaning without damaging the abutment surface. Metal scalers and curettes or ultrasonic tips should never be used to clean the implant surface because they may damage the surface of the implant. Several versions of implant scales are available to permit access in all situations.

Universal scaler: Can be used in most areas to clean the abutment surfaces and apical portion of the framework.
Lingual scaler: Designed for cleaning the lingual side of the abutment.
Posterior scaler: Designed to enable access to the posterior lingual abutment surfaces.
Buccal scaler: Cleans the buccal surface of the abutment.

Lasers
The word LASER is an acronym for Light Amplification by Stimulated Emission of Radiation. The use of lasers for treatment has become a common phenomenon in the medical field. The application of lasers in clinical dentistry has provided us with a new treatment modality. The use of lasers in periodontal treatment has been explored in following areas,
- To treat dentinal hypersensitivity.
- Removal of diseased pocket lining epithelium.
- Bactericidal effects of lasers on pocket microorganisms.
- Removal of calculus deposits from the root surface.
- Root surface detoxification.
Laser therapy in periodontics is becoming quite popular these days and this topic requires an elaborate discussion which is available in “Lasers in periodontics”.
Instrument sharpening
The objective of instrument sharpening is to restore the sharpness of the blade while maintaining the original contour and the angles of the instruments. A sharp instrument improves the quality of periodontal instrumentation and reduces operator fatigue. A sharp edge of the instrument enhances the tactile sensitivity and reduces the amount of lateral pressure required to perform the desired function. In addition, the patient comfort level is also improved. Sharp instruments easily detect calculus and overhanging restoration margins.
Assessment of instrument sharpness:
There are four methods, by which the sharpness of an instrument can be assessed,
Glare test:
A sharp cutting edge does not reflect light but a dull instrument does. If it is observed that the cutting edge is reflecting the light beam, the instrument is dull.
Acrylic test stick:
This is a more sensitive test to determine instrument sharpness. An acrylic stick is taken and blade of the instrument is placed on its surface at an angle between 80 to 90⁰ to the long-axis of the stick. The cutting edge is first pulled gently in toward the stick and then a gentle pull stroke is given. If the cutting edge bites into the acrylic, the instrument is sharp (Figure 52.32). On the other hand, if the instrument does not bite into but slides along the acrylic, the instrument is dull.
Clinical performance:
A clinician regularly working with hand instruments can judge reduced sharpness of an instrument. A sharp instrument provides good tactile sensitivity and removes calculus easily as compared to a dull instrument which provides reduced tactile sensitivity and causes operator fatigue.
Comparing with new instrument:
When it is suspected that the instrument has become dull, it can be compared with new instrument (master sample) which has cutting edge sharpness and contour provided by the manufacturer.
Tools for instrument sharpening:
Sharpening stones are required for sharpening the dull instruments. There are several types of sharpening stones available for instrument sharpening. Fine grit stones are used for instrument sharpening and according to the dullness of …….. Contents available in the book …….. Contents available in the book …. …….. Contents available in the book …. …….. Contents available in the book ….
Periobasics: A Textbook of Periodontics and Implantology
The book is usually delivered within one week anywhere in India and within three weeks anywhere throughout the world.
India Users:
International Users:
Natural stones (fine to medium):
Arkansas (used with oil lubrication)
Synthetic stones:
- Fine to coarse: India and Carborundum (used with water lubrication),
- Fine: Ceramic stones (used with water lubrication)

Arkansas stone:
It is a natural stone with fine grit. Oil lubrica-tion is suggested when using this stone, however, it can be used dry as well. The purpose of using oil during sharpening is that the metal particles that are grounded away during sharpening procedure float on the oil rather than getting embedded into the stone surface. The buildup of these shavings in the oil is referred to as “sludge”.
India Stone:
This stone is a synthetic stone with fine or medium grit. It is made up of aluminum oxide crystals. Oil lubrication is required while sharpening with this stone.
Ceramic stones:
The ceramic stone is a hard synthetic stone available in either fine or medium grit. This stone is excellent for routine sharpening of dental instruments and uses water as lubricat. As compared to sludge which is formed with oil lubrication, metal fillings are formed with water lubrication, which should be removed from the stone surface.
Shapes of sharpening stones:
Sharpening stones are available in various shapes such as conical, flat, cylindrical and wedge shaped. The conical stone is an Arkansas stone used for finishing or removing any wire edges after sharpening. A flat stone is rectangular in shape and can be an Arkansas, Ceramic or India stone. These are available in various sizes. The …….. Contents available in the book …….. Contents available in the book …. …….. Contents available in the book …. …….. Contents available in the book ….
Selecting a sharpening stone:
A sharpening stone is selected according to the dullness of the instrument. Fine grit stones like Arkansas stone or medium grit India stones are used when little sharpening is required. These stones remove less metal particles and quickly restore the cutting edge when properly used. Coarsely surfaced stones remove metal particles at a faster rate. These are used when significant recontouring of the instrument blade and cutting edge is required i.e. in significantly blunt instruments. The rotary mounted stones are significantly more abrasive as compared to handheld sharpening stones. These are also used when significant instrument recontouring is required.
Sharpening methods:
Various instrument sharpening methods are as follows,
1) Manual sharpening,
Un-mounted stones,
- Flat.
- Cylindrical.
2) Power-driven sharpening,
Mandrel-mounted stones .
- Cylindrical, fit in the handpiece.
3) Sharpening machines .
4) Professional sharpening.
Manual sharpening technique:
A thorough knowledge of instrument design is essential before its sharpening is attempted. Depending on the instrum
ent to be sharpened and the amount of sharpening to be done, a sterilized sharpening stone is selected. There are two techniques used to manually sharpen periodontal instruments,
- Moving the instrument over the stone which is recommended for sharpening flat surfaces such as hoe or scalers.
- Moving stone over the instrument which is recommended for sharpening curettes.

In either technique, the moving component (stone or instrument) is held in the operator’s dominant hand and the non-moving component is stabilized by the other hand. The index finger or thumb is braced near the top of the instrument to counterbalance the pressure caused by grinding the lower blade. While sharpening the instrument, care must be observed to prevent any injury by applying controlled sharpening strokes. The instrument is held in a palm and thumb grasp and the hand holding the instrument is supported against a firm surface such as the top of a cabinet. The operator should position the elbow of the hand holding the instrument close to the body for better control.

The fingers holding the stone should not wrap around it along its length, but should be positioned behind the short ends of the stone. The instrument is held in an appropriate angulation over the sharpening surface of the stone before the sharpening stroke is initiated. An angulation of 110⁰ between stone surface and the face of the sickle or curette is established. Continuous sharpening motions (of instrument or stone) are initiated with light pressure maintaining a constant angle along the length of the cutting edge. The amount of pressure …….. Contents available in the book …….. Contents available in the book …. …….. Contents available in the book …. …….. Contents available in the book ….

Sharpening of individual instruments:
Sharpening of explorers:
Explorers have a fine tip which becomes dull due to its repeated application to detect caries, pits and fissure and overhanging restoration margins. The dullness of an explorer can be identified by moving it over the plastic testing stick where instead of catching the irregularities, it slides over them. Another identification of dullness of explorer is reduced tactile sensitivity of the instrument. Following are the steps to sharpen an explorer,
- A sterilized instrument sharpening stone is selected.
- Explorer is held in a modified pen grasp.
Then it is dragged and rotated on the surface of the sharpening stone at an angle, keeping the tip and 2-3 mm of the terminal end in contact with the stone. - After applying 2-3 strokes, the instrument sharpness is assessed. Usually, few strokes are sufficient to sharpen an explorer.
When the length of explorer end is reduced due to repeated sharpening, it should be replaced.
Sharpening of universal curette:
The sharpening of universal curette should result in the establishment of a definite cutting edge with a correct angulation of the face of the blade with lateral surface. A universal curette has two cutting edges and a rounded toe. Sharpening of both the cutting surfaces and maintenance of its original shape is required while sharpening. For ease of understanding, sharpening of universal curette can be divided into two parts: the sharpening of the lateral surfaces of working end and sharpening of the face of the blade.
Sharpening of the lateral surfaces of working end:
It can be done by two methods: moving the instrument over the sharpening stone or moving the sharpening stone over the instrument. Sharpening by moving the instrument on stone requires a stabilized sharpening stone on a table top or stable cabinet. The curette is held in a modified pen grasp and an angulation of 100-110⁰ is established between the surface of the sharpening stone and face of the curette. Maintaining this angulation, the instrument is moved on the sharpening stone, sharpening lower third of the blade to middle third of the toe.
Sharpening by moving stone over the instrument requires stone to be held in the dominant hand of the operator and instrument to be held in the palm and thumb grasp secured against a stable surface. The instrument is held in such a way that the face of the blade is parallel to the floor. The sharpening stone is then placed at an angle of 100-110⁰ (between the surface of the sharpening stone and face of the curette) on the lateral surface of the working end. Stone is then moved on the instrument making short, light and firm strokes. The stone is moved on the entire cutting edge of the instrument creating a sharp cutting edge. Both upward and downward strokes are made to obtain a sharp cutting edge.
The common error during these procedures is pressure applied during sharpening. Throughout the sharpening procedure same pressure of the instrument on the stone or stone on the instrument should be maintained to avoid any changes in the normal shape of the curette. Usually during sharpening the operator tends to …….. Contents available in the book …….. Contents available in the book …. …….. Contents available in the book …. …….. Contents available in the book ….
Sharpening of the face of the blade:
The face of the curette blade can be sharpened by using cone-shaped sharpening stone. It must be remembered that while sharpening the face of the blade, too much metal should not be removed, otherwise the strength of the working end will be compromised. The difficulty faced during sharpening is that many times uneven pressure is applied which may affect the shape of the instrument.
Sharpening of area-specific curettes:
The most commonly used area-specific curettes are Gracey curettes. The difference between universal and area-specific curettes is that the blade angle in area-specific curettes is offset. The area-specific curettes can also be sharpened by moving the instrument over the stone or vice versa. The grasp of the instrument, angulation (100-110⁰) and sharpening strokes are similar to that described for universal curette. The difference lies in the angulation of the long axis of the instrument with the surface of the stone while sharpening. Because the blade angle of Gracey currtes is offset at 60-70⁰, it opens the stone angle on Gracey more as compared to universal curettes, when the lower shank of both instruments is kept perpendicular to the floor. When Gracey curette is held so that the face of the blade is parallel to the floor, because of the offset blade angle the shank of the instrument will not be perpendicular to the floor as compared to universal curette where it is perpendicular to the floor.
After establishing proper angulation, up and down strokes are made starting at the shank end of the blade till curved toe. Finishing stroke is always a down stroke toward the back of the …….. Contents available in the book …….. Contents available in the book …. …….. Contents available in the book …. …….. Contents available in the book ….
Sharpening of extended shank and mini-shank curettes:
The extended-shank and mini-shank curettes are sharpened similarly as described for area specific curettes. In extended shank curettes the shank length is more as compared to the standard Gracey curettes but the blade length, design and offset angle are similar. So, sharpening procedure is similar to that of the standard Gracey curettes. In mini-shank curettes however, the blade length is half as compared to the standard Gracey curettes. During sharpening of these curettes, excessive pressure may result in shortening of the blade or may result in decreased strength due to excessive loss of metal particles. So, care must be taken to maintain a proper angulation and pressure while sharpening these curettes.
Sharpening of sickle scalers:
A sickle scaler may be straight or curved. In straight sickle, the face of the blade is flat from shank to tip, whereas, on the curved sickle, the face of the blade is curved from shank to tip. While sharpening a sickle scaler, the stone remains stationary and the instrument is moved over the stone. The instrument is held in a modified pen grasp by the dominant hand and the stone is stabilized by the non-dominant hand. The instrument is then placed over the stone so that the face of the blade makes an angle of 100-110⁰ with the surface of the stone. For a straight sickle, the entire lateral surface of the sickle is in contact with the stone, whereas, for a curved sickle, only a small portion of the lateral surface is sharpened at a time. After stabilizing the working hand with a fulcrum, short and firm strokes are applied for sharpening. Once one cutting edge is sharpened, the instrument is turned over and other cutting edge is sharpened, following the same procedure. The last stroke while sharpening is a pull stroke, so that any wire edges can be avoided.
Sharpening of periodontal files:
The objective of file sharpening is to achieve sharp cutting edges for efficient calculus removal or amalgam overhangs. As already stated, the parts of a periodontal file are body, shank, and handle. The round, oval, oblong or rectangular head contains multiple cutting edges that are adapted parallel to the calculus deposit and engaged, resulting in the fracturing of the calculus. The cutting edge of the file which is directed towards the handle is called as lip, located at either a 90° or 105° angle with the shank. Rake angle refers to the distance between each lip that approximates 55°, depending on the design.
A special flat sharpening file called a tanged file or a three-sided file, also called as jeweler’s file is used for the sharpening of the periodontal file. Before sharpening, the rake angle of the file should be recognized. The tanged file is then placed within the rake so that the tanged file is towards the handle of the instrument. The file is then sharpened by positioning it on each blade and moving across the bevel of each successive blade in a series of lateral movements.
Sharpening of periodontal chisel:
A chisel is used to remove heavy supragingival calculus from the proximal surfaces of anterior teeth, when the embrasure spaces are open. A push horizontal stroke from facial to lingual surface is used to dislodge the calculus on the proximal surfaces. These are sharpened by holding the instrument in a modified pen grasp and placing the face …….. Contents available in the book …….. Contents available in the book …. …….. Contents available in the book …. …….. Contents available in the book ….
Sharpening of periodontal hoe:
The periodontal hoe is used to remove gross amounts of supragingival calculus and some subgingival calculus in large wide-open pockets. These are used with a pull stroke to remove calculus. The cutting edge of the hoe is placed on the sharpening stone so that the angle between instrument shank and the surface of the stone is around 100⁰ and angle of the blade is 45⁰. Pull stroke is used for sharpening the instrument.
Sharpening of periodontal knives:
Periodontal knives are used to incise gingival tissues. The knife must be sharp to function properly and must not be allowed to touch other instruments to prevent any damage to its cutting edge. The knife must be sharpened after each surgical procedure and before sterilization. The gingivectomy knives with a flat blade (Kirkland knife) are sharpened by modifying only the bevel on the back surface of the instrument. This can be done by drawing the blade of the instrument over a stationary stone or by holding the instrument in a stationary position and drawing the stone over its cutting edge.
The blade of an interproximal knife (Orban’s knife) is made up of two long straight cutting edges which come together at a sharply pointed tip of the instrument. Similar to flat surface gingivectomy knife, only the back surface of the interproximal knife blade is sharpened. The instrument is held in a modified pen grasp and maintaining a proper angle, it is moved on a stationary sharpening stone until the desired sharpness of the cutting edge is achieved.
Conclusion
The aim of periodontal therapy is to remove all the local factors responsible for disease progression and to make periodontal tissue architecture conducive for self-oral hygiene maintenance. These goals are achieved by non-surgical and surgical periodontal therapy. An efficiently done non-surgical/surgical periodontal therapy is a fundamental requirement for good clinical results. A thorough knowledge of instruments, their method of clinical application and the method of sharpening dull instruments is mandatory before their clinical usage. A detailed description of the instruments used in non-surgical and surgical periodontal treatment has been discussed above. One must read “Principles of instrumentation” to understand the appropriate clinical application of these instruments.
References
References are available in the hard-copy of the website.
Periobasics: A Textbook of Periodontics and Implantology
The book is usually delivered within one week anywhere in India and within three weeks anywhere throughout the world.