Introduction to periodontal instrumentation
The accurate use of periodontal instruments is fundamental for appropriate periodontal treatment. The outcome of periodontal therapy to a great extent depends on the operator’s skill to use the periodontal instruments in an accurate manner, following the principles of instrumentation. With clinical experience, the principles of periodontal instrumentation can be mastered. In the following sections, various aspects of periodontal instrumentation shall be discussed.
Principles of instrumentation
The basic principles of periodontal instrumentation are 1,
1. Accessibility (operator’s posture and patient positioning).
2. Visibility, illumination, and retraction.
3. Selection of proper instrument.
4. Condition of instruments (sharpness).
5. Maintaining a clean field.
6. Instrument stabilization.
7. Instrument activation.
Accessibility (operator’s posture and patient positioning)
The clinician’s position relative to the patient should provide complete accessibility to the area of operation. First of all, the clinician must be seated comfortably on the operating stool. A correct position of the operator is very important to help the operator to have good visibility and accessibility of the oral cavity. Improper positioning of chair height will cause premature tiring of the operator and also adversely affect the …….. Contents available in the book ………. Contents available in the book ………. Contents available in the book ………. Contents available in the book …..

Operator’s posture during dental treatment
- The operator should be in optimum comfort while operating, to adequately perform instrumentation.
- The seat height of the dental stool should be low enough so that the heels of the operator touch the floor. The angle between lower and upper legs at knee joint should be around 110° or a little more, with the legs, slightly spread.
- The operator should sit in a relaxed, symmetrical posture upright with the arms against the upper body which minimizes the static load of upper arms and shoulders. While operating, the operator should minimize the movements of the upper arm both sideways and forwards as much as possible. The sideways movement should be within 15-20° and forwards within 25 °. The operator can bend the body forward from the hip joints to a maximum of 10-20° but any rotator or lateral movement should be avoided. The head should not be bent forward more than 25°. The shoulders of the operator should be relaxed while working.
- The operator should accustom to a dynamic way of working on the patient, frequently changing the positions according to comfort so that an alternating loading and relaxation occurs within the muscles and the vertebral column.
- The operator (right handed), when working at 9.00 to 12.00 o’clock position should spread the feet apart so that the legs and the dental stool make a tripod, creating a stable position for the operator. The same position should be achieved for a left-handed operator at 12.00 to 3.00 o’clock position.
- For operating the maxillary teeth, patient’s chair height should be 8 cm or 3 inches below the shoulder level of the operator. While operating on mandibular teeth, the patient chair height should be 16 cm or 6 inches below the level of operator’s shoulder level.
- While working, the distance between working field in the mouth and eyes or spectacles normally ranges between 35-40 cm.
- The back of the operator should be supported at the upper/ back side of the pelvis. It helps in maintaining the upright position when muscles in the pelvic region become too fatigued to maintain an upright position of the back 4.

Operator’s positions around dental chair while operating
Appropriate positioning of the operator while working on different parts of the dentition is necessary to efficiently perform the instrumentation 7. The operator positions around the patient based on the operator’s working hand may be as following,
Right-handed operator or clinician:
7 o’clock position– to the front of the patient’s head.
9 o’clock position– to the side of the patient’s head.
10 to 11 o’clock position– to the back of the patient’s head.
12 o’clock position– directly behind the patient’s head.
Left-handed operator or clinician:
5 o’clock position– to the front of the patient’s head.
3 o’clock position– to the side of the patient’s head
2 to 1 o’clock position– to the back of the patient’s head.
12 o’clock position– directly behind the patient’s head.
While working on different parts of maxillary and mandibular arches, the operator position varies according to the teeth to be operated and tooth surfaces to be operated. For the ease of understanding, the maxillary and mandibular arches have been divided into six sextants. The facial and lingual/palatal surfaces of posterior teeth and mesial and distal surfaces in the sextant 2 and 5 have been shown with different colors.
Left-handed operator:
For a left-handed clinician, to operate on the facial surfaces of teeth in sextant 1 (blue) and palatal surfaces of sextant 3 (blue), the clinician sits in the region of 3 to 12 o’clock. The head of the patient is tilted towards the clinician with chin tilted upwards. To operate on the palatal surfaces of sextant 1 (yellow) and facial surfaces of sextant 3 (yellow), the clinician sits in 2-12 o’clock region with the patient’s head tilted away from the clinician and chin tilted upwards.

Positioning for sextant 2:
Right-handed operator:
The lingual and labial surfaces of the maxillary teeth in the second sextant can be divided into two portions at the midline. For a right-handed operator, the blue portions are toward the clinician and yellow portions are away from the clinician during treatment. To operate on the blue surfaces (towards the operator), the patient’s head should be …….. Contents available in the book ………. Contents available in the book ………. Contents available in the book ………. Contents available in the book ……
Left-handed operator:
To operate on the yellow (towards the clinician) surfaces, the operator sits in 1-3 o’clock region with the head of the patient turned away from the clinician and the chin tilted upwards. To operate on blue surfaces (away from the operator) surfaces, the operator sits in 1-12 o’clock region with the head of the patient tilted towards the clinician and chin tilted upwards
Positioning for sextant 5:
Right-handed operator:
Similar to the sextant 2, the facial and lingual surfaces of mandibular teeth are divided into two halves at midline. To operate on the surfaces towards the operator (blue), the patient’s head is turned away from the operator and the chin is tilted down. The operator’s region is from 10 to 12 o’clock. To operate on the surfaces away from the operator (yellow), the patient’s head is tilted towards the operator and the chin is tilted down. The clinician is in the region between 11 and 12 o’clock.
Left-handed operator:
To operate on yellow surfaces (towards the clinician), the operator sits in 2-12 o’clock region with the patient’s head turned away from the operator and the chin tilted down. To operate on the blue surfaces (away from the clinician), the operator sits in 12-1 o’clock region with the patient’s head is tilted towards to operator and chin is tilted down.
Positioning for sextants 4 and 6:
Right-handed operator:
To operate on the facial surfaces in sextant 4 (blue) and the lingual surfaces in sextant 6 (blue), head of the patient is turned toward the operator with the chin tilted down. The operator’s position is 9 to 11 o’clock region. To operate on the lingual surfaces in sextant 4 (yellow) and the facial surfaces in sextant 6 (yellow), the patient’s head is tilted away from the operator and the chin is tilted upwards. The operator sits in 9 to 10 o’clock position.

Left-handed operator:
To operate on the facial surfaces of sextant 4 (blue) and lingual surfaces of sextant 6 (blue), the operator sits in 1-3 o’clock region with the patient’s head is tilted away from the operator and the chin is …….. Contents available in the book ………. Contents available in the book ………. Contents available in the book ………. Contents available in the book …..
Patient’s position during dental treatment
The common patient positions during dental treatment are,
- Supine position
- Reclined position
- Upright position
The most common patient position during periodontal treatment is the supine position. However, the choice of patient position varies with the operator, type of procedure and area of the mouth to be operated. In the supine position, the patient’s head, knees, and feet are approximately at the same level. The head of the patient should be at a higher level than feet (approximately 10°). Only in emergency conditions such as syncope, the patient’s head should be positioned lower than the feet. Once the treatment is over, the chair should be raised slowly in an upright position so that the patient can leave the dental chair easily and gracefully. It should be noted here that during the treatment of the patient, the position of the patient should be changed gently.
Visibility, illumination, and retraction
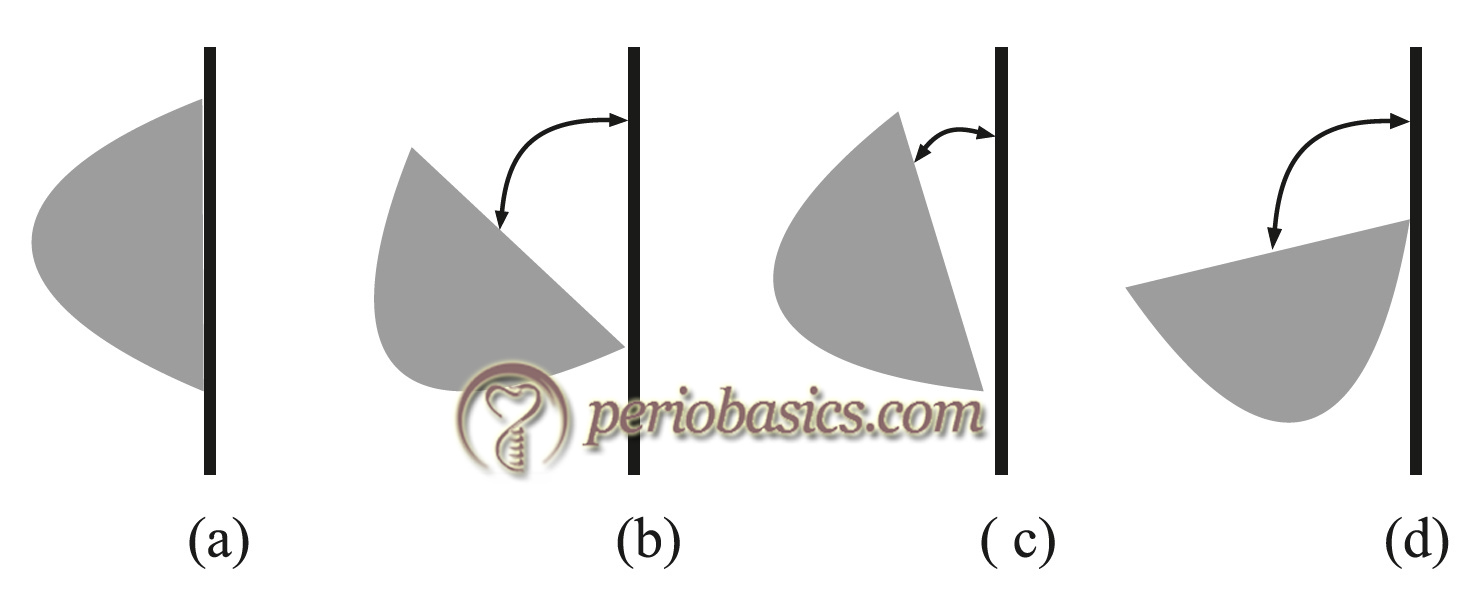
The second principle of periodontal instrumentation is good visibility, illumination, and retraction. The operator should preferably operate on the patient with direct vision and direct illumination. If working under direct vision is not possible, indirect vision may be obtained by using mouth mirror for reflecting light to the site to be operated. The light beam of the dental chair lamp should be oriented parallel to the viewing direction in order to obtain shadow free lighting. It minimizes shadows from the hands, teeth, lips and cheek on and around the working field. To achieve this, the dental light should have three axis of adjustment (orthogonal), allowing the lamp to turn in all directions.
Retraction of cheeks, lips or tongue provides the operator a good accessibility to different areas in dentition. Mouth mirror is …….. Contents available in the book ………. Contents available in the book ………. Contents available in the book ………. Contents available in the book ……
Selection of proper instrument
It is important to select appropriate instruments for periodontal non-surgical or surgical procedures. For example, scalers are used for supra-gingival calculus removal whereas curettes are used for subgingival calculus removal due to their relatively small working end which can be inserted below the gingival margin. The clinician must choose the best instruments out of those made by various manufacturers, considering their blade quality (size and shape), shank quality (rigid or flexible) and handle quality (solid or hollow). Factors which determine the selection of an instrument include quality and quantity of calculus, severity of periodontal involvement, gingival retractability, root morphology and overall accessibility 9. The Gracey curettes have been given numbers so that they can be easily identified for use in various parts of the dentition. The most significant property of an instrument is its blade size. In areas with narrow pockets, narrow blade size is used. Second important property of an instrument is the flexibility or rigidity of the shank. Rigid shank instruments are suitable for tenacious calculus removal whereas flexible shank instruments use suitable for root planing.
The tooth surface on which instrumentation has to be done is another important factor, determining the selection of instruments. Tooth surface-associated factors which determine the instrument selection include tooth location within the oral cavity (anterior/posterior/maxillary/mandibular), specific site on the tooth (mesial/distal/buccal/labial/lingual/palatal/line angle areas), the morphology of tooth (anatomy of cementoenamel junction/furcation) and location of the …….. Contents available in the book ………. Contents available in the book ………. Contents available in the book ………. Contents available in the book ……
Condition of instruments
The instruments used by the operator should be adequately sharp and clean. Use of the dull instruments results in inadequate instrumentation which may become an important reason for the failure of the treatment. The sharp instruments increase the tactile sensation as well as facilitate good debridement, helping in achieving favorable outcomes of periodontal treatment. Sharp instruments can be used more precisely and efficiently as compared to dull instruments 10.
Maintaining a clean field
The operating field should be free from saliva, blood, and debris. In spite of good illumination and retraction, accumulation of saliva or blood may interfere with adequate visibility of the area being operated. The pooling of saliva in the operating field also interferes with the instrument stabilization. The finger rest may be difficult to establish due to wet and slippery surfaces of teeth. Adequate suction should be used to eject saliva and blood from the mouth. Along with this, gauze pieces should be used to gently clean the debris from the operating field while doing subgingival instrumentation and open flap surgical procedures. While doing surgical procedures, the area should be irrigated occasionally with normal saline to clean the debris.
While doing root planing, the gingival margin can be retracted away from the tooth by using compressed air or gauze pieces. The jet of compressed air pushes the gingival margins away from the tooth, providing a clear view of the tooth surface immediately below the gingival margin. Similarly, the end of the gauze piece can be inserted in the …….. Contents available in the book ………. Contents available in the book ………. Contents available in the book ………. Contents available in the book …..
Instrument stabilization
The appropriate stabilization of the instrument is the basic requirement of proper instrumentation. The stabilization and control over the instrument are essential for effective instrumentation. The instrument grasp and the finger rest are two major factors determining the stabilization of the instrument.
Instrument grasp:
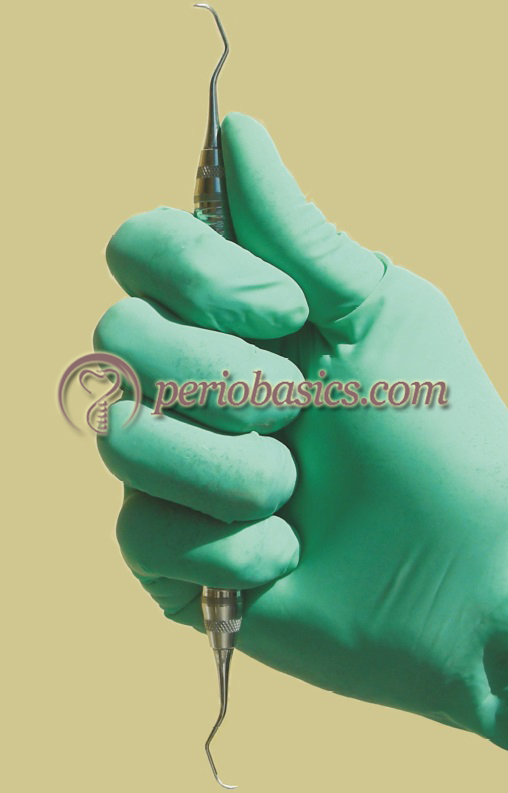
A proper instrument grasp facilitates adequate tactile sensation, adaptation, activation and comfort to the operator 11. An appropriate instrument grasp minimizes operator fatigue, thus facilitating good instrumentation. The commonly used grasps to hold periodontal instruments include standard pen grasp, modified pen grasp and palm and thumb grasp 12. Out of these, the most effective and stable grasp for all periodontal instruments is the modified pen grasp 13.
Standard pen grasp:
In this grasp, the index finger and thumb hold the instrument with side of the middle finger resting on the shank. This grasp provides less tactile sensitivity and flexibility of movement during instrumentation as compared to the modified pen grasp. Hence, this grasp has a limited use during instrumentation.

Modified pen grasp:
It is the modification of standard pen grasp. In this grasp, the clinician holds the instrument with the pads of the index finger and the thumb opposite to each other on the handle closer to the working end. The thumb and index finger are not touching, thereby creating a tripod effect with the middle finger placed along the shank of the instrument. The tripod effect provides stability to the grasp and facilitates ease of instrument control. The forefinger and thumb make a “V” shape during instrument activation in this grasp. While holding the instrument in this grasp, the index finger is kept straight from the fingertip to the second knuckle whereas the thumb is slightly curved in a c-shape.

The index finger bends at the second knuckle with the handle of the instrument resting somewhere between the second and third knuckle. If the clinician cannot maintain a neutral wrist position, the handle of the instrument should be moved slightly backward or forward in front of the second knuckle of the index finger, facilitating the operator to achieve the flexibility to maintain neutral wrist position. The middle finger holds the shank of the instrument in such a …….. Contents available in the book ………. Contents available in the book ………. Contents available in the book ………. Contents available in the book …..
Palm and thumb grasp:
This grasp is primarily used while sharpening of the instruments and during manipulation of air and water syringes. This grasp is not recommended for periodontal instrumentation. The tactile sensitivity and control over the instrument are limited with this grasp which is a prime requirement during periodontal instrumentation.
Finger rest (fulcrum):
Finger rest serves as a stabilization point for the instrument. It helps the hand and instrument to be moved as a single unit. The lateral surface of the pad of the ring finger of the working hand is most commonly used as the fulcrum. Middle finger may also be used as fulcrum but it is not recommended as it restricts the arc of movement during instrument activation. It also hampers the instrument control and tactile sensitivity. The activation of the instrument is done by exerting downward pressure on the fulcrum finger along with applying pressure on the instrument with the index finger and thumb to increase stability and control during instrumentation. While using fulcrum, maximum control is achieved by placing the ring finger close to the middle finger. These two fingers function as a unit during scaling and root planing.
Finger rests can be classified as intraoral or extra-oral. The intraoral finger rests can be conventional, cross arch, opposite arch or finger on finger. The most commonly used intraoral finger rest is conventional finger rest. Following is the description of the various intraoral finger rests,
Conventional rest: Here, finger rest is established on the tooth surface immediately adjacent to the working area.
Cross-arch rest: In this case, finger rest is established on the tooth surface on the other side of the same arch.
Opposite arch: Finger rest is established on the tooth surfaces on the opposite arch, for example, while working on the maxillary arch, finger rest is established on the mandibular arch.
Finger on finger rest: It is established on the thumb or index finger of the non-operating hand.

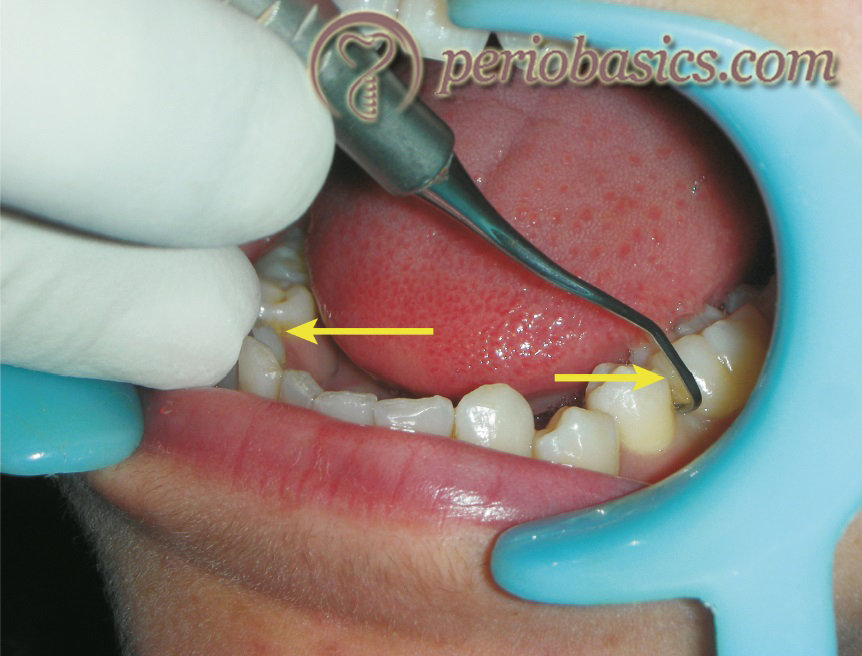

Extra-oral fulcrums are sometimes used to achieve instrument stability while doing instrumentation on certain surfaces of posterior maxillary teeth. Extra-oral fulcrums are not exactly “finger rests” because tip or the pad of fingers is not used as a fulcrum, instead, front or back surfaces of the fingers are placed on the patient’s face to achieve appropriate stability. The most important factors affecting extraoral fulcrum include the surface area of contact between the hand and the patient’s face, adequate pressure, and extended grasp. The surface area of contact between the hand and patient’s face should be maximized to establish a firm foundation.
Adequate pressure from the part of hand in contact with the face ensures good control over the scaling or root planing strokes. It must be noted that it is bone and soft tissue of the patient’s face that serve as the fulcrum to stabilize the working stroke. The amount of pressure applied depends on the type of stroke. For exploratory strokes, only a …….. Contents available in the book ………. Contents available in the book ………. Contents available in the book ………. Contents available in the book …..
Palm-up fulcrum:
In this fulcrum, the backsides of middle, ring and little fingers are placed straight and together firmly against the skin overlying the lateral aspect of the mandible on the face. For right-handed operator, it is used on the right side of the face. Strokes are activated by pulling in a coronal direction with the arm, not by flexing the fingers. The stroke movement is initiated at the shoulder joint and fingers remain stationary in their grasp position as the arm activates the working stroke. To achieve maximum control over the instrument stroke, as much as possible, back surfaces of the fingers should be in firm contact with the basal portion of the mandible.
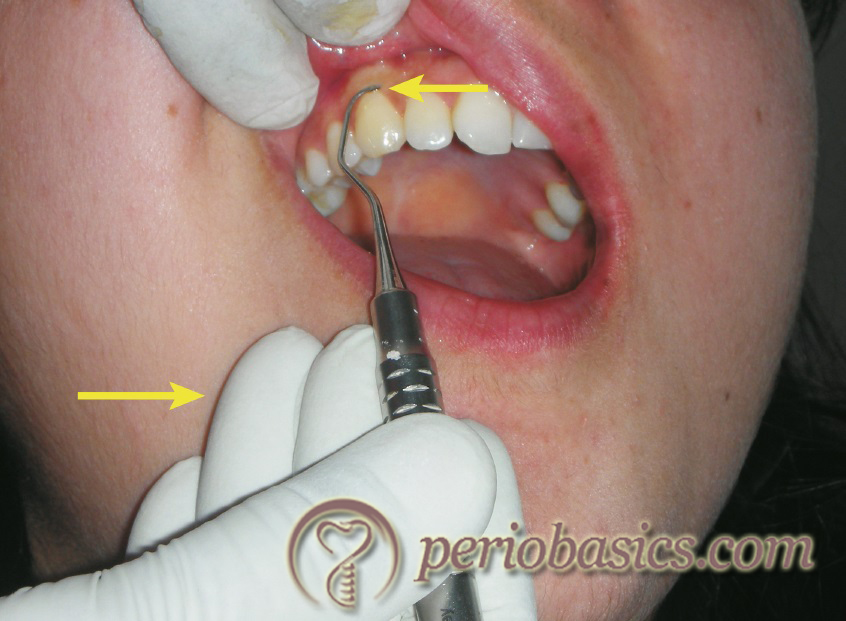
Palm-down fulcrum:
In this fulcrum, the front surfaces of the fingers are placed flatly against the skin overlying the lateral aspect of the mandible. For the right-handed operator, it is used on the left side of the face. The palm of the hand should closely cup the mandible to provide additional support whenever possible.

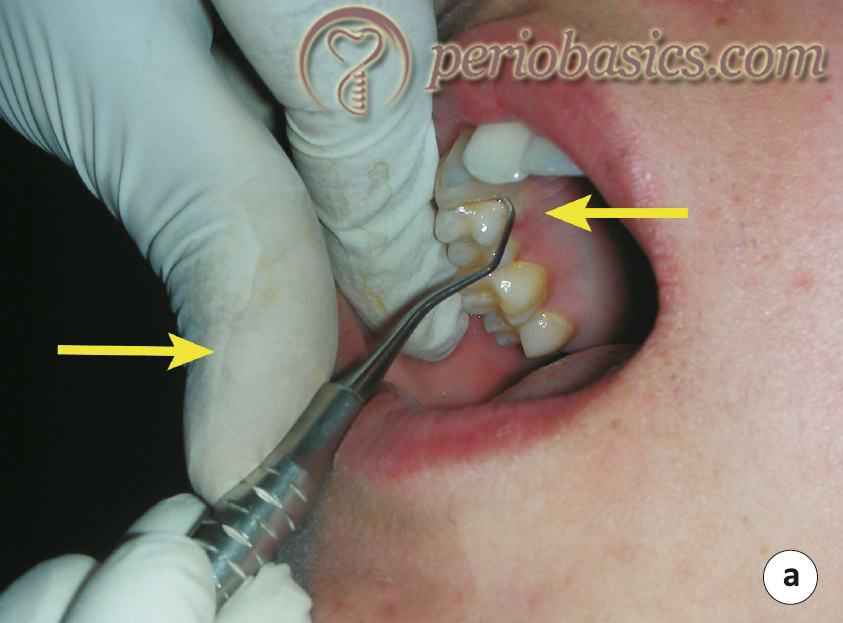
Reinforced rests:
Reinforced rest can provide extra stability to the extraoral fulcrum. It is established by placing finger or thumb of the non-operating hand to the handle or shank of the instrument during applying working strokes. This type of rest is commonly used when the distance between the fulcrum and the curette blade is more and a precise control and pressure are compromised by this distance. The reinforcing finger acts as a support that provides added control and pressure against the tooth. This type of rest can only be used when the area to be operated is in direct vision of the operator because the non-functioning hand cannot be used to hold the mouth mirror.

Instrument activation
The instrument is activated by appropriately adapting it on the tooth/root surface, achieving appropriate angulation of the cutting edge, applying adequate pressure before initiating the stroke and lastly making the desired stroke.
Instrument insertion:
The instrument is inserted into the gingival sulcus or pocket with its blade to tooth angle as close to 0⁰ as possible. This angulation is easy to achieve with instruments like a file that adapts parallel to the calculus deposit. To achieve this angulation with curettes or sickle, the blade of the instrument is completely closed against the tooth surface. To achieve this, the clinician has to rotate the shank of the instrument so that it becomes perpendicular (instead of parallel) to the long axis of the tooth. However, 0⁰ angulations cannot be achieved in all areas of dentition, especially on the mesial posterior surface.
So, the goal while inserting a curette is to maintain the blade of the curette as close to root surface as possible while extending it to the level of epithelial attachment below the level of calculus attachment causing minimal soft tissue distention. Typically, the angle of insertion varies from 20⁰ to 40⁰ depending upon the instrument inserted, site of insertion and tone of the soft tissue. While removing calculus, the blade is kept around 1 mm apical to the level of calculus attachment to the tooth surface. By doing this, the clinician …….. Contents available in the book ………. Contents available in the book ………. Contents available in the book ………. Contents available in the book ……
Some instruments such as explorers and probes are inserted as well as activated in close to 0⁰ angulations. The angulation is increased only when the tip or the terminal end of the instrument is made to touch the tooth surface.
Instrument adaptation:
The adaptation of the instrument depends on the type of procedure to be performed and type of instrument to be used. In general, the instrument is adapted by placing lower 1/3rd to 2/3rd of the blade against the tooth surface. The working end of the instrument is placed on the tooth surface in such a way that it precisely adapts to the contour of the tooth/root surface. The simplest instrument to adapt is a periodontal probe. It is simply placed along the tooth surface with at least two points in contact with the tooth surface along its length. Vertical strokes are given to activate the instrument. Sharp instruments such as curettes and …….. Contents available in the book ………. Contents available in the book ………. Contents available in the book ………. Contents available in the book …..
Selection of the correct working end and cutting edge:
There are multiple methods to identify a correct working end. The most common method is to identify the working end, which should be directed towards the surface to be debrided. For example, to debride the mesial and the buccal surface of the mandibular first molar the toe of the curette should be directed towards the mesial surface. This can easily be identified by closely adapting the curette on the tooth surface. Only the correct end of a bi-ended instrument with appropriate angulation of the cutting edge will adapt closely to the surface to be debrided.
The second identifying method is the position of the terminal shank. With the position of instrument handle as parallel as possible with the tooth in buccolingual direction, the terminal shank is nearly parallel to the proximal surface of the tooth for a correct working end. On the other hand, if the terminal shank crosses the proximal or buccal/lingual surfaces diagonally or horizontally, the incorrect working end is adapted.
The correct cutting edge for area-specific curettes can be …….. Contents available in the book ………. Contents available in the book ………. Contents available in the book ………. Contents available in the book …..
Adaptation of the working end:
Once the explorer or curette has been inserted into the gingival sulcus or pocket, 1-2 mm of the terminal 1/3rd of the working end is adapted to the tooth surface, especially at line angles of convex surfaces and concave surfaces of the developmental depressions. If middle 1/3rd is adapted to tooth surface rather than terminal 1/3rd, the tip or the blade frequently results in soft tissue trauma causing discomfort to the patient.
Terminal 1-2 mm of the working end is adapted diagonally to the calculus deposit. This is because if the entire working end is adapted to the surface, the borders and configuration of the deposit cannot be determined. Also, the tactile sensation is reduced when the entire working end is in contact with tooth surface as compared to the …….. Contents available in the book ………. Contents available in the book ………. Contents available in the book ………. Contents available in the book …..
Establishing appropriate blade angulation:
After adapting the working end of the instrument on the tooth surface, appropriate blade angulation is established so that the desired result can be achieved once the stroke is made. The range of angulation of an instrument when it is applied on cementum, enamel or calculus is greater than 45⁰ to less than 90⁰. If the angulation is less than 45⁰, it will lead to burnishing of the deposit whereas if it is more than 90⁰, it will remove the soft tissue pocket lining (gingival curettage). For curettes, the ideal angulation for scaling and root planing is 70⁰ to 80⁰. A detailed description of curette adaptation and activation on the tooth surface has been given in “Periodontal instruments”.
Activating the instrument:
The activation of the instrument involves a combined motion of the hand, wrist and forearm to produce an appropriate stroke to assess or debride the tooth surface. The clinician activates an instrument with wrist-arm motions that roll from the fulcrum finger. The pressure exerted against the fulcrum is a critical component of activation. The wrist flexion involves the movement of the hand at the wrist and is similar to the movement made during waving or painting with a brush. The instrument motion cannot be produced by fingers alone because finger movements use smaller, less powerful muscles, produce a limited range of motion, and do not engage the fulcrum.
The motion of the instrument depends upon the function to be performed. Primarily rolling, pivoting and rocking or a combination of these motions is used during various instrument strokes. However, while working on a particular tooth surface one of these motions predominate. Rolling and pivoting motions are required to maintain the adaptation of the working end with the tooth surface during stroke especially at line angles of the tooth.
The pressure applied during making a stroke depends upon the desired action. When removing calculus, initially firm or moderate pressure is applied, which is then progressively diminished, whereas light pressure is applied when root planing is to be done. If insufficient lateral pressure is applied for removing heavy calculus, a burnished surface …….. Contents available in the book ………. Contents available in the book ………. Contents available in the book ………. Contents available in the book …..
Strokes during instrumentation
During periodontal instrumentation, three types of activation strokes are used: assessment stoke (exploratory stroke), calculus removal stroke (scaling stroke) and root planing stroke 1. These strokes may be activated in vertical, horizontal or oblique direction. Vertical and oblique strokes are most commonly used during periodontal instrumentation. Horizontal strokes are used primarily on tooth line angles and in deep periodontal pockets were vertical or oblique strokes are difficult to apply. The factors that determine pressure, length and number of strokes are,
- Amount and nature of calculus to be removed,
- Tone of the soft tissue,
- Contour of the tooth, and
- Pocket depth and shape.
Assessment (exploratory) stroke:
These strokes are used to evaluate root surface anatomy, surface irregularities, presence of calculus on the root surface and other plaque retentive factors. As the name “exploratory” indicates, these strokes are light strokes applied on the root surface to assess root surface condition. The instruments that are used to assess root surface with exploratory stroke include explorers, probes, sickles, and curettes. During activating these strokes, the instrument is held with light pressure and is moved with light pressure against the tooth surface so that maximum tactile sensitivity is achieved. The best guide to apply light pressure is not to apply any lateral pressure consciously. The strokes applied are of moderate length and must overlap on all surfaces.
Calculus removal (scaling) stroke:
These strokes are employed with calculus removing instruments such as sickles, curettes, and files. These are also used to remove overhanging restoration margins. While activating these strokes, lateral pressure is applied on the cutting edge of the instrument to remove the supra- or subgingival calculus deposited on the tooth/root surface.
The initial step in the activation of scaling stroke is the establishment of a firm grip over the instrument with the help of finger rest. The amount of pressure applied depends on the purpose of stroke and class of instrument used. According to the pressure to be applied during making the stroke, pressure is applied on the finger rest on the tooth on which the finger rest has been established. As the pressure applied by finger rest is on the tooth, the patient feels light pressure and not discomfort. Now, the index finger and thumb are flexed slightly to exert pressure on the instrument and in turn on the tooth surface. The pressure must be equally distributed between the thumb and index finger otherwise the clinician may lose the control over the instrument grasp. The instrument is best under control when the pressure is equally distributed between the index finger and thumb.
The cutting edge of the instrument is then placed below the attachment of calculus on the tooth surface and its apical border is engaged. A firm movement in the coronal direction is then made to dislodge the calculus …….. Contents available in the book ………. Contents available in the book ………. Contents available in the book ………. Contents available in the book …..
“Channeling” is the procedure by which calculus deposit is removed piece by piece. The procedure is done when a relatively large portion of tooth surface is covered by calculus and it cannot be completely removed as one piece. The procedure involves the application of controlled and powerful wrist generated strokes. During making a stroke, the terminal portion of the working end is kept in contact with the tooth surface/calculus by rolling and pivoting. The channeling strokes are approximately 1 mm long. The approach to remove calculus by channeling depends on the width and length of calculus deposit. If the calculus deposit is narrow (apicocoronally) and wide (mesiodistally or buccolingually), it can be removed by advancing from the distal portion to mesial portion while removing the calculus in small (1-2 mm) segments. On the other hand, if calculus deposit is wide (apicocoronally) and narrow (mesiodistally or buccolingual), the approach remains the same with the addition of 1-2 mm channeling strokes from the …….. Contents available in the book ………. Contents available in the book ………. Contents available in the book ………. Contents available in the book …..
Root planing stroke:
The root planing strokes are light to moderate pressure strokes used to remove residual calculus after scaling strokes have removed the main bulk of calculus and for final smoothening and planing of the root surface. These are also used to remove the bacterial plaque and bacterial endotoxins from the root surface. These strokes are multi-directional and cover all the surfaces where instrumentation has been performed. During making root planing strokes, unnecessary removal of cementum should be avoided and strokes should be made only with light pressure. Use of curettes with a flexible shank is recommended for root planing as these provide good tactile sensitivity and remove less cementum as compared to rigid shank curettes.
Direction of instrument stroke
The direction of the instrument is designated by its relation to the long axis of the tooth. The instrument stroke may be vertical, oblique, horizontal or circumferential, selection of which depends on the type of instrument used and the function to be performed. Scaling strokes which utilize moderate to high pressure are applied primarily in vertical or oblique direction. Horizontal strokes are directed toward tissue and are applied with light pressure. Instrument strokes also may be described as pull, push, and walking. The pull stroke is used during scaling where after engaging the calculus the stroke is made. It is the most commonly used stroke during periodontal instrumentation. In the push stroke, the instrument is apically moved toward the gingiva. This stroke is rarely used as it may cause trauma to the gingiva. The walking stroke uses both coronal and apical movement of the working end of the instrument. It is used with explorers and probes to assess the root surface.
Conclusion
The goal of instrumentation is to ensure a clean root surface which is biologically acceptable and is the prime requirement for a healthy periodontium. If all the principles of instrumentation are followed, the chances of leaving deposits over the tooth/root surface are minimized. It must be ensured that instrumentation strokes overlap so that no portion of the tooth surface is missed. The effective instrument strokes must cover the tooth surface completely from the junctional epithelium to the gingival margin. An appropriate instrumentation causes minimum trauma to the soft tissue and minimum discomfort to the patient. Furthermore, unnecessary removal of the root cementum should be avoided while instrumentation over the root surface. A clinician can master the technique of instrumentation by strictly following and practicing the principles of instrumentation.
Suggested reading
-
Pattison AM, Pattison GL. Periodontаl instrumentation. Appleton & Lange; 1992.
-
Schoen DH, Dean MC. Contemporary periodontal instrumentation. WB Saunders Company; 1996.