Introduction to periodontal esthetic surgeries
Esthetics is the prime focus of today’s dental care. Along with the functionally efficient occlusion, patients frequently ask for an esthetic smile. Esthetic dentistry is not just limited to color matching composite or porcelain restorations, but it refers to the overall presentation of the orofacial complex. Color and contour of the gingiva, as well as its adaptation around the teeth, play a very important role in the overall esthetic appearance of the face.
Historically, Friedman (1957) 1 used the term “mucogingival surgery” to describe the surgical procedures for the correction of relationships between the gingiva and oral mucous membrane with reference to three specific problems: those associated with attached gingiva, shallow vestibules, and frenum interfering with the marginal gingiva. With the advancements in the surgical procedures, more and more non-pocket surgical procedures which primarily focused on the esthetics of soft tissue adaptation around the teeth were introduced. In 1993, Miller proposed the term “periodontal plastic surgery” to describe these surgical procedures. In 1996, the world workshop on periodontics 2 renamed the “mucogingival surgery” as “periodontal plastic surgery” and this broad term included the following procedures,
Periodontal-prosthetic corrections.
Crown lengthening.
Ridge augmentation.
Esthetic surgical corrections.
Coverage of the denuded root surface.
Reconstruction of papillae.
Esthetic surgical correction around implants.
Surgical exposure of unerupted teeth for orthodontics.
In the present discussion, we shall discuss in detail, mainly the treatment procedures for the correction of soft tissue defects in relation to the tooth and the edentulous ridge. Other procedures such as bone augmentation procedures and esthetic surgical correction around implants have been discussed elsewhere.
Definition
Periodontal plastic surgery procedures are performed to prevent or correct anatomical, developmental, traumatic or plaque disease-induced defects of the gingiva, alveolar mucosa, and bone [American Academy of Periodontology (AAP) 1996] 2.
Basic principles of facial esthetics
Facial symmetry is dependent on standard esthetic principles that involve proper alignment, symmetry, and proportion of the face. The most important components of the face that play a key role in smile designing are the interpupillary line and Lips. The interpupillary line should be perpendicular to the midline of the face and parallel to the occlusal plane. Lips are important from an esthetic point of view as they make the boundaries of the smile. Maxillary incisal edge position is the most important determinant in ……… Contents available in the book ……… Contents available in the book ……… Contents available in the book ……… Contents available in the book ………
Periobasics: A Textbook of Periodontics and Implantology
The book is usually delivered within one week anywhere in India and within three weeks anywhere throughout the world.
India Users:
International Users:
Zenith points are the most apical position of the cervical tooth margin where the gingiva is most scalloped. It is located slightly distal to the vertical line drawn down from the center of the tooth. Under ideal conditions, the gingival margin and the lip line should be congruent or there can be a 1-2 mm display of the gingival tissue. Up to 3 mm gingival display may be considered as esthetically acceptable, but when more than that, it results in a gummy smile which requires surgical correction 3.
Tooth length, proportion, and symmetry play an important role in the esthetics of smile. The average length of teeth in the esthetic zone, i.e. central incisor, lateral incisor, and canine are 11 mm, 10.5 mm and 11 mm, respectively. The crown width to length ratio for maxillary anterior teeth is nearly 8:10. In various situations, the crown width to length ratio may be disturbed, resulting in an un-esthetic appearance.
Problems associated with an inadequate width of attached gingiva
Attached gingiva is a part of keratinized gingiva which does not include marginal gingiva which is also a part of keratinized gingiva. The keratinized gingiva includes both free and attached gingiva and extends from the gingival margin to the mucogingival junction. The width of the keratinized gingiva may vary from 1-9 mm 4.
Lang and Loe (1972) 4 strongly suggested that an adequate width of keratinized gingiva is important for maintaining gingival health and rationalized the introduction of numerous surgical procedures to increase the width of attached gingiva. They suggested the width of at ……… Contents available in the book ……… Contents available in the book ……… Contents available in the book ……… Contents available in the book ………
Along with the width of attached gingiva, the thickness of gingiva is also important. A thin gingiva is more likely to recede due to inflammation and faulty brushing technique than an adequately thick gingiva. Gosalind et al. (1977) 10 reported that the average thickness of the attached gingiva is 1.25 mm. The methods of determining the width of attached gingiva have been discussed in “Art of history taking in periodontics”.
According to Friedman et al. (1992) 11, the ”inadequate” zone of gingiva ……… Contents available in the book ……… Contents available in the book ……… Contents available in the book ……… Contents available in the book ………
The important reasons for the inadequate width of attached gingiva include,
- Deep pockets reaching the level of the mucogingival junction.
- Due to vigorous brushing in areas with thin gingiva.
- Abnormal frenal attachment which exaggerates the pull on gingival margin.
Some individuals have an insufficient width of attached gingiva by birth, resulting in the muscles pull on the gingiva, causing recession. Various surgical procedures have been advocated which are aimed at increasing the width of attached gingiva. The advantages of increasing the width of attached gingiva include,
- Efficient plaque removal around the gingival margin,
- Reduced marginal inflammation around restored teeth, and
- Improved esthetics.
It must be remembered that if inadequate attached gingiva is present in young children, surgery is not an immediate choice of treatment. During growth and development, due to dimensional changes in the attached gingiva, it may spontaneously improve, if adequate oral hygiene is maintained. So, mucogingival surgery should be postponed until possible spontaneous improvement has been allowed to take place 12, 13.
Problems associated with a shallow vestibule
The vestibular depth is measured from the gingival margin to the bottom of the vestibule. A shallow vestibule jeopardizes the maintenance of proper oral hygiene, thus facilitating plaque accumulation and initiation of gingival inflammation. If the inadequate vestibular depth is accompanied with minimum or no attached gingiva, the maintenance of oral hygiene is further compromised. On the other hand, if minimum attached gingiva is present with adequate vestibular depth, a surgical intervention may not be required if the patient is able to maintain a good oral hygiene.
Another requirement ……… Contents available in the book ……… Contents available in the book ……… Contents available in the book ……… Contents available in the book ………
Problems associated with aberrant frenum
The frenal pull on the gingival margin may interfere with plaque removal and tension on this frenum may tend to open the sulcus. A high frenum and muscle attachment produces pull on the marginal gingiva which can be seen by pulling the lip outwards and upwards (for upper lip) / downwards (for lower lip). If the marginal gingiva moves with this maneuver, it indicates muscle pull which requires a surgical correction.
Indications of periodontal plastic surgery
- To establish an adequate zone of attached gingiva to facilitate proper oral hygiene maintenance and prevent further recession.
- Before coronal positioning of a graft and/or for restorative considerations, particularly if the restorative margins will be placed subgingivally.
- To increase vestibular depth.
- To correct soft tissue recession by root coverage techniques or to cover gingival clefts.
- Ridge augmentation/modification prior to prosthodontic treatment.
- To eliminate the frenal pull and muscle attachments on the gingival margin.
- For root coverage due to esthetic reasons.
Gingival recession
Gingival recession is defined as an apical displacement of gingival margins from the cementoenamel junction (CEJ), which results in root exposure 14. The recession may occur due to the apical displacement of the marginal gingiva or due to the formation of a true periodontal pocket. There are multiple factors which are responsible for the gingival recession. These are,
Bone anatomy:
The presence of an adequate amount of bone around the teeth is required for normal soft tissue adaptation around the teeth. Gingival recession significantly increases in root surfaces which are not covered with the bone (dehiscence) 15.
Tooth position:
Tooth eruption and its position affect the amount of gingiva which surrounds the teeth. A buccally erupted tooth tends to show significantly more recession as compared to a normally positioned tooth 14.
Orthodontic movements:
The orthodontic movement of teeth may increase the probability of recession. Tooth movement in a position which will compromise its periodontal support predisposes to the development of recession 16.
Improper tooth brushing technique:
One of the most common reasons for recession is improper tooth brushing technique 17-19. It has also been shown that recessions are related to the use of hard toothbrushes 18.
High frenum attachment:
High frenum attachment is attributed to the localized gingival recession.
Calculus:
Several studies have shown that it is an important factor in gingival recession 20, 21.
Active periodontal disease:
The active periodontal disease results in connective tissue attachment loss and periodontal pocket formation or gingival recession 22.
Smoking:
Several studies have demonstrated that marginal recession is greater in smokers than non-smokers 23-26.
Classifications of gingival recession
Coverage of the denuded root surface is one of the primary goals of periodontal plastic surgery. It was important to classify gingival recession on the basis of its clinical presentation and also on the basis of its probable clinical outcome after treatment. Historically, various classification systems have been proposed to classify gingival recession. However, three most commonly followed classifications systems are discussed here,
Classification of gingival recession by Sullivan and Atkins 27:
Sullivan and Atkins published the first classification of gingival recession, according to its amenability of being covered using mucogingival surgical procedures. The basis of their gingival recession classification was according to the depth and width of the recession defect. Four categories to describe defects were:
1. Deep wide,
2. Shallow wide,
3. Deep narrow, and
4. Shallow narrow.
Classification of gingival recession by P D Miller 28:
Miller (1985) proposed a classification scheme for recession defects that has been used extensively by clinicians to classify gingival recession. He classified the gingival recession according ……… Contents available in the book ……… Contents available in the book ……… Contents available in the book ……… Contents available in the book ………
Class I:
Marginal tissue recession not extending to the mucogingival junction. No loss of interdental bone or soft tissue. Complete root coverage can be anticipated.
Class II:
Marginal recession extending to or beyond the mucogingival junction. No loss of interdental bone or soft tissue. Complete root coverage can be anticipated.
Class III:
Marginal tissue recession extends to or beyond the mucogingival junction. Loss of interdental bone or soft tissue, apical to the cementoenamel junction but coronal to the level of the recession defect. Partial root coverage can be anticipated.
Class IV:
Marginal tissue recession extending to or beyond the mucogingival junction. Loss of interdental bone or soft tissue apical to the level of the recession defect. No root coverage can be anticipated.

Drawbacks of Miller’s classification of gingival recession:
- The first drawback of this classification is that the reference point for this classification is mucogingival junction.
- The keratinized tissue and its components (free and attach-ed gingiva) have not been considered in this classification.
- In Miller’s Class III and IV recession, the interdental bone or soft tissue loss is an important criterion to categorize the recessions. The amount and type of bone loss have not been specified. Furthermore, Class III and IV recession classes do not exactly specify the level of interdental papilla and amount of loss and a clear picture of the severity of the recession is hard to project.
- According to Miller’s Class III and Class IV recession, marginal tissue ……… Contents available in the book ……… Contents available in the book ……… Contents available in the book ……… Contents available in the book ………
- In this classification, Class III and Class IV recession can be differentiated on the basis of the position of the gingival margin of the two adjacent teeth. However, in case of a missing adjacent tooth, there is no reference point and it is impossible to include this case in the Class III or Class IV.
- Miller’s classification does not specify facial or lingual involvement of the marginal tissue.
- The recession of the interdental papilla cannot be classified by Miller’s classification.
- The recession present on the palatal aspect of the maxillary teeth cannot be classified by this classification because there is no mucogingival junction on the palatal.
- Miller classification estimates the prognosis of root ……… Contents available in the book ……… Contents available in the book ……… Contents available in the book ……… Contents available in the book ………
Classification of gingival recession by Cairo et al. (2011) 30:
Cairo et al. recently introduced a new classification system of gingival recessions using the level of interproximal clinical attachment as an identification criterion; they also explored the predictive value of the resulting classification system on final root coverage outcomes following surgery. Three recession types (RT) were identified,
Recession Type 1 (Rt1):
Gingival recession with no loss of interproximal attachment. Interproximal cementoenamel junction is clinically not detectable at both mesial and distal aspects of the tooth.
Recession Type 2 (Rt2):
Gingival recession associated with loss ……… Contents available in the book ……… Contents available in the book ……… Contents available in the book ……… Contents available in the book ………
Recession Type 3 (Rt3):
Gingival recession associated with loss of inter-proximal attachment. The amount of interproximal attachment loss (measured from the interproximal cementoenamel junction to the depth of the pocket) is higher than the buccal attachment loss (measured from the buccal cementoenamel junction to the depth of the buccal pocket).

This classification system has been adapted in the World Workshop 2017 classification for periodontal and peri-implant diseases and conditions 31.
Procedures for increasing width of attached gingiva
Free gingival autografts are widely used for increasing the width of attached gingiva and also for the root coverage in areas with recession. This procedure can be done apical to the area of recession to increase the width of attached gingiva, for root coverage or to treat both of these problems at the same time. In procedures where the gingival augmentation is done apical to the area of recession, no attempt is made to cover the denuded root surface. By doing these ……… Contents available in the book ……… Contents available in the book ……… Contents available in the book ……… Contents available in the book ………
Periobasics: A Textbook of Periodontics and Implantology
The book is usually delivered within one week anywhere in India and within three weeks anywhere throughout the world.
India Users:
International Users:
Free gingival autografts
The free gingival autograft is one of the most common techniques used for gingival augmentation apical to the area of recession. This technique accomplishes the following objectives: enhances plaque removal around the gingival margin, reduces gingival inflammation and improves esthetics. This procedure results in an increased width of attached gingiva which helps in stopping the progressive gingival recession. It must be remembered that this procedure can also be used for root coverage when placed coronal to gingival recession.
History of free gingival graft:
The free gingival graft was first described by Bjorn in 1963, and Sullivan and Atkins in 1968 32. The procedure was initially described to increase the width of attached gingiva and to extend the vestibular depth. Later on, the procedure was used to attempt coverage of exposed root surfaces. This is a versatile procedure and can also be used over an extraction socket or osseous graft 32, 33.
Indications:
Free gingival grafts are used for,
- Increasing the amount of keratinized tissue (specifically, attached gingiva).
- Increasing the vestibular depth.
- Increasing the volume of gingival tissues in edentulous spaces (pre-prosthetic procedures).
- Covering roots in areas of gingival recession.
Contraindications:
The contraindications of a free gingival graft are as follows,
- Lack of donor tissue thickness.
- Medical considerations (uncontrolled diabetes, hypertension, bleeding disorders, anticoagulant therapy, etc.).
- When the mesiodistal width of the denuded root is signific-antly larger than the interproximal periosteal blood supply, so that the graft
- would not receive an adequate blood supply.
- An unacceptable color mismatch between the grafted site and adjacent gingiva.
Surgical procedure:
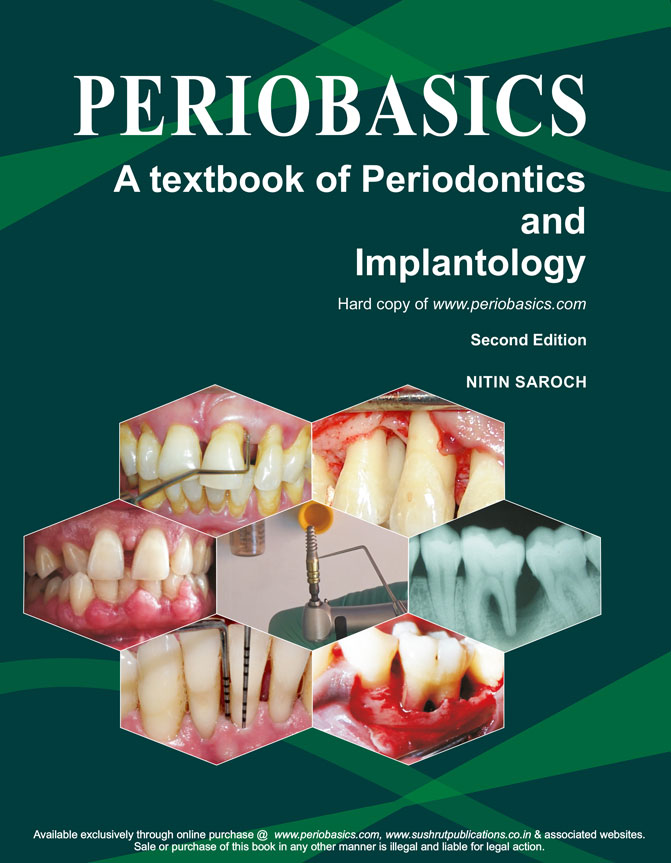
The free gingival autogenous grafts involve two surgical sites with recession defect being the primary recipient site, and the donor site (which is usually the maxillary palatal tissue) being the secondary surgical site. The recipient site is a firm connective tissue bed which receives the graft. While preparing the recipient bed, the periosteum is left covering the bone. The incisions to prepare the recipient bed are extended to approximately twice the desired width of the attached gingiva, allowing for 50% contraction of the graft when healing is complete. According to Egli et al. (1975) 34, the graft tissue harvested should be approximately 33% greater than the amount required to compensate for the post-operative shrinkage. If the recipient site is penetrated by muscle attachments, they try to elevate the graft and reduce the final width of the attached gingiva.
As the grafted tissue does not have its own blood supply, therefore it relies on blood supply and nourishment from the recipient site. That is why there needs to be an adequate overlap of the graft tissue with the soft tissue around the recession defect at the recipient site. When placed at the recipient bed, initially the grafted tissue ……… Contents available in the book ……… Contents available in the book ……… Contents available in the book ……… Contents available in the book ………
The soft tissue graft is harvested from the palate between the palatal root of the first molar and the distal line angle of the upper canine as this is the region where the thickest tissue can be found 35. The anatomical consideration is important while harvesting the graft. The greater and lesser palatine neurovascular bundle should not be injured while harvesting the graft. Reiser et al. (1996) 35 reported that this neurovascular bundle on an average lies approximately 12 mm from the CEJ of the maxillary premolars and molars. The ideal thickness of a graft is between 1.0 and 1.5 mm 36. If while harvesting a thicker graft is obtained, it can be thinned by holding it between two wet wooden tongue depressors and slicing it longitudinally with a sharp #15c blade.
The rugae area should be avoided for harvesting the graft ……… Contents available in the book ……… Contents available in the book ……… Contents available in the book ……… Contents available in the book ………
One disadvantage of the free gingival graft is that it retains the color of the donor tissue. The grafted tissue can be clearly seen if the color of the recipient site and grafted tissue are different. This procedure is not recommended in areas with high esthetic concern 38.
The surgical procedure for the free gingival graft is as follows,
Preparation of the recipient site:
- After administration of the local anesthetic agent, sound anesthesia is achieved, which is followed by a thorough root planning of the exposed root surfaces using curettes.
- A horizontal incision is then made using a #15c blade at the level of CEJ extending from the line angle of adjacent teeth on either side of the recession deep into the papilla, creating a well-defined butt joint margin.
- Vertical incisions are then made along the disto-proximal line angles of the adjacent teeth extending beyond the mucogingival junction and into the alveolar mucosa.
- The overlying keratinized epithelial tissue is then excised with the help of a sharp blade and care should be taken not to leave any tissue tags.
- A template is then prepared using aluminum foil on the recipient site to harvest the graft of the desired size from the palate.
Preparation of the donor site:
- After placing the template on the palate, an incision is given with a #15c blade to demarcate the tissue which has to be harvested.
- With the help of a ……… Contents available in the book ……… Contents available in the book ……… Contents available in the book ……… Contents available in the book ………
- The graft obtained is then inspected for any glandular or fatty tissue remnants.
- Hemorrhage at the donor site is controlled using a pressure pack of the moist gauge.
- A pre-fabricated acrylic Hawley’s retainer is then given to the patient for the protection of the wound at donor site which the patient has to wear for a period of 2 weeks.
Suturing of the graft:
- The recipient site is inspected and is cleaned of any excess clot or tissue tags.
- The graft is then ……… Contents available in the book ……… Contents available in the book ……… Contents available in the book ……… Contents available in the book ………
- It must be made sure that the graft is completely immobilized. Any movement of the grafted tissue interferes with the healing process.
- Excess tension in the sutures should be avoided because it may distort the graft from the underlying surface.
- It must be remembered that less is the manipulation of the graft more are the chances of its survival and desired results.
Healing following free gingival graft:
Healing following free gingival graft has been well studied. In most of the cases, sloughing of epithelium occurs, but the survival of underlying connective tissue determines the fate of the graft. Oliver et al. (1968) 39 and Nobuto et al. (1988) 40 studied healing following free gingival graft in monkeys and divided the healing process into three phases,
1. The initial phase (from 0-3 days),
2. Revascularization phase (from 2-11 days), and
3. Tissue maturation phase (from 11-42 days).
The initial phase (from 0-3 days):
As soon as the graft is placed and stabilized over the recipient bed, a thin layer of exudate occupies the space in between the graft and the recipient bed. During these initial days, the graft obtains its nutrients from this exudate. This avascular “plasmatic circulation” is essential for graft survival during this period. Blood clots or a thick layer of exudate jeopardizes this plasmatic circulation and may cause the failure of the graft. So, in order to ensure a good plasmatic circulation, blood between the graft and the recipient site must be removed by exerting pressure against the graft following suturing.
During the first day post-operatively, the connective tissue of the graft becomes edematous. Degeneration of some of its elements takes place. But, as the healing progresses, the degenerated connective tissue is replaced by newly formed granulation tissue. It is important to note that when placed over denuded ……… Contents available in the book ……… Contents available in the book ……… Contents available in the book ……… Contents available in the book ………
Revascularization phase (from 2-11 days):
During this period, revascularization of the graft takes place. The anastomosis of the blood vessels in the recipient bed and the graft is established initially, re-establishing the blood supply of the graft. As the healing progresses, the proliferation of the blood vessels takes place, resulting in a dense network of blood vessels in the graft. The fibrous union of the graft with the underlying connective tissue starts from the second day and progresses for several days 41. With this union, the grafted tissue becomes completely integrated with the recipient bed.
Tissue maturation phase (from 11- 42 days):
During this period, the number of blood vessels gradually reduces in the grafted tissue and at approximately 14 days, the vascularization of the grafted tissue appears to be normal. There is a gradual proliferation of the epithelium which keratinizes and virtually becomes indistinguishable from the surrounding epithelium.
Root coverage procedures
The recession is a common finding and many times it causes compromised esthetics. Root coverage is one of the most important components of periodontal plastic surgeries. In the literature, three types of periodontal plastic surgery procedures have been described to treat recession defects. These include free grafts, pedicle flaps, and guided tissue regeneration 42. Free gingival grafts can be used for recession coverage as described in the previous section. Before discussing various root coverage procedures, let us first discuss the classification of root coverage procedures,
Classification of treatment modalities for root coverage
Currently, numerous surgical techniques are proposed for root coverage. These procedures are as follows 43:
I) Pedicle soft tissue grafts,
Rotational flaps:
Laterally positioned flap.
Double papilla flap.
Advanced flaps:
Coronally positioned flap.
Semilunar flap.
II) Free soft tissue grafts,
Non-submerged graft:
One stage [free gingival graft].
Two stage [free gingival graft + coronally positioned flap].
Submerged grafts:
Connective tissue graft + double papilla flap.
Connective tissue graft + coronally positioned flap
Envelope technique.
III) Additive treatments,
Root surface modification agents.
Enamel matrix proteins.
Guided tissue regeneration:
Nonresorbable membrane barriers.
Resorbable membrane barriers.
Pedicle soft tissue grafts
Rotational flaps
Laterally pedicle graft
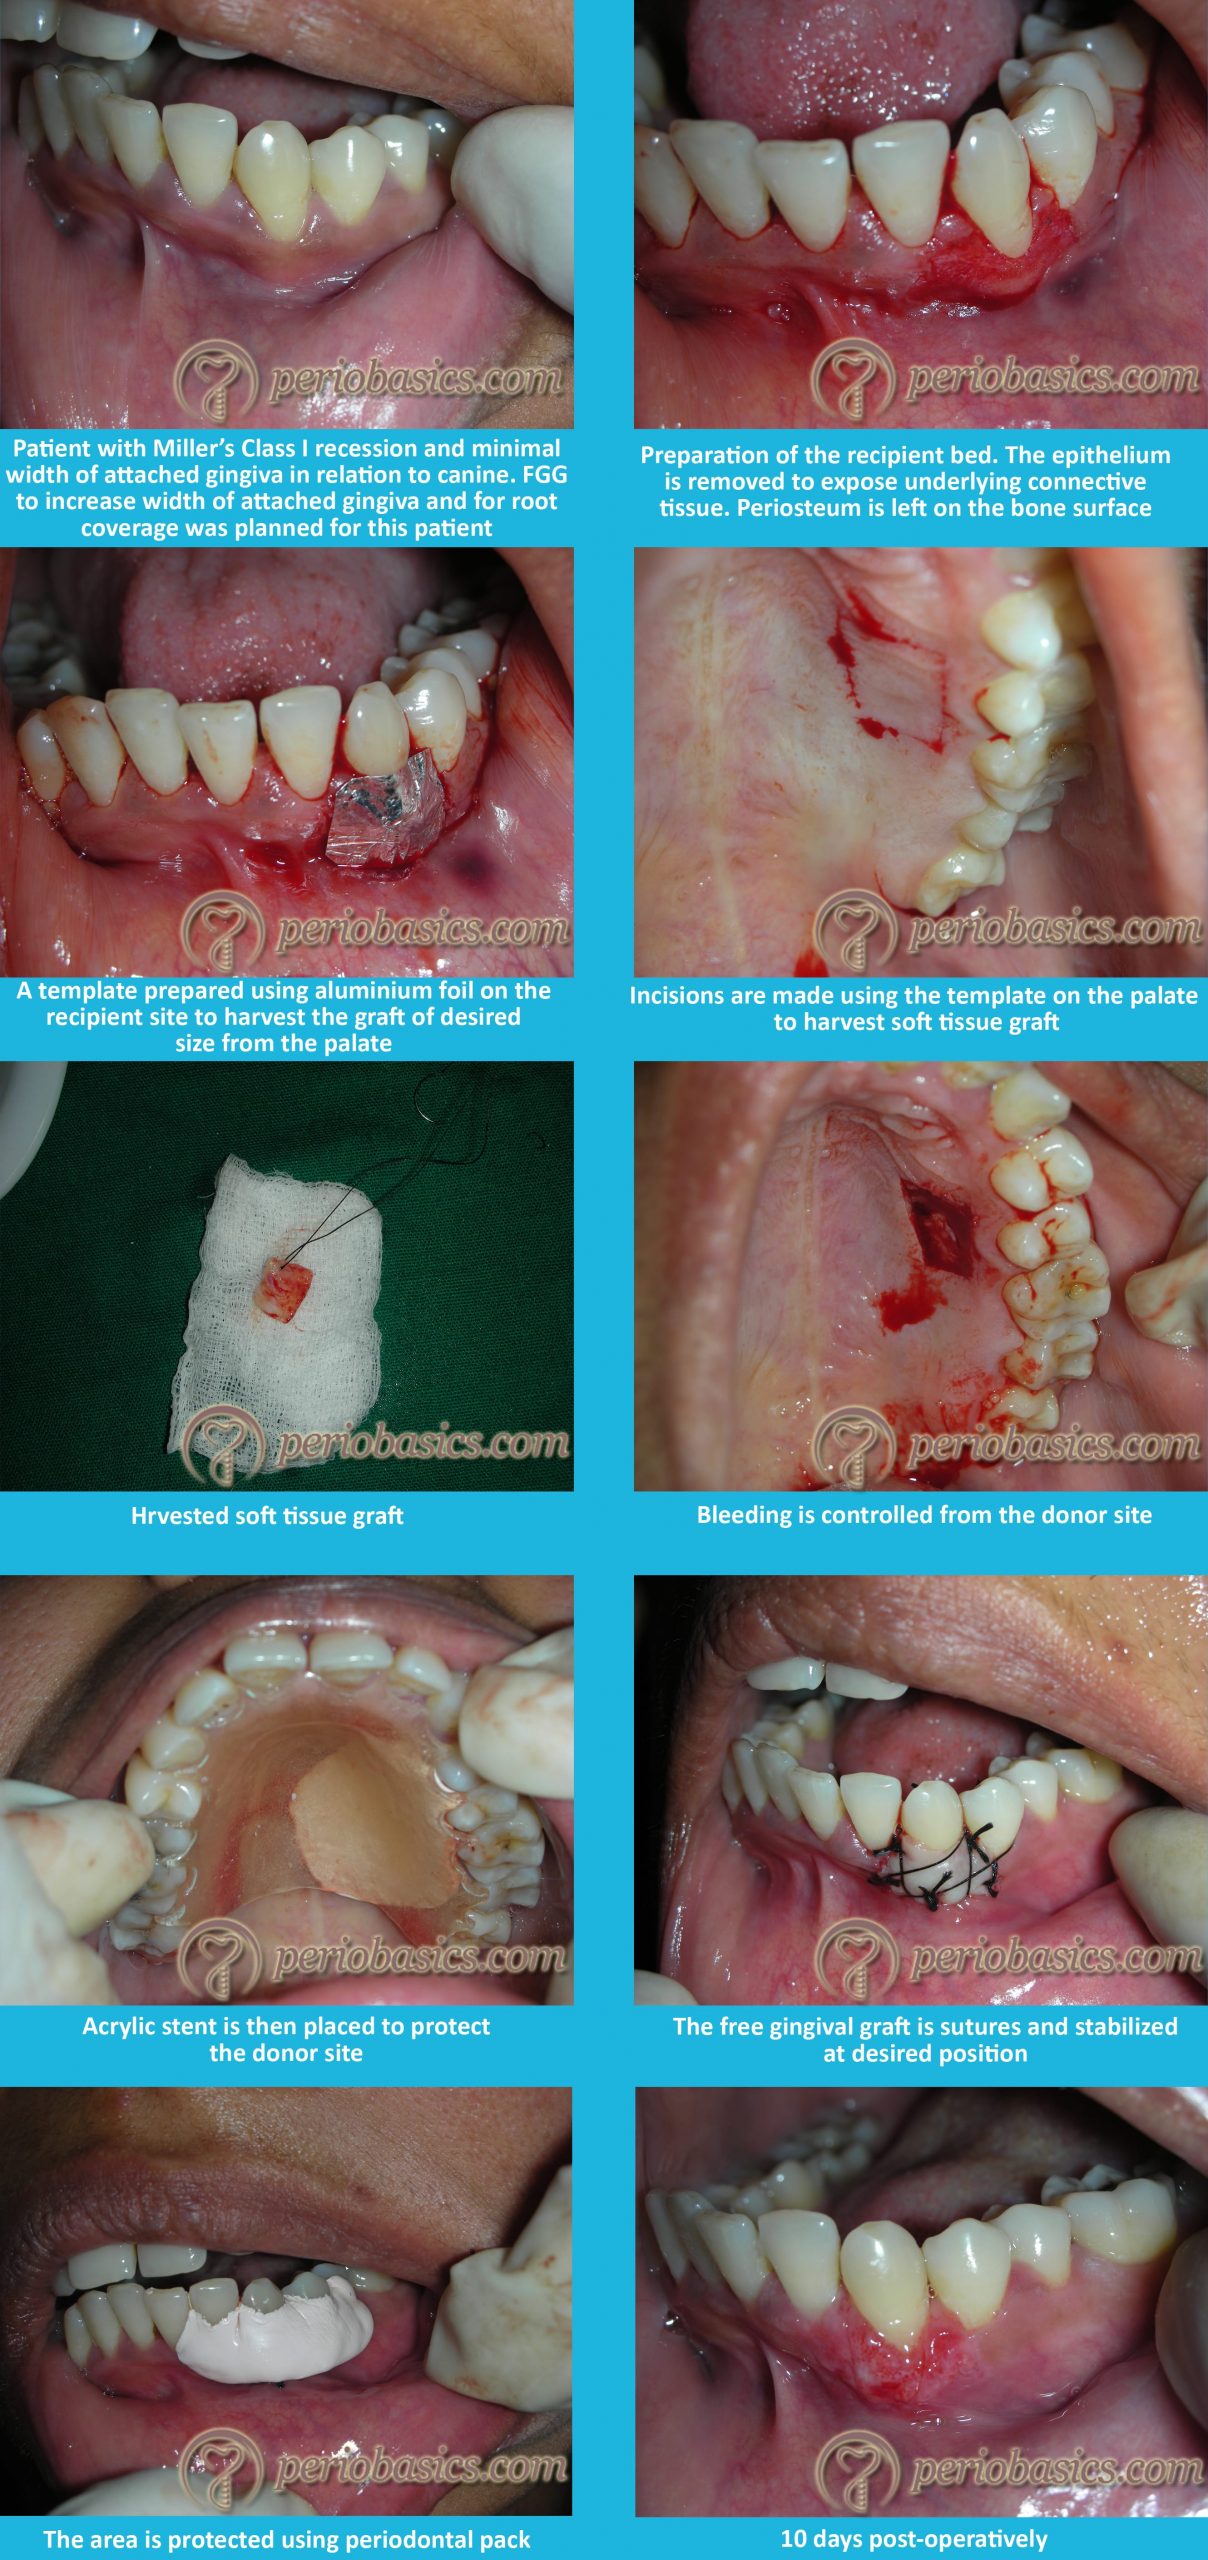
A lateral pedicle graft involves repositioning the donor tissue from an area adjacent to the recession defect to cover the exposed root surface. Grupe and Warren (1956) 44 in 1956 first described it as the ”lateral sliding flap”. The procedure was then improved and named, the laterally positioned flap 45, 46. Hattler (1967) 47 later on, used split-thickness flap repositioned in a similar way to cover multiple exposed root surfaces.
Variations in incision design as described by Grupe and Warren have been described with other names such as the ”rotation flap” 48, ”oblique rotational flap” 49 and the ”transpositioned flap” 50. When the lateral movement is both mesial and distal to the defect (by including both mesial and distal interdental papillae), the rotational flap is called a double papilla flap 51.
Advantages:
- It is a simple procedure.
- Predictable for narrow areas of root exposure.
- Versatile.
- Avoids recession at the donor site.
Disadvantages:
- Cannot be used for the root coverage in case of multiple tooth recession.
- Cannot be done in the case of narrow interdental papilla.
- Cannot be done if the thickness of gingival is less.
- Does not give good results in wide areas of recession.
Clinical procedure for laterally repositioned pedicle flap:
As already stated, in this procedure donor tissue adjacent to the recession is used to cover the recession. Following is the clinical procedure for the same,
Preparation of the recipient site:
The recipient site is prepared by making a reverse bevel incision along the soft tissue margin of the defect. After removal of the epithelium, the underlying connective tissue is exposed to allow the adequate union and healing of the repositioned flap. Similarly, the surface epithelium adjacent to the recession defect on the side opposite to where the ……… Contents available in the book ……… Contents available in the book ……… Contents available in the book ……… Contents available in the book ………
Re-positioning of the pedicle flap:
The tissue adjacent to the recession from where the pedicle flap has to be raised is then prepared. A pedicle flap twice the width of the recession defect is then raised. The pedicle flap is raised by placing an oblique incision away from the recession defect leaving a few millimeters of keratinized gingival tissue around the adjacent tooth at the donor site. A second oblique incision is made from where the first incision ends and is carried apically beyond the alveolar lining mucosa. A split-thickness flap is then raised. The split-thickness pedicle flap is then repositioned over the recipient bed. It must be made sure that the graft tissue is free of any tension. If tension is present in the flap, the releasing incision is extended more apically. Excessive tension on the flap causes excessive movement and poor stabilization of the re-positioned tissue, which adversely affects the healing and may result in undesired results. The flap is then sutured at the recipient bed using fine interrupted sutures. After suturing, gentle pressure is applied for a few minutes with the help of a moist gauze to minimize clot underneath the pedicle flap.
The operated area is then protected by placing a periodontal dressing, but it is not mandatory. A newer material, Barricaid TM (Dentsply International Inc. Milford, DE, USA) which is light-cured can be used ……… Contents available in the book ……… Contents available in the book ……… Contents available in the book ……… Contents available in the book ………
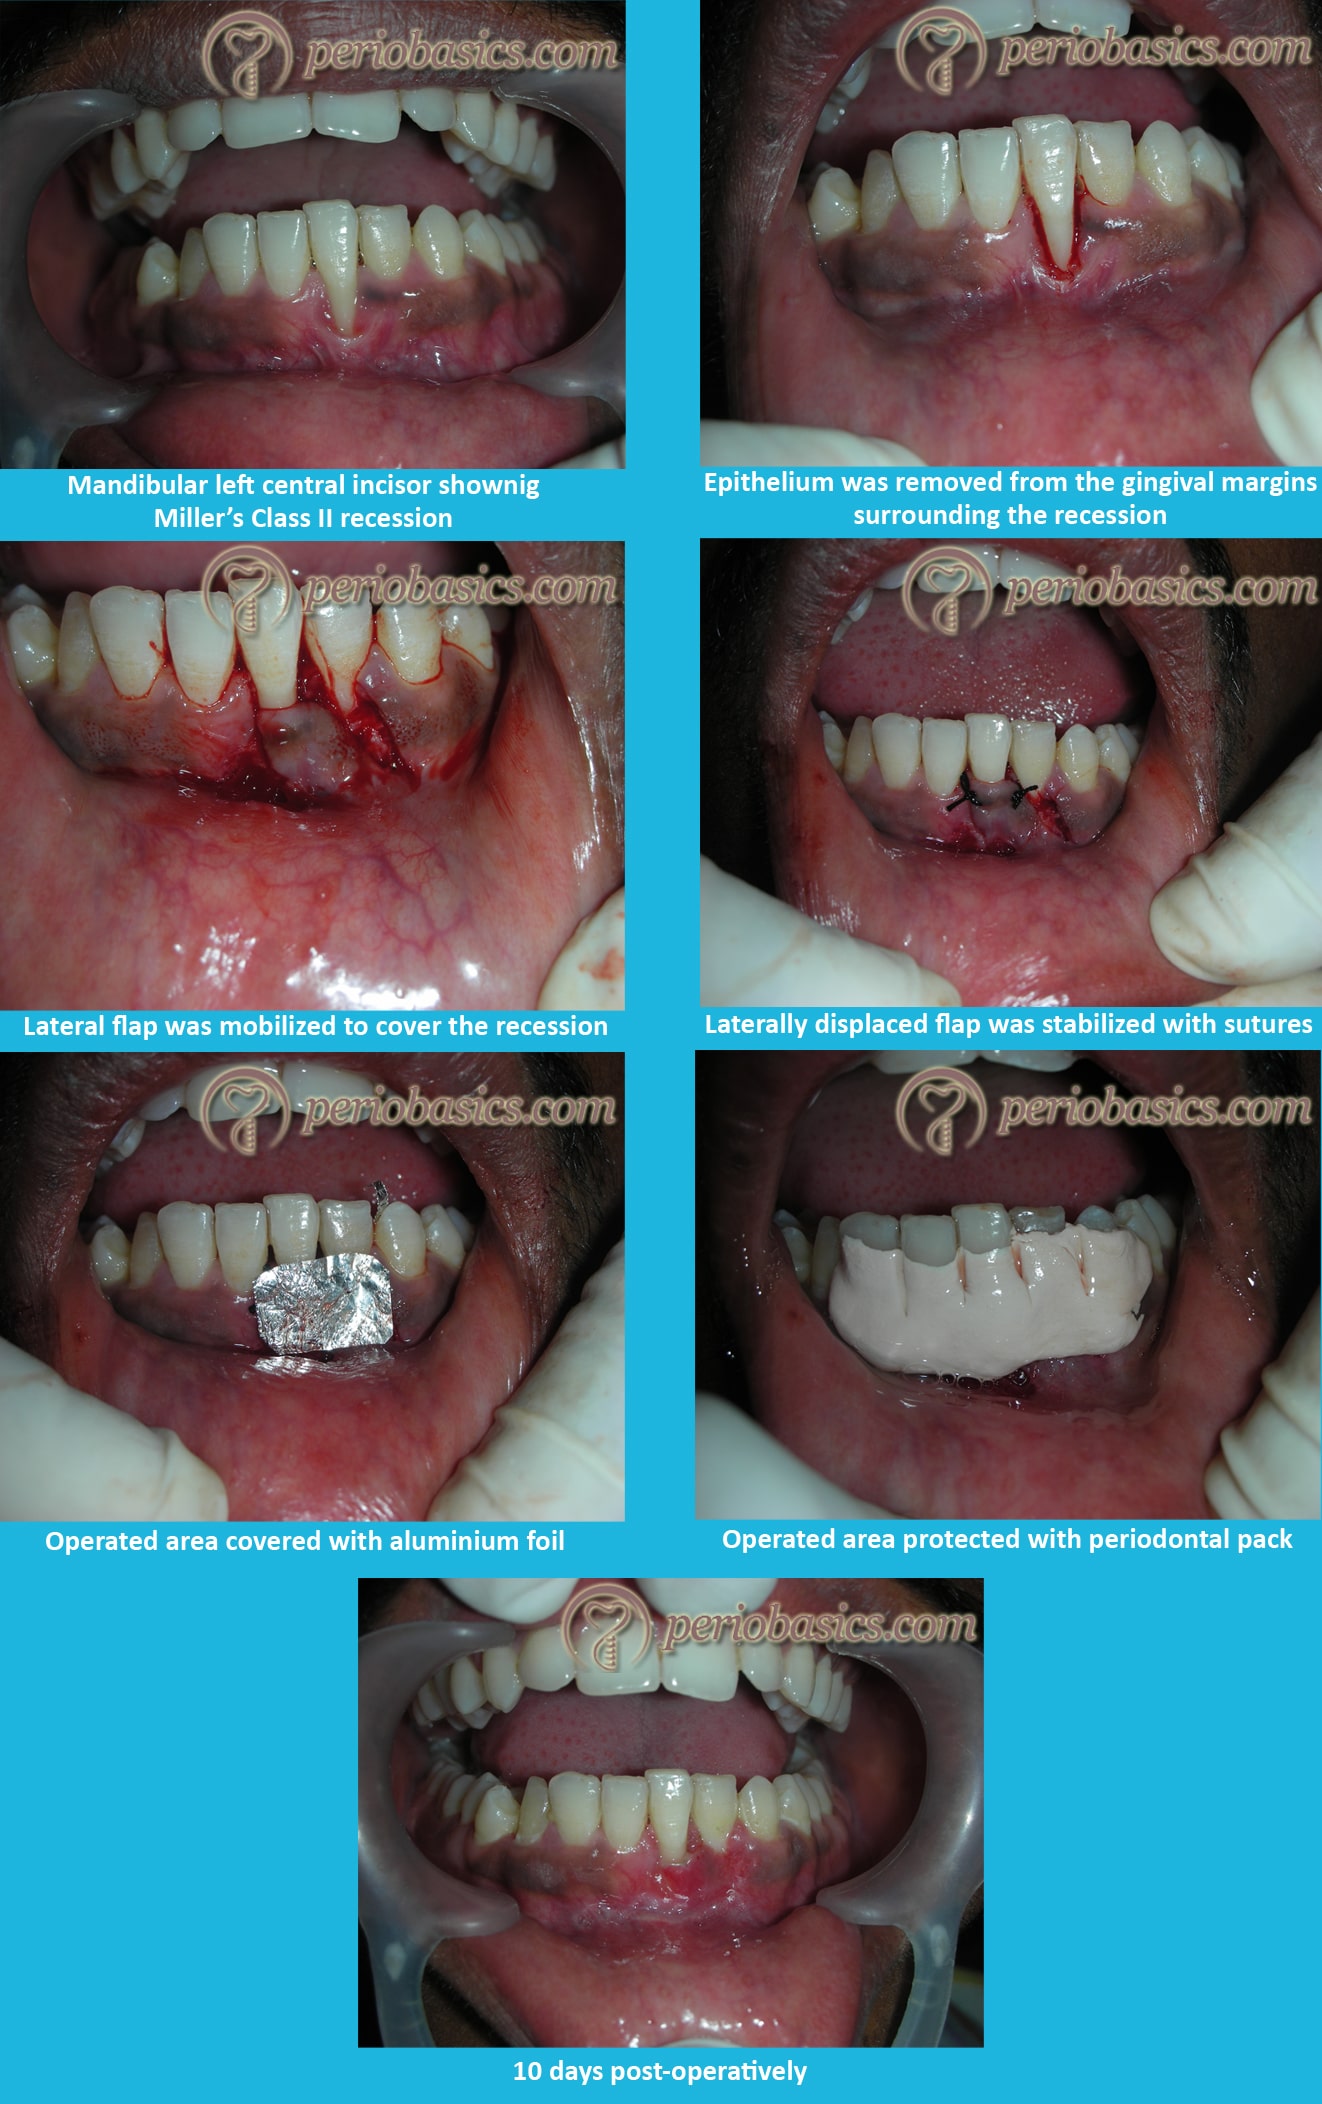
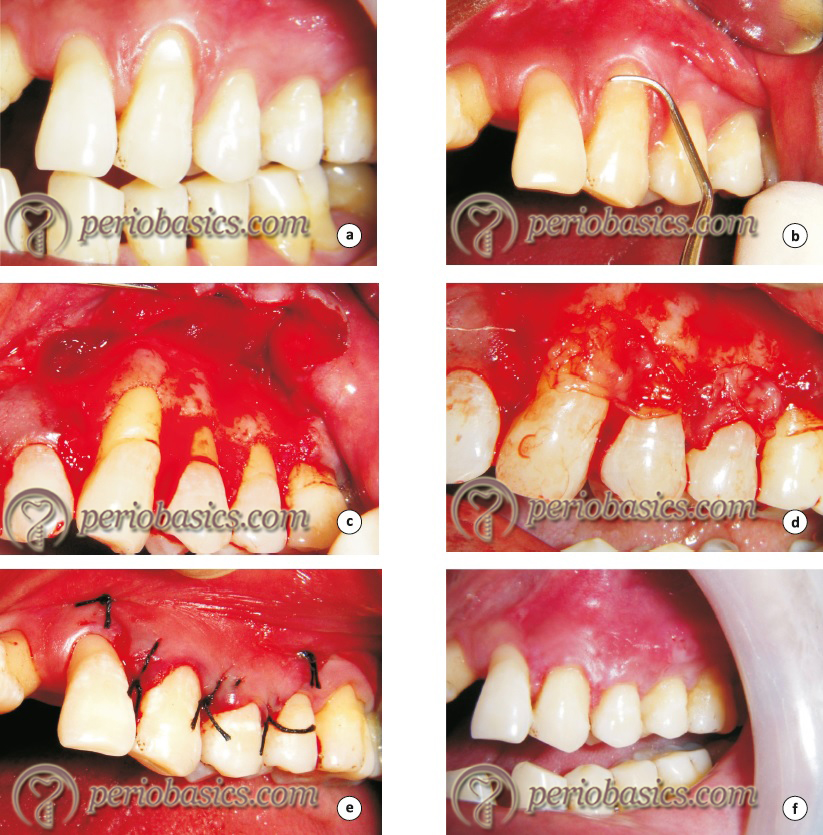
Variations in incision design for lateral pedicle flap:
One of the most important disadvantages of the laterally positioned pedicle flap with originally described incisions is the exposed harvesting site extending up to the marginal gingiva. As it heals by secondary intention, the renewed recession may occur at the harvested area. These limitations have been confirmed by Grupe (1966) 45 and later by Zucchelli (2004) 52.
Another problem with the original incision design was tension at the base of the flap when the flap is laterally displaced. This can be avoided by giving a “cut-back” incision which relieves the tension. The following figure describes originally described incisions by Grupe and Warren (1956) 44 (a), modified incision to protect the marginal gingiva described by Grupe (1966) 45 (b), the cut back incision as described by Corn (1964) 53 (c) and modified incision to protect marginal gingiva as described by Zucchelli (2004) 52 (d).
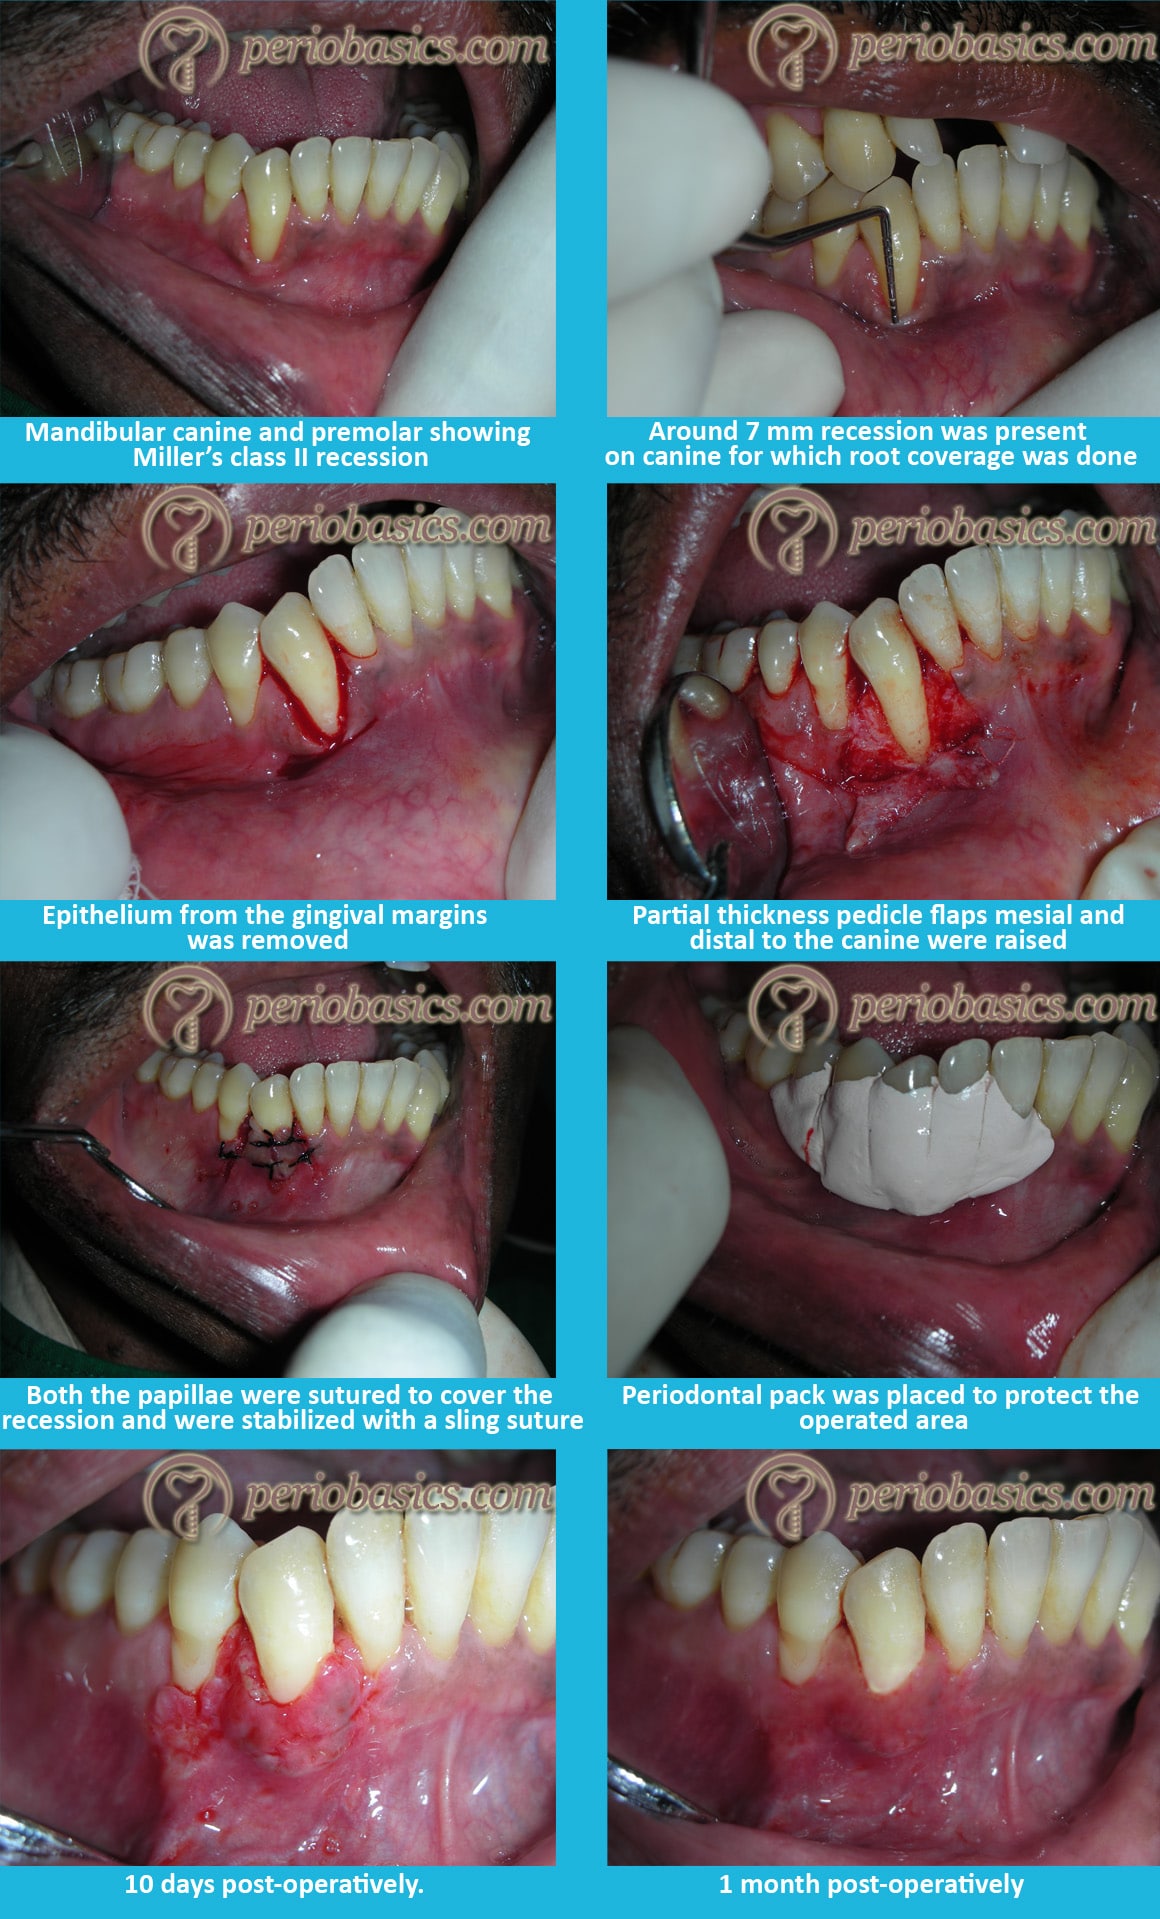
Double papilla flap
As already stated, Cohen and Ross in 1968 51, described the double papilla repositioned flap using the interproximal papillae to cover recessions and correct gingival defects in areas of insufficient gingiva not suitable for a lateral sliding flap. This procedure can be used for root coverage when ……… Contents available in the book ……… Contents available in the book ……… Contents available in the book ……… Contents available in the book ………
Indications:
- When the interproximal papillae adjacent to the mucogingival problem are sufficiently wide.
- When the attached keratinized gingiva on an approximating tooth is insufficient to allow for a laterally positioned flap.
- When periodontal pockets are not present.
Advantages:
- The risk of loss of alveolar bone is minimized because the interdental bone is more resistant to loss than is radicular bone.
- The papillae usually have thicker gingiva with a greater width of attached gingiva as compared to the radicular surface of teeth.
- The clinical predictability of this procedure is fairly good.
Disadvantage:
The primary disadvantage of this procedure is that it is a technique sensitive procedure where two interdental papillae are joined together to act as a single flap.
Clinical procedure:
Following clinical steps are followed while doing double papilla laterally repositioned pedicle flap,
- Following administration of local anesthesia, two horizontal incisions are made on both sides, parallel to the CEJ of the tooth to be treated with a #15c blade.
- With a reverse bevel incision, the epithelial lining of the gingival margins around the recession is removed exposing the underlying connective tissue.
- The root surface is then thoroughly scaled with the help of curettes.
- Vertical incisions are then made on the mesial and distal aspects of the surgical site at the line angles of the adjacent teeth extending beyond the mucogingival junction to facilitate mobilization of the pedicle flaps.
- A partial-thickness pedicle flaps with sufficient mesial and distal interdental papillae are then raised by giving scalloped internal bevel incision with a #15c blade. Interdental papillae are undermined while lifting the papilla gently with the side of the blade and separated from the underlying connective tissue.
- Both the pedicle flaps are then sutured with the help of fine sutures at the center of the root surface.
- The tissue is now grasped with pliers ……… Contents available in the book ……… Contents available in the book ……… Contents available in the book ……… Contents available in the book ………
- With the help of a moist gauze, gentle pressure is then applied to the repositioned tissue to minimize blood clots between the recipient bed and repositioned tissue.
- The area may be protected with the help of periodontal pack or Barricaid TM.
- Sutures are removed after 10-14 days and the patient is instructed to avoid mechanical tooth cleaning for further 2 weeks. Antimicrobial mouth rinses are prescribed for infection control.
- The most common problem associated with double papilla design is that the sutures to join two flaps are placed on the avascular surface of the root, because of which this area may become dehiscent.
Healing following soft tissue pedicle graft:
The healing following the lateral pedicle graft has been studied well. In areas other than the root surface, healing of the repositioned flap is similar to as observed after flap surgery. There is a proliferation of the new connective tissue and blood vessels. The fibrous union then matures in due course of time. Wilderman and Wentz (1965) 54 studied the healing of soft tissue over the denuded root surface in a dog model. They divided the healing process into following four stages,
1. The adaptation stage (from 0-4 days)
2. The proliferation stage (from 4-21 days)
3. The attachment stage (from 21-28 days)
4. The maturation stage (from 28 days-6 months)
The adaptation stage (from 0-4 days):
Initially, after the repositioning of the flap, a thin fibrin layer occupies the space between the flap and the root surface. During the initial few days of healing, epithelium from the transplanted tissue proliferates and attaches to the tooth surface at its coronal portion.
The proliferation stage (from 4-21 days):
As the healing continues, the fibrin layer between the repositioned flap and the root surface is then invaded by the proliferation of the connective tissue from the inner surface of the flap. It must be noted that the healing on the root surface is different from the healing in other areas because connective tissue proliferation on the root surface is only from the inner surface of the flap, unlike other areas where the connective tissue proliferates from both the inner surface of the flap and the recipient bed. 6-10 days postoperatively, a layer of the fibroblasts can be seen on the root surfaces which ……… Contents available in the book ……… Contents available in the book ……… Contents available in the book ……… Contents available in the book ………
The attachment stage (from 21-28 days):
This stage is characterized by the insertion of newly formed collagen fibers into the newly formed cementum on the root surface.
The maturation stage (from 28 days-6 months):
During the last stage of healing, there is continuous formation and maturation of the collagen fibers. The collagen fibers for-med can be seen inserting the cementum deposited on the apical portion of the recession. This union of the flap and the root surface allows a stable structural relation between the two.
Advanced flaps
Coronally positioned flap
In this procedure, a partial-thickness flap is created apical to the area of recession and is then repositioned coronally to cover the root. Bernimoulin et al. (1975) 55 first reported the coronally positioned graft, succeeding grafting with a free gingival autograft. It was described as a two-stage procedure wherein the first stage a free gingival graft was placed apical to the margins of the recession to be treated and in the second stage (after a few months), the graft was coronally positioned over the denuded root surfaces. Techniques involving coronal positioning of the flaps have been previously described by Mutschelknauss (1968) 56 and by Restrepo (1973) 57. Bjorn (1971) 58 ……… Contents available in the book ……… Contents available in the book ……… Contents available in the book ……… Contents available in the book ………
Periobasics: A Textbook of Periodontics and Implantology
The book is usually delivered within one week anywhere in India and within three weeks anywhere throughout the world.
India Users:
International Users:
Maynard (1977) 59 outlined the following requirements as criteria for the success when using coronally positioned flaps:
- The presence of shallow crevicular depths on proximal surfaces.
- Normal interproximal bone heights.
- Tissue height within 1 mm of the CEJ of adjacent teeth.
- Six-week healing of the free gingival graft prior to coronal positioning.
- Reduction in root prominence.
- Adequate release of the flap during the second-stage surgery to prevent retraction during healing.
Coronally advanced flap can be done in one stage or two-stage procedure. One stage procedure is done to cover shallow recession defects. A two-stage procedure is done when the recession is more and there is insufficient soft tissue apical to the recession to provide recession coverage. In two-stage procedure, the first procedure involves a free gingival graft, connective tissue graft or guided tissue regeneration procedure to increase the thickness and ……… Contents available in the book ……… Contents available in the book ……… Contents available in the book ……… Contents available in the book ………
Clinical procedure:
- After performing extraoral asepsis with an anti-microbial solution, intraoral asepsis is performed with 0.12% chlorhexidine solution.
- A profound anesthesia is achieved using a local anesthetic agent.
- Two vertical incisions are made starting from the adjacent teeth on both the sides which extend beyond the mucogingival junction.
- The internal bevel incision is then made from the gingival margin to the bottom of the pocket to eliminate the diseased pocket wall.
- The flap is then raised using sharp dissection.
- The root surface of the tooth is thoroughly instrumented with manual scalers to achieve a flat root surface.
- The flap is now sutured coronal to its original position. Interrupted sutures are placed to stabilize the flap at its place.
- The area is then covered with a periodontal pack (not mandatory), which is removed along with the sutures after 1 week to 10 days.
As already stated, the main disadvantage of this procedure is that the results are often not favorable if the insufficient width of attached gingiva is present. In these cases, the two-stage procedure is adopted where the free gingival graft is done initially to increase the width of the attached gingiva and then the coronally displaced flap is done.
Semilunar flap
The semilunar coronally displaced flap was described by Tarnow in 1986 60. The technique involved a semilunar incision made parallel to the free gingival margin of the facial tissue, and coronally positioning this tissue over the denuded root. The main advantages of the procedure were: no requirement of sutures, no tension on the flap, no shortening of the vestibule, and no interference with the existing papillae.
Clinical procedure:
- The patient is prepared for the surgery by giving plaque control instructions, scaling and root planning is done two weeks prior to the surgery to minimize the inflammation. There should be minimal pocket depth on the buccal aspect of the tooth prior to the surgery.
- Root planing is done on the exposed root surface.
- A semilunar incision is made following the curvature of the free gingival margin. The incision may be extended to the alveolar mucosa if there is not enough keratinized gingiva to cover the recession. The incision should curve apically far enough mid-facially to ensure that the apical part of the flap rests on the bone ……… Contents available in the book ……… Contents available in the book ……… Contents available in the book ……… Contents available in the book ………
- Now, using a #15c blade, a split-thickness incision is made from the initial incision line coronally. This incision is connected with intrasulcular incision mid-facially.
- The tissue is then coronally displaced and positioned at the CEJ to cover the recession.
- With the help of a moist gauze, the tissue is held in its place for 5 minutes.
- The area is protected by placing a periodontal dressing.
- The periodontal dressing is removed after 7-10 days.
The main advantage of this procedure is that it is easy to perform and is a quite predictable procedure for root coverage in mild to moderate recession areas where sufficient gingival tissue is available.
Free soft tissue grafts
Non-submerged graft:
The non-submerged grafts include free gingival graft procedure which has already been discussed in previous sections.
Submerged grafts:
Sub-epithelial connective tissue graft:
The sub-epithelial connective tissue graft was introduced by Langer and Langer in 1985 61. Later on, the technique was modified by Nelson in 1987 62. The main objective of the technique was to provide soft-tissue coverage to individual and multiple root sites. The technique aimed at covering deep and wide recession areas where often desirable results were not achieved.
Indications:
- Root coverage where a gingival color match is esthetically important.
- Similar coverage for multiple root exposures.
- For the avoidance of “keloid” formation.
- Recession adjacent to an edentulous area which also requir-es ridge augmentation.
Clinical procedure:
The clinical procedure for the connective tissue graft procedure includes the following steps,
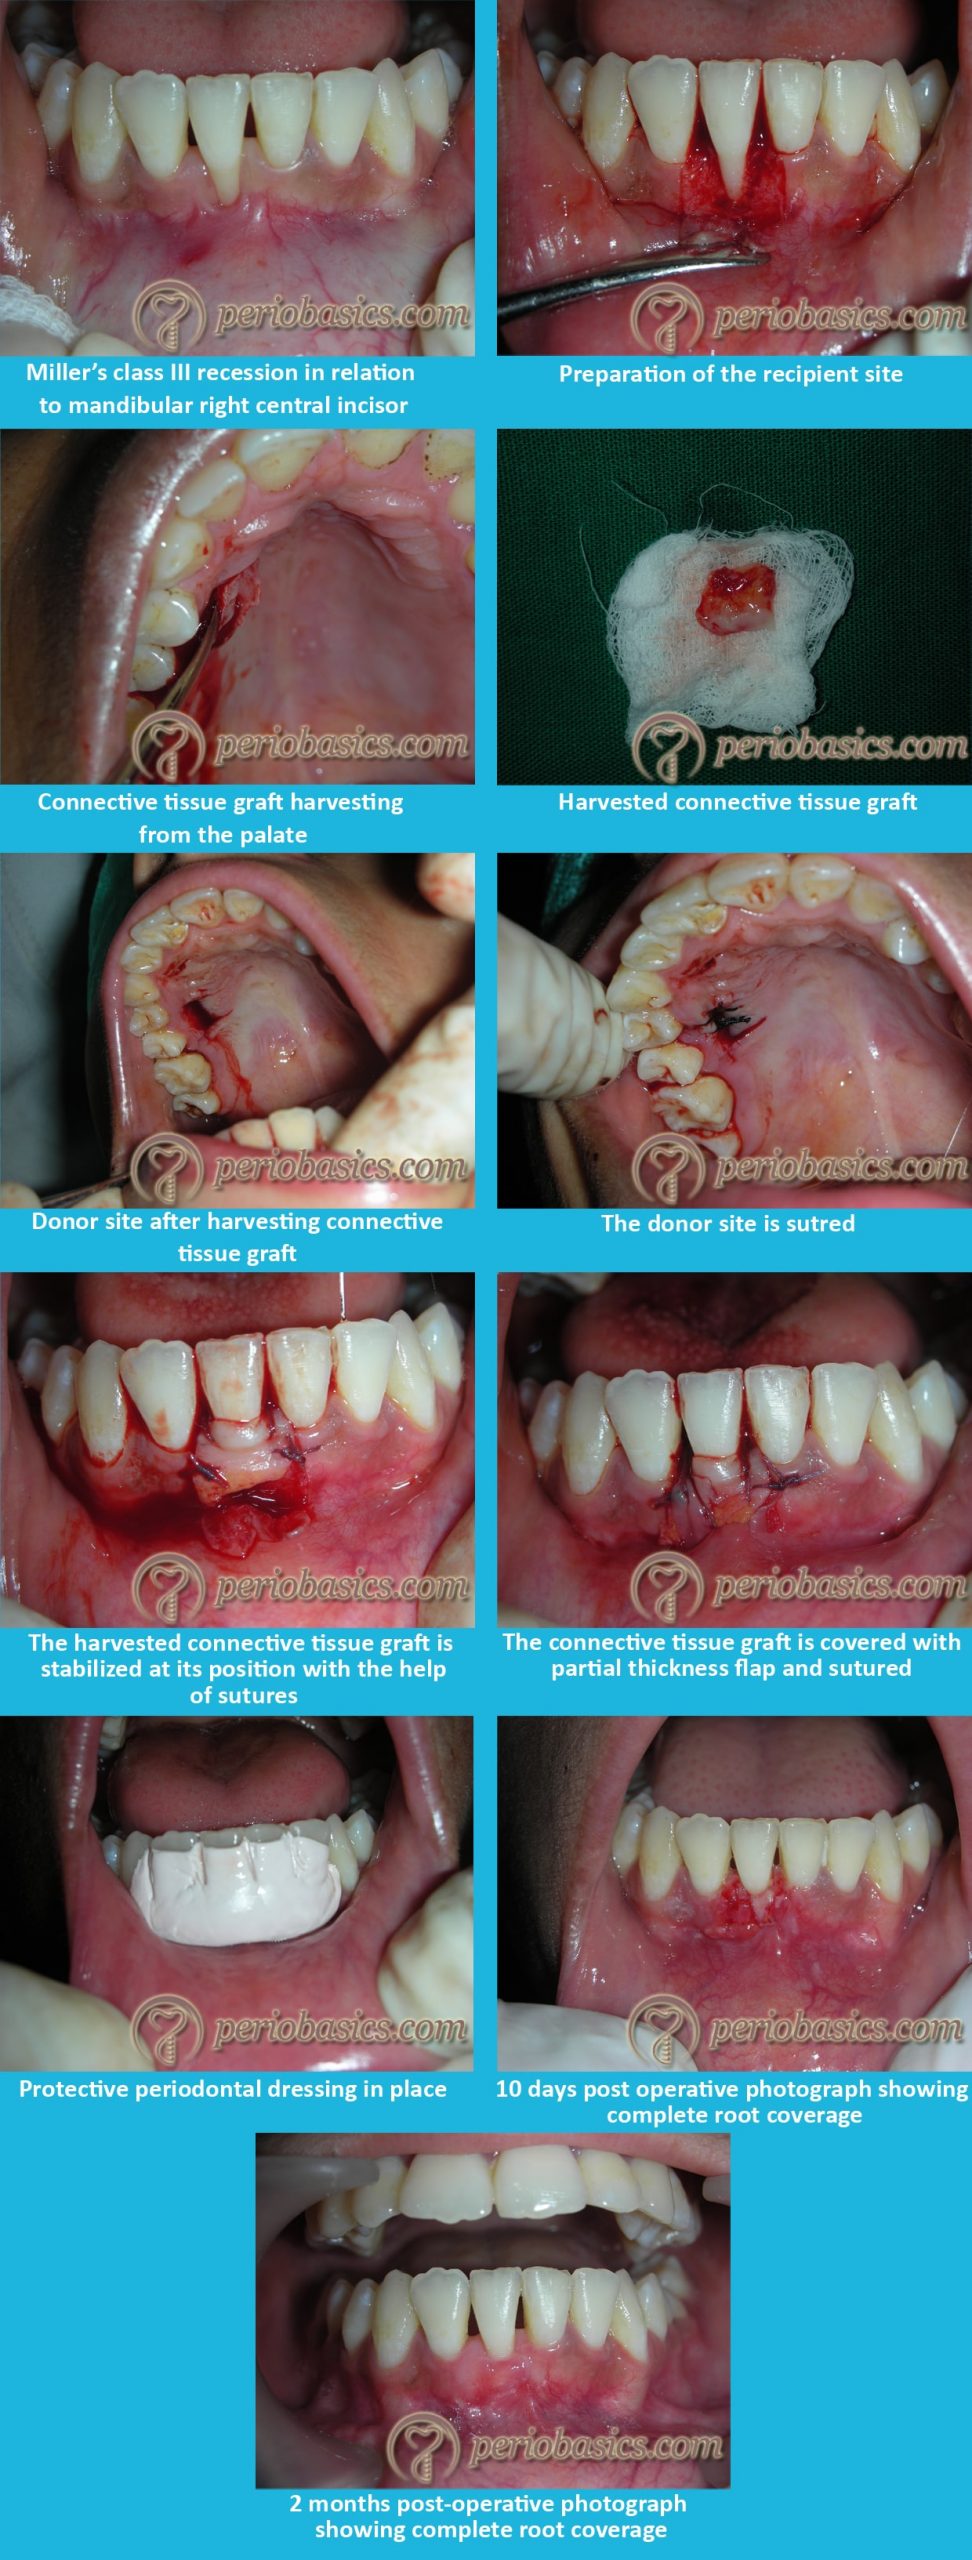
Preparation of the recipient site:
- After the patient has been prepared for the surgery, the recipient bed is prepared for the connective tissue graft procedure.
- A partial-thickness flap is then raised with two vertical incisions placed at a distance of at least one papilla mesial and distal to the area of recession. The flap is raised beyond the mucogingival junction so that it is mobile.
- The root surface is then meticulously planed. Root surface bio-modification agents (such as tetracycline, citric acid, etc.) may be applied on the root surface.
Harvesting of connective tissue graft:
- The area on the hard palate, from where the connective tissue graft has to be harvested is anesthetized using a local anesthetic agent.
- The available thickness of the mucosa is estimated by the use of the tip of the syringe needle with a stopper of an endodontic reamer or file.
- The connective tissue graft is harvested from the plate using a “trap door” approach. The desired graft length is measured which should be 6 mm longer than the width of the dehiscence ……… Contents available in the book ……… Contents available in the book ……… Contents available in the book ……… Contents available in the book ………
- Two vertical cuts are now made at both ends of the horizontal incision to facilitate graft removal.
- A second horizontal incision is now made through the initial incision directed apically.
- A small periosteal elevator or scalpel is now used to release the connective tissue graft from the bone. All adipose and glandular tissue are removed from the harvested graft. The palatal wound is sutured in a primary closure.
Placement of the harvested tissue on the recipient site and suturing:
- The harvested graft is immediately placed on the denuded root surface. The graft is then sutured with fine, resorbable sutures to the periosteum.
- The graft is then covered with the partial thickness flap on the outer surface. It is made sure that at least one-half to two-thirds of the graft is covered by the flap as it is essential for graft survival.
- The area is then covered with a foil and periodontal pack.
- After 7-10 days, dressing and sutures are removed.
- The main advantage of this procedure is desirable esthetics and minimum post-operative discomfort to the patient as the donor site heals by primary intention.
Connective tissue graft using the “envelope” technique
The connective tissue graft can also be placed using this technique. Following is the clinical procedure for envelop technique,
- An internal bevel incision is placed along the gingival margin to eliminate the sulcular epithelium.
- Now, an envelope is prepared around this incision in the gingiva both in the apical and lateral direction, extending 3-5 mm. In the apical direction, the preparation should extend beyond the mucogingival junction so that placement of the connective tissue graft is facilitated.
- A connective tissue graft is harvested from the palate by “trap door” technique in the same way as described previously in the sub-epithelial connective tissue graft.
- The harvested graft is now placed in the prepared envelope in such a way that the recession is completely covered.
- Sutures are placed to ……… Contents available in the book ……… Contents available in the book ……… Contents available in the book ……… Contents available in the book ………
- With the help of a moist gauze, the pressure is applied for 5 minutes to adapt the graft closely to the root surface and covering soft tissue.
- The area is then covered with the help of periodontal dressing.
Pouch and tunnel technique:
The survival of the graft depends on its stability and presence of abundant blood supply. Root coverage is especially difficult to achieve in areas with multiple recession. Zabalegui et al. (1999) 63 treated multiple gingival recessions by creating a tunnel under the areas of gingival recession to receive the connective tissue graft, thus avoiding dissecting the inter-mediate papilla and improving blood supply to the flap.
The main aim of the pouch and tunnel technique is to minimize the incisions and maximize the blood supply to the graft. In this technique, the sub-epithelial donor connective tissue is placed into the pouches beneath the papillary tunnel which allows intimate contact of the donor tissue to the recipient site, thus ensuring an abundant blood supply to the graft. Following is the description of the clinical technique for pouch and tunnel procedure,
- After preparing the patient for the surgery, local anesthesia is administered to achieve profound anesthesia.
- With the help of # 15c or 12d blade, a sulcular incision is made around teeth adjacent to the recession. The incision separates the junctional epithelium and connective tissue attachment from the root surface.
- With the help of small curette, a tunnel is prepared beneath the papilla without injuring the interdental papilla.
- Using #15c blade a split-thickness pouch is now created which is extended 10-12 mm apical to the recession extending beyond the mucogingival junction and 6-8 mm mesial and distal to the denuded root surface.
- After preparation of the tunnel and ……… Contents available in the book ……… Contents available in the book ……… Contents available in the book ……… Contents available in the book ………
- The harvested graft is now pushed into the tunnel and is stabilized in the pouch made for the graft. The graft is sutured in place by using fine sutures.
- The flap is now positioned at the CEJ to completely cover the recession. The flap is now stabilized in this position by placing holding sutures which engage the underlying periosteum.
- Moderate pressure with sterile gauze dampened with saline is applied for five minutes to control bleeding and to achieve intimate contact of the graft with recipient bed.
- The operated area is now covered with a periodontal dressing.
- Periodontal dressing and sutures are removed after 7 days.
- One major advantage of this procedure is the establishment of thicker gingival margins after healing. The thicker gingival margin is more stable to allow for the possibility of “creeping reattachment” of the gingival margin.
Additive treatment
Using barrier membrane (GTR):
The goal of guided tissue regeneration-based root coverage is to repair the gingival recession via new attachment formation. The new connective tissue attachment is accompanied by the regeneration of new cementum and bone. Piniprato et al. (1995) 64 showed more gain of keratinized gingiva in GTR if a longer healing period was allowed and the results obtained were constant and comparable to other techniques. The clinical procedure for root coverage using guided tissue regeneration is as follows,
- After achieving profound anesthesia, the denuded root surface is thoroughly scaled.
- A full-thickness trapezoidal flap is prepared by giving a horizontal crevicular incision extending from the mid-facial surfaces of the adjacent teeth.
- Subsequently, vertical incisions are placed from the mid-facial surfaces of the adjacent teeth extending them apically.
- The full-thickness flap is elevated 3-4 mm apical to the crest of osseous dehiscence; partial-thickness flap is prepared thereafter.
- The surgical site is degranulated.
- The GTR membrane is bent in a tent-like fashion with a suture and placed over the denuded root surface.
- A sling suture is used to stabilize the membrane against the root surface.
- The flap is displaced coronally until the flap covers the membrane completely, so as to avoid the exposure of the membrane and sutured using a sling suture.
- Interrupted sutures are placed to stabilize the flap in a coronally advanced position.
- The area is protected with periodontal dressing which is removed after 7-10 days.
Various studies on recession defect coverage have utilized the principles of GTR and employed either bioabsorbable 65-84 or non-resorbable 85-93 membranes. Bio-absorbable membrane studies show mean defect coverage ranging from 45% to 94% with a mean of 72% for all the studies. Whereas, for non-resorbable ……… Contents available in the book ……… Contents available in the book ……… Contents available in the book ……… Contents available in the book ………
Factors influencing the degree of root coverage
The outcome of a root coverage procedure depends on many factors which can be divided into three categories: the patient-related factors, the recession site-related factors and the technique-related factors.
Patient-related factors:
Patient’s oral hygiene status is an important factor which influences the outcome of a root coverage procedure. Poor oral hygiene adversely affects the outcome of a root coverage procedure 96. Faulty tooth brushing is one of the most common causes of gingival recession. The patient must be educated about the correct brushing technique ……… Contents available in the book ……… Contents available in the book ……… Contents available in the book ……… Contents available in the book ………
Recession site-related factors:
The class of recession (Miller’s classification) is the most significant factor determining the outcome of the root coverage procedure. The interdental area serves as a major source of nutrition for the grafted tissue. According to Miller’s classification system, full root coverage can be achieved in Class-I and Class-II recession cases because interdental tissue which serves as a source of blood supply, is present. In the case of Class-III and Class-IV recession, only partial root coverage can be achieved due to lack of interdental tissue.
The dimensions of the recession also have a direct relationship with the outcome of surgical therapy. Wide and deep recession have a less favorable outcome as compared to the narrow and shallow recession. In a study done by Wennstrom et al. (1996) 97, a ……… Contents available in the book ……… Contents available in the book ……… Contents available in the book ……… Contents available in the book ………
Technique-related factors:
The most important technique-related factor determining the success of the root coverage procedure is the thickness of the graft. If an inadequate thickness of the graft is taken, the results of the surgical therapy are adversely compromised. A systemic review, which included 15 studies, analyzed the thickness of the tissue flap and root coverage. It was found that for complete root coverage a critical thickness of free gingival graft was 1 mm 98. For the free gingival grafting procedure, the graft thickness of 2 mm has been recommended 99.
Also, the final positioning of the flap margin plays an important role in root coverage. It was demonstrated in one study that for complete root coverage in the treatment of Miller’s Class I recessions with a coronally advanced flap procedure, the flap margin has to be positioned at least 2 mm coronal to the CEJ 100.
Tension in the flap in the coronally advanced flap also negatively affects the outcome of the procedure. Pini Prato et al. (2000) 101 in one study investigated the effects of residual tension in the final outcome of the root coverage procedure. The degree of root coverage was investigated in cases where the coronally advanced flap was done for ……… Contents available in the book ……… Contents available in the book ……… Contents available in the book ……… Contents available in the book ………
Conclusion
In this chapter, we discussed the etiology, diagnosis, classification, prognosis and surgical treatment of various mucogingival problems. There are various factors which govern the success of a periodontal esthetic surgery, most important of which are the correct diagnosis and gentle manipulation of the soft tissue during the surgery. The autogenous grafts harvested from the palatal area still remain the gold standard for free-gingival grafting procedures because none of the available allograft materials can be considered as a true substitute for autogenous tissue grafts. Further research is required to improve the techniques used in periodontal esthetic procedures as well as to reduce patient morbidity associated with the procedure.
References
References are available in the hard-copy of the website.
Periobasics: A Textbook of Periodontics and Implantology
The book is usually delivered within one week anywhere in India and within three weeks anywhere throughout the world.
India Users:
International Users:
Suggested reading
-
Zuhr O, Hürzeler M, Hürzeler B, Rebele S, Wandrey SO. Plastic-esthetic periodontal and implant surgery: a microsurgical approach. London: Quintessence; 2012.