Introduction to sutures
The primary objective of suturing is to position and secure surgical flaps to promote optimal healing (primary healing). In other words, we can say that the flaps are immobilized to stabilize the wound. Suturing reduces post-operative pain and increases patient comfort. It also reduces the chances of infection in deeper tissues, like bone. Suturing has been done for centuries and presently there are many suture materials available for this purpose. Adequate wound care and a perfect suture approximation are extremely important for achieving good results following periodontal esthetic surgeries and regenerative procedures 23. For various surgical procedures such as periodontal plastic, cosmetic, and reconstructive procedures, selection of appropriate suturing technique, thread type, thread diameter and surgical needle is of paramount importance.
History of sutures
The closing of wounds with the help of needle and thread has been practiced by mankind for several thousand years. The earliest reported sutures belong to ancient Egypt (3000 BC). Eyed needles were invented somewhere between 50,000 and 30,000 BC. By 20,000 BC, bone needles were the gold standard unsurpassed until the Renaissance 24. East African tribes used to ligate blood vessels with the help of tendons and suture the wounds using acacia thorns. North American Indians used cautery. Indian physician Sushruta, around 500 BC described in detail wound suturing and suture materials.
Roman physician Galen in 2nd century described gut sutures. The so-called ‘catgut’ was manufactured during the 10th century by harvesting it from sheep intestines. Historically, various suture materials have been used, including those derived from plant materials (flax, hemp and cotton) or animal materials (hair, tendons, arteries, muscle strips and nerves, silk, and catgut). Till 1930, catgut was the staple absorbable suture material and silk and ……. Contents available in the book ……. Contents available in the book ……. Contents available in the book ……. Contents available in the book …….
Periobasics: A Textbook of Periodontics and Implantology
The book is usually delivered within one week anywhere in India and within three weeks anywhere throughout the world.
India Users:
International Users:
Surgical needle
Surgical needles are produced from stainless steel alloys, which have excellent resistance to corrosion. The stainless steel used to make needles contain a minimum of 12% chromium, which results in the formation of a thin layer of chromium oxide on its surface when exposed to oxygen. The high nickel content in the metal provides high strength, making it resistant to bending and breakage.
Ideal properties of a surgical needle:
1. It should be made up of high-quality stainless steel, possessing high resistance to bending and breakage.
2. It should be sterile and corrosion resistant.
3. It should have a diameter as small as possible.
4. It should provide a stable grasp in the needle holder.
5. It should be capable of implanting suture material through the tissue with minimal trauma.
6. It should be sharp enough to enter the tissue with minimum resistance.
Anatomy of surgical needle:
The surgical needle is composed of three components: swage, body, and point.

Swage:
It is the suture material attachment to a needle which makes a single, continuous unit of suture material and needle. The primary function of swage is to provide a smooth transition from needle to suture thread. Swaged needle is also referred to as eyeless needle because it does not have a hole at the suture side of the needle as seen in eyed needle.
Body:
Most part of the surgical needle is made up of the body. The body of the needle is the part where it interacts with a needle holder. The needle holder pushes the needle into the tissue by putting force on the body of the needle. Various properties of the needle which affect its interaction with the needle holder include needle ……. Contents available in the book ……. Contents available in the book ……. Contents available in the book ……. Contents available in the book …….
Point:
It is the portion of the needle that extends from the tip to the maximum cross-section of the body.
Classification of surgical needles
Surgical needles can be classified on the basis of curvature or their cutting edges as,
Based on curvature:
Surgical needles vary in their curvature and are described as the proportion of a circle completed. Commonly used needles for general surgical procedures are with 1/4, 3/8, 1/2 and 5/8 curvatures (Figure 59.9). For dental surgical procedures, most commonly used needles are 3/8 and 1/2 circle needles 25, 26. The 3/8 needle can be easily passed from buccal to lingual surface in one motion by rotating the needle in a single rotation along the central axis. 1/2 circle needles are used in restricted areas such as posterior areas around molars and mandibular incisors. This needle is commonly used for mucogingival surgeries 25, 27, 28.

Based on cutting edges:
On the basis of the presence or absence of cutting edges, the needle can be classified into the following types,
- Conventional cutting needle.
- Reverse cutting needle.
- Taper point needles.
- Taper cut surgical needles.
- Blunt point needles.
Conventional cutting needle:
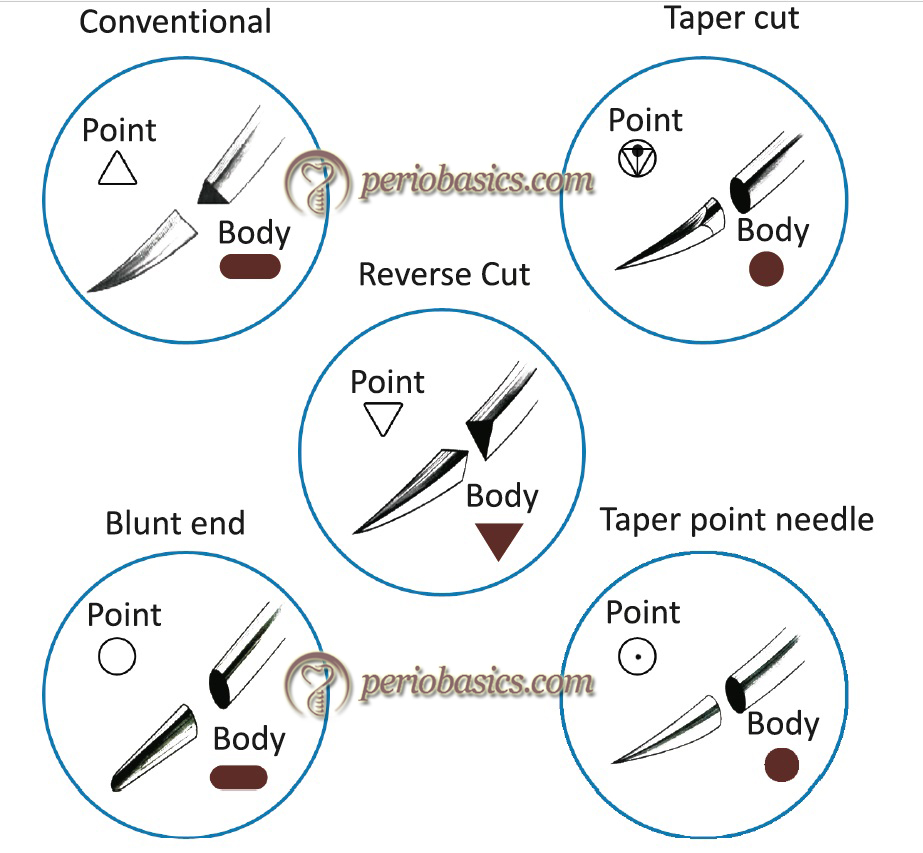
It is triangular in cross-section with three cutting edges and flattened body. The third cutting edge of the needle is present on the concave side of needle curvature. The problem associated with this needle is that it can ‘cut-out’ of the tissue. This is because inner cutting edge of the needle cuts toward the edges of the wound. This needle is commonly used during periodontal flap surgeries.
Reverse cutting needle:
It is also triangular in cross-section with the third cutting edge on the convex side of the needle curvature in contrast to the conventional cutting needle where the third cutting edge is on the concave side of needle curvature. The main advantage of this design is that it reduces the chances of ‘cut-out’. Also, this configuration provides the needle with greater strength. After needle insertion, the hole created in the tissue provides a wide wall of tissue for the suture to be tied against. This is the most commonly used needle for periodontal surgical procedures, especially in periodontal esthetic surgeries.
Taper point needles:
These are also called as round needles. The needle has a round body and the point tapers into a sharp tip. It pierces and spreads the tissue without cutting it. This needle is commonly used during periodontal flap surgeries.
Taper cut surgical needle:
This needle has combined features of a taper point and a reverse cutting needle. The three cutting edges of the needle point extend 0.8 mm back from the tip and merge into a round taper body. It is primarily used to suture dense and tough tissues and is not commonly used in periodontal surgeries.
Blunt point needles:
These needles have a rounded, blunt point rather than a sharp tip. It dissects friable tissue rather than cutting it and is rarely used for periodontal surgical procedures.
Suture materials
Presently, a variety of suturing materials is available. The ideal properties of a suture material include good tensile strength, tissue biocompatibility, ease of tying and minimal chances of knot slippage. The clinician should select the specific suture thread and diameter based on the type of surgical procedure to be done. Surgical sutures are available in a number of sizes based on the diameter of the thread. Suture sizes are defined by the ……. Contents available in the book ……. Contents available in the book ……. Contents available in the book ……. Contents available in the book …….
Classification of suture materials
Sutures can be classified in three different ways,
On the basis of origin
- Natural.
- Synthetic.
On the basis of their absorbability
- Absorbable.
- Non-absorbable.
On the basis of number of threads in suture thread
- Monofilament.
- Braided.
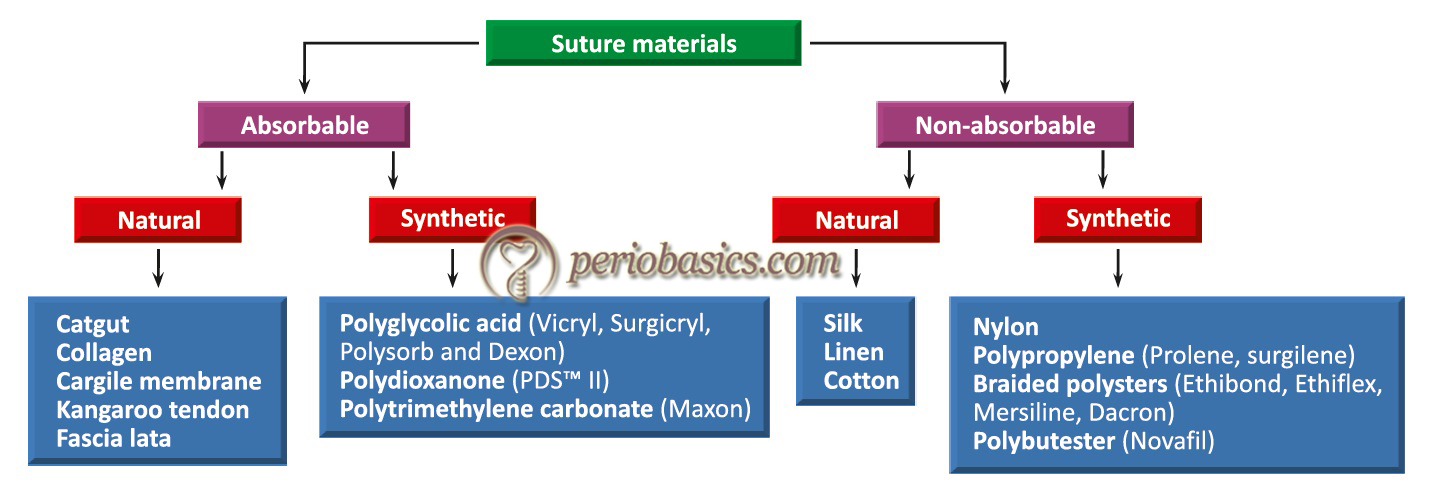
Most commonly used classification for suture materials is, on the basis of their absorbability i.e. absorbable and non-absorbable. Non-absorbable sutures are made up of inert materials which cause a minimal reaction when placed in the tissue. These have to be removed after the initial healing, usually within 7-10 days. The absorbable sutures are absorbed either by digestion or hydrolysis. The digestion of suture materials takes place by enzymes secreted from PMN’s, whereas hydrolysis of suture takes place in the presence of water which causes the breakdown of suture material.
General principles of suturing
The needle should be grasped at approximately one-third the distance from the eye and two-thirds from the point.
- The needle should enter the tissues perpendicular to the tissue surface and no less than 2-3 mm from the incision.
- The needle should be passed through the tissues along its curvature.
- The suture should be passed at an equal depth and distance from the incision on both sides.
- The needle always passes from the thinner tissue to the thicker tissue.
- Suture, whenever possible, should be placed from movable to immovable tissue.
- While doing suturing involving interdental papillae, the suture should pass below the imaginary line formed by the base of the triangles formed by these interdental papillae.
- The sutures should be tied only to approximate the tissues, not to blanch.
- The knot should never lie on the incision line.
- Sutures should be placed at a greater depth than the distance from the incision, so as to evert the wound margins.
- Use the least amount of sutures that will secure the wound. Excessive suturing causes needless perforation of the tissue and hampers the blood supply of healing wound.
- Use as few knots as possible because they are the weakest part of the suture and at the same time act as irritants.
- Use the smallest suture possible to close the wound.
- Sutures should be removed 7-10 days post-operatively to prevent the formation of epithelial tracks.
Various periodontal suturing techniques
Suturing techniques used during periodontal surgical procedures can be broadly classified as interrupted suturing and continuous suturing. An interrupted suture technique is ……. Contents available in the book ……. Contents available in the book ……. Contents available in the book ……. Contents available in the book …….
Interrupted sutures
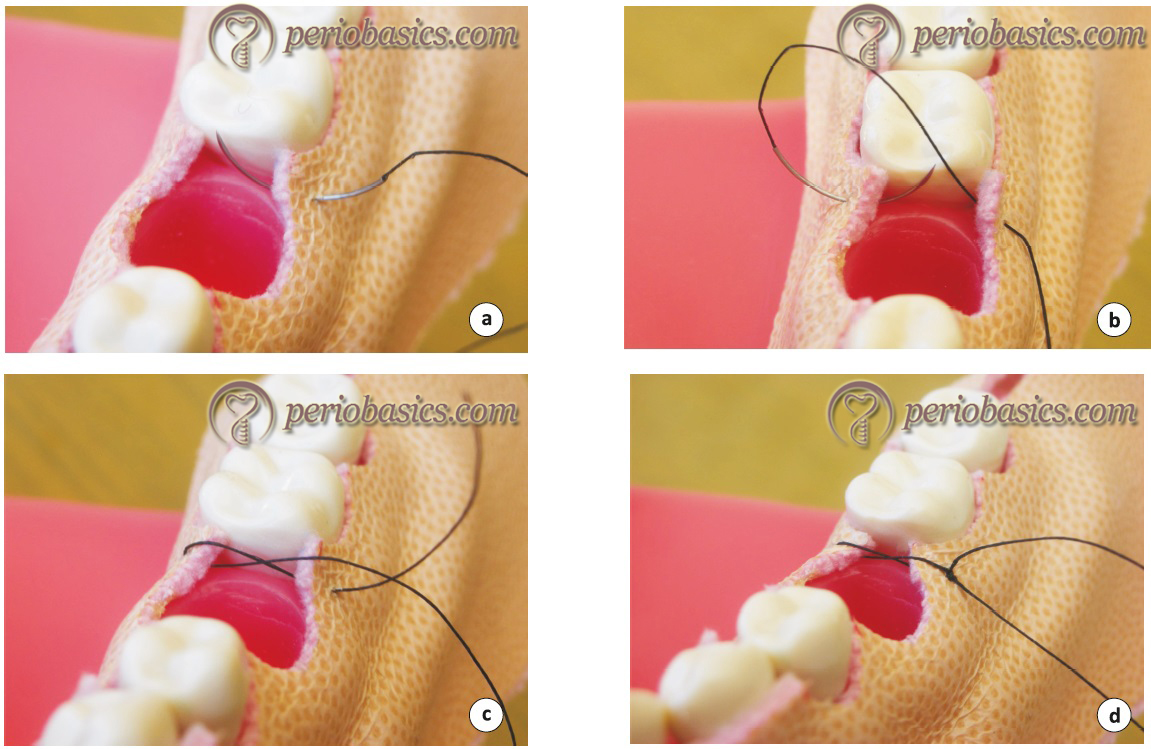
Simple-loop (interrupted) suture technique:
This is the most commonly used suturing technique used to stabilize elevated flaps and to stabilize tissue along the incision line. The technique of suturing is as follow
- The needle is stabilized in a needle holder and the outer surface of the buccal flap is pierced keeping the needle perpendicular to the surface.
- The needle is pushed along its curvature, moving it towards the lingual flap and piercing the inner aspect of the lingual flap.
- Once the needle and suture thread are out from lingual flap, the needle is passed below the contact area to bring the suture thread on the buccal aspect.
- The free ends of the suture are tied and the suture thread is cut off, leaving 2-3 mm of suture material.

Figure-eight (interrupted) suture technique:
This is also a commonly used suturing technique used in periodontal surgical procedures. Their indications are similar to that of simple loop technique. The main advantage of this technique is that it is easy to perform. The disadvantage of this technique is that the suture remains in between the flaps, thereby preventing ideal approximation of the flap edges. The technique of suturing is as follows,
- After stabilizing the needle in a needle holder, the outer surface of the buccal flap is pierced.
- The needle is pushed along its curvature to bring it on the lingual aspect and without piercing the lingual flap the thread is brought to the lingual aspect below the contact area.
- Then the outer surface of the lingual flap is pierced and the needle is passed below the contact area to bring it on the buccal aspect.
- The free ends of the suture thread are tied and cut off, leaving 2-3 mm of suture material.
Vertical-mattress (interrupted) suture technique:
This suturing technique facilitates precise adaptation of interdental papillae and is frequently used in conjunction with periosteal sutures. It is also very useful for appropriate tissue approximation in GTR and other regenerative procedures. The technique of suturing is as follows,
- The needle is inserted on the outer surface of the buccal flap just above the mucogingival junction. Then it is pushed towards bone to engage the periosteum. It should be noted that periosteum has not been reflected with the flap.
- When moved along its curvature, the needle should come out from the center of the papilla 2 to 3 mm from the flap edge.
- The needle is then passed through the contact area and suture thread comes on the lingual aspect.
- The needle engages the lingual flap in the same way as it engaged the buccal flap starting from the center of the lingual papilla, 2-3 mm from the edge of the flap.
- The needle is then passed through the contact area to reach the buccal aspect where knots are placed and the suture is cut off leaving 2-3 mm of the suture material.

Horizontal-mattress (interrupted) suture technique:
Technique 1:
This type of suture is placed primarily to resist flap tension caused by muscle pull and soft-tissue contraction, providing stability to the healing wound. It is placed away from the ……. Contents available in the book ……. Contents available in the book ……. Contents available in the book ……. Contents available in the book …….
This technique is primarily used in edentulous areas. The technique of suturing is as follows,
- The needle is pierced on the outer surface of the buccal flap 3-4 mm from the flap margin.
- The needle is then brought on the lingual aspect and the internal side of the lingual flap, 3 to 4 mm from the lingual flap margin.
- The needle then pierces at a distance of around 5 mm from the second piercing in the horizontal direction.
- The needle is then brought on the buccal aspect, piercing the inner surface of the buccal flap.
- Knots are placed and excess suture is removed.
Technique 2:
In this technique is opposite to the technique 1. Here, suture thread lying over the tissue in technique 1 is placed below the tissue and vice versa. The advantage of this technique is that the suture thread crosses from buccal or lingual flap to the opposite flap over the tissue surface, thus eliminating the requirement of placing the primary suture line. The technique of suturing is as follows,
- The needle is engaged with a needle holder and the outer surface of the buccal flap is engaged 5 to 7 mm from the flap margin. The needle is moved along its curvature in a horizontal direction and a bite of 4-5 mm is taken on the buccal flap.
- The needle and suture thread are passed on the lingual aspect through contact area and a similar procedure is repeated on the lingual aspect, engaging the lingual flap.
- The needle is passed on the buccal side where knots are placed and the excess suture material is cut off.

Technique 3 (Criss-cross):
In this variant of horizontal mattress suture, the suture thread passes over to the opposite side in a criss-cross manner. The advantage of this suture is that when placed in the interdental area, it precisely controls the papilla and keeps the suture out of the healing interproximal sulcus area. Thus, it provides adequate holding of soft tissue in the interdental areas.
Sling suture:
Sling sutures are usually required when flap has to be coronally positioned. In this technique, only one flap is engaged with suture. The outer aspect of the flap is pierced at the distal end of the tooth and the needle is passed below the contact area. The suture is wrapped mesially around the tooth and the inner aspect of the same ……. Contents available in the book ……. Contents available in the book ……. Contents available in the book ……. Contents available in the book …….

Continuous suture techniques
Continuous interlocking suture technique:
This technique is used to suture long edentulous spans. It is usually utilized after the implant placement in edentulous span or during ridge augmentation or reduction surgeries. This is a quick technique for closing long horizontal or vertical incisions. The technique of suturing is as follows,
- A simple loop suture is placed at one end of the incision and only the free end of the suture thread is cut.
- Both flap margins are pierced 5 mm laterally from the simple loop.
- An interlock is made by threading the needle under the last horizontal span.
- The locking pattern is followed in increments of 5 mm from the last locking segment and the entire span is closed.
- A small loop is left on the final segment after piercing both flap margins.
- This loop is used to place a knot and the excess of the suture material is cut.
Continuous sling suture:
The continuous sling suture may be dependent or independent. When both buccal and lingual/palatal flaps are raised, this suturing method is referred to as dependent sling suture whereas when only one flap is elevated, the suturing is referred to as independent.
Independent sling suture:
As already stated, this technique secures only one flap and is utilized when only one flap is raised. The technique of suturing is as follows,
- A simple loop suture is placed at the mesial end of the flap and the free suture thread is cut off.
- Then suture is then slung around the tooth on the lingual side.
- Suture is then brought on the buccal aspect by passing it through the contact area.
- The buccal flap is pierced at the next papilla at 2 to 3 mm from the flap margins.
- The suturing is completed be slinging the suture around the lingual surface of all teeth until whole span is completed.
- At the distal end, a loop of the suture is left, which is used to place the second knot to finish the procedure.
Dependent sling suture:
It is placed when both buccal and lingual flaps are elevated. There are two techniques to place this suture: technique 1 where only one knot is placed and technique 2 where two knots are placed.
Technique 1 (with single knot):
In this technique suturing is started at the distal end of the flap. The technique of suturing is as follows,
- The buccal flap is engaged by piercing the suture needle at the distal-most interdental papilla of the elevated flap.
- The suture is slung around the lingual surface of the tooth and is passed through the contact area to come on the buccal aspect to engage the next mesial papilla.
- The next mesial papilla is pierced by needle 2-3 mm from the flap margin and the needle is passed through the contact area to reach lingual aspect.
- The suture is then slung around the tooth and passed from the mesial contact area to reach the buccal aspect.
- The next papilla is then engaged and the procedure is continued till the mesial-most papilla.
- It should be noted that till mesial-most papilla is reached, the lingual/palatal flap is not engaged with suture.
- At the mesial end, after engaging the buccal papilla the needle is passed through the contact area to reach the lingual aspect.
- Now, the mesial-most interdental papilla of the lingual/palatal flap is engaged and the suture is passed to the buccal aspect through the contact area.
- The suture is slung around the buccal surface of the tooth and is brought on lingual/palatal aspect.
- The next interdental papilla is then engaged and procedure is continued till we reach the distal most end of the flap from where suturing was started.
- After engaging the last lingual/palatal interdental papilla, the suture is brought on the buccal aspect and knot is placed to complete the suturing.
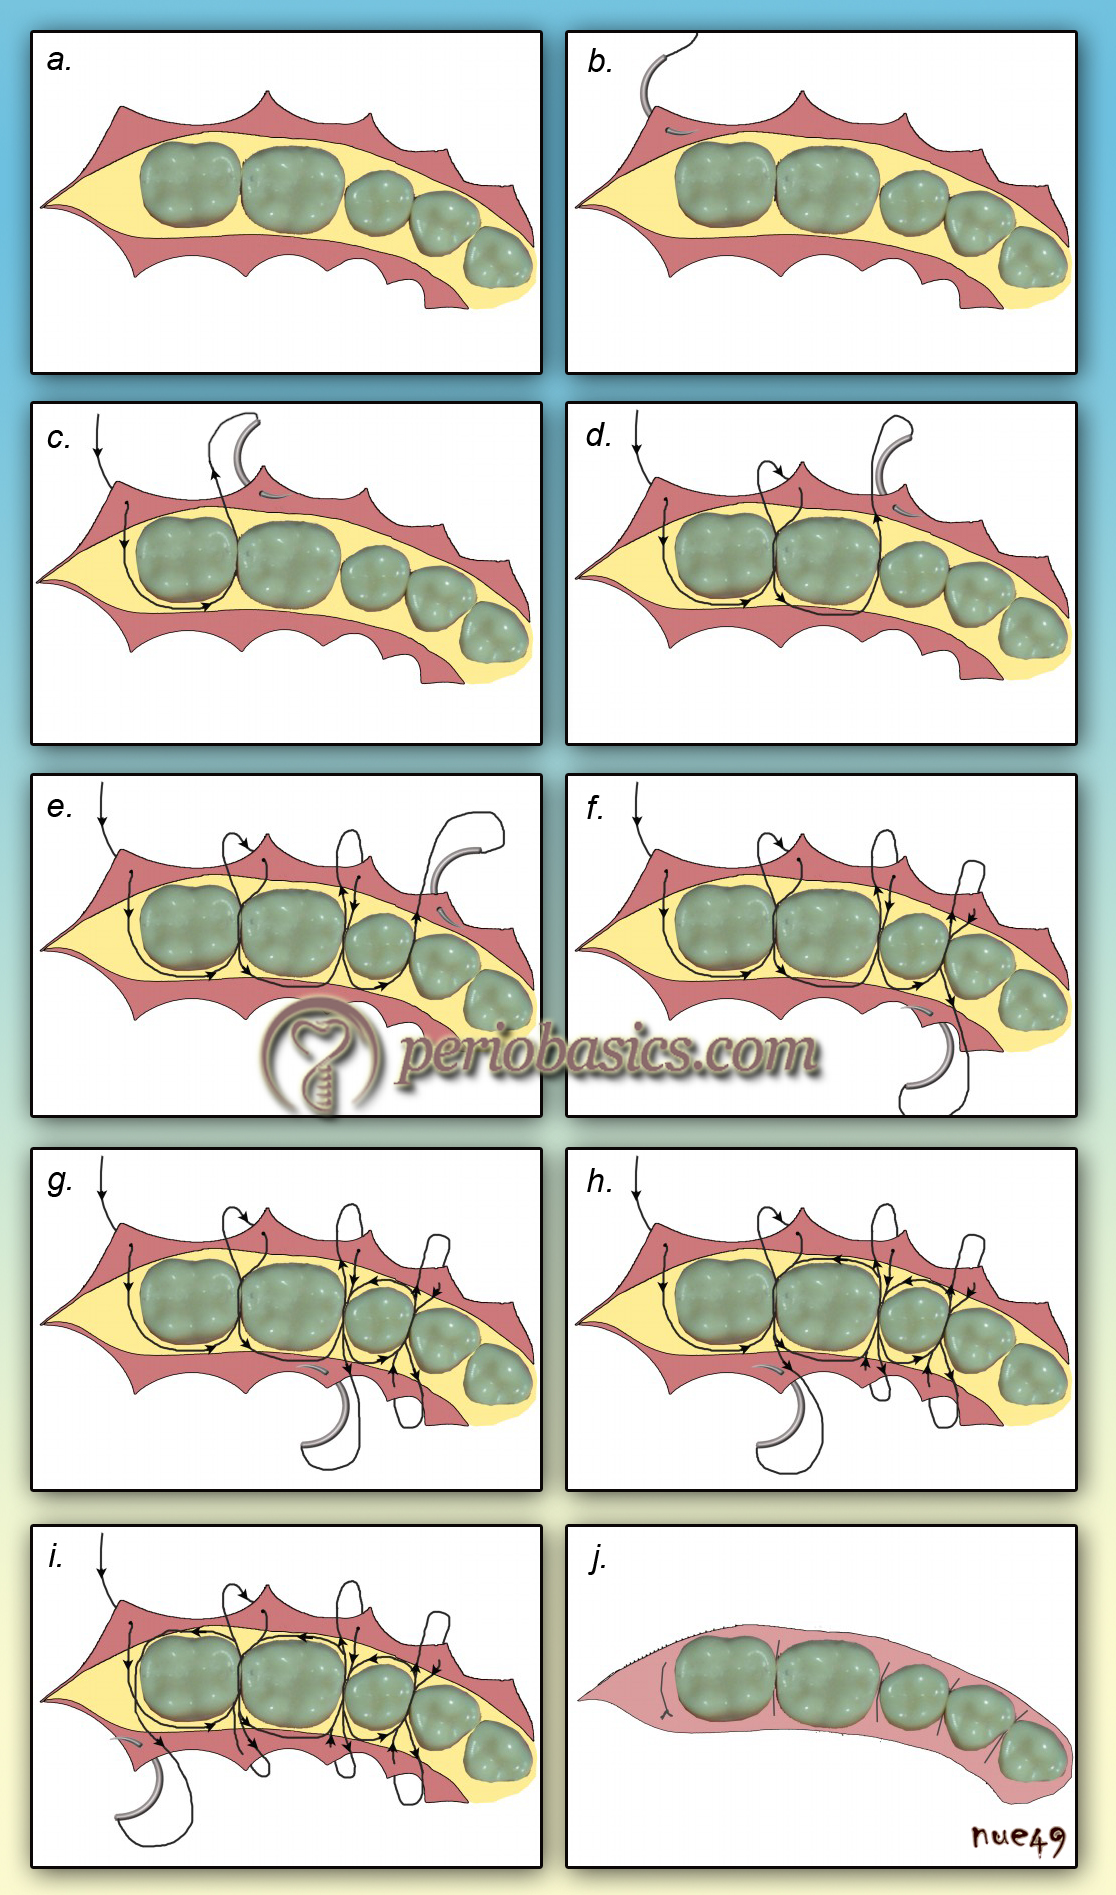
See video of the suturing technique at: “Continuous sling suture”
Technique 2 (two-knot technique):
In this technique, one knot is placed at one end of the entire span and another knot on the other end. The technique of suturing is as follows,
- A simple loop suture is placed at the distal most interdental papilla, the suture is tied off and remaining free end is cut.
- The needle is then passed to the lingual/palatal aspect through the same interdental area and is slung around the lingual surface of the tooth.
- The needle is brought to the next interdental area by passing it through the contact and the next buccal interdental papilla is engaged.
- The needle is then passed through the same contact area and lingual papilla is pierced on the inner surface.
- The needle is then passed under the contact area and is wrapped around the tooth to reach next lingual interdental area.
- The lingual interdental papilla is pierced on the inner aspect and suture is brought on the buccal aspect.
- The buccal interdental papilla is pierced on the buccal surface and suture is wrapped around the tooth to reach next buccal interdental area.
It should be noted that in this technique both lingual/palatal and buccal flaps are simultaneously engaged unlike technique 1 where the - buccal flap is engaged first followed by lingual/palatal flap.
- In the last interdental area, a loop is left to place a knot. After tying the suture the excess suture material is cut off.
Continuous horizontal-mattress suture technique:
It is primarily applied to suture edentulous areas. The procedure is as follows,
- A simple loop suture is placed at the distal end of the span and free end of the suture is cut off.
- Both the flaps are pierced at 5 mm from the initial simple loop.
- Continue the piercings in increments of 5 mm, alternating between buccal and lingual flaps.
- At the mesial end of the span, after piercing both the flaps a small loop is left for placing a knot.
- The knot is placed and the excess suture material is cut off, leaving 2-3 mm.
Continuous vertical-mattress suture technique
This suturing technique is indicated during resective procedures where the flap has to be positioned apically to prevent re-formation of periodontal pockets. It is also frequently used during the crown lengthening procedure. The procedure is as follows,
- An interrupted vertical mattresses suture is placed at the mesial or distal end of the span and free suture end is cut off.
- The suture is then passed through the same interdental area and is wrapped around the lingual tooth surface to reach next buccal interdental area.
- A vertical mattresses suture is placed on the buccal aspect in the next interdental area and the needle is passed on the lingual aspect to place a vertical mattresses suture.
- The needle is then passed on the buccal aspect and is wrapped around the tooth to reach the lingual aspect of the next interdental area.
- A vertical mattresses suture is placed and a needle is passed to the buccal aspect where again a vertical mattresses suture is placed.
- The needle is wrapped around the tooth to reach the next buccal interdental area and procedure is continued for the whole span.
- In the final segment, a loop is left, which is used to tie a knot and finish the suturing.
Advantages of continuous suture:
1. It allows as many teeth as required to be involved in suturing.
2. Minimizes placement of knots.
3. Teeth are used to anchor the flap allowing better adaptation of flaps in the interdental area.
4. The tension on the flap is equally distributed along the whole span.
5. Buccal or lingual/palatal flaps may be independently engaged.
6. Requires less time for both placement and removal.
Disadvantages of continuous suture:
The main disadvantage of the continuous suture is that if the knot loosens or threads breaks, a portion or the entire flap may loosen, exposing bone, implants, grafts, etc. Hence, the knots should be re-checked before cutting the suture thread to ensure its stability.
Special sutures
Periosteal suture:
The periosteal suturing ……. Contents available in the book ……. Contents available in the book ……. Contents available in the book ……. Contents available in the book …….
For placing these sutures, there are some pre-requisites,
- Good access to the surgical site.
- A partial-thickness flap dissection is required to place these sutures because the sutures are placed in intact periosteum on the bone surface.
- The periosteal bed should be well fixed to the underlying bone and should not be easily disturbed by manipulation of the external flap or the vestibular attachments.
- The shape and dimensions of the needle should allow manipulation of the extremely delicate tissues with minimum trauma.
- The procedure of suture placement is similar to simple loop suture where the needle is pierced into the tissue to engage the periosteal layer and the flap is stabilized.
Suture knots
Surgical knot tying is an important component of the art of suturing. There are primarily four types of knots used,
Square knot: Two single ties in opposite direction
Granny’s knot: Two or three ties in the same direction.
Surgeon’s knot 2-1: Two ties in one direction and third in the opposite.
Surgeon’s knot 2-2: Two tie in one direction and two in opposite direction.
Principles of suture removal
Sutures are removed 7-10 days post-operatively. The area should be first irrigated with normal saline to remove gross debris. A swab containing normal saline should be used to clean the area to remove encrusted necrotic debris and blood. A sharp suture scissor should be used to remove the sutures. The suture material should be cut as close as possible to the tissue because it will prevent the suture material, which was exposed to the oral environment and has been laden with bacteria, from passing through tissue while suture removal. Sutures can be then pulled out with the help of a cotton plier. The knots should be removed first so that their accidental entrapment into the tissue can be prevented.
Complications following suturing
- If the suture is loosened the primary objective of suturing; healing by primary intention is compromised.
- The opening of the incision line (dehiscence of the wound) due to suture loosening may increase chances of infection.
- In the case of braided sutures, because of the “wicking‐ effect”, there can be spread of infection all along the suture line.
- If the suture material is left in situ for longer periods than 3 weeks, the epithelial cells migrate down the suture pathway leading to epithelial inclusion cyst or “railroad track” scar.
- If the non‐resorbable sutures like silk, are left in place for a longer duration the lead to abscess formation known as “stitch abscess”.
Conclusion
Suture materials and suturing techniques should be carefully selected for a particular case. It has been observed that inappropriate suturing may adversely hamper the healing process. All the principles of suturing should be followed during suture placement. In the above discussion we read about various suture materials, suturing needles and suturing techniques. In the next article we shall read about the “Periodontal dressing” materials.
References
References are available in the hard-copy of the website.
Periobasics: A Textbook of Periodontics and Implantology
The book is usually delivered within one week anywhere in India and within three weeks anywhere throughout the world.

