Introduction to asepsis and disinfection
Sterilization and disinfection are the cornerstones of any surgical procedure. Before performing a periodontal surgical procedure, the standard protocol to sterilize and disinfect the instrument and equipment should be adhered strictly. There are many items in a dental office that are used during dental surgical procedures. Many od them can be sterilized, many others cannot be sterilized, so these should be properly disinfected. In the following discussion, we shall read about the sterilizations and disinfection procedure in detail.
Serialization and disinfection of instruments and clinical items
Sterilization and disinfection of the instruments is a funda-mental step for any surgical procedure. The instruments and clinical items which are involved during surgical procedures have been divided into three categories by the Centers for Disease Control and Prevention (CDC) 2003 as 11,
Critical items.
Semi-critical items.
Non-critical items.
Critical items:
Those instruments/items which are used to penetrate soft tissue or bone during the surgical procedure are included in critical items category. These carry a higher risk of disease transmission and must be sterilized before the surgical procedure.
Semi-critical items:
These are the instruments/items which come in contact with the mucous membrane but are not used to penetrate soft tissues or contact bone. The instruments in this category include mouth mirror and instruments used for restoration of teeth. Although the risk of disease transmission is intermediate with these instruments, these must …….. Contents available in the book …….. Contents available in the book …….. Contents available in the book …….. Contents available in the book ……..
Periobasics: A Textbook of Periodontics and Implantology
The book is usually delivered within one week anywhere in India and within three weeks anywhere throughout the world.
India Users:
International Users:
Non-critical items:
These are the items that come in contact with the intact skin only, such as the dental chair. These carry a low risk of disease transmission and intermediate-level disinfection should be used to disinfect these items before and after the surgical procedure to minimize the risk of disease transmission.
| Dental instrument categories according to CDC. | ||
|---|---|---|
| Category | Requirement | Examples |
| Critical | Sterilization required | Needle, scalpels, surgical instruments, sutures etc. |
| Semi-Critical | Sterilization required | Mouth mirrors, amalgam condensers, handpieces etc. |
| Non-Critical | Tuberculocidal intermediate-level disinfection | Counter tops, articulators, light handles etc. |
For the ease of understanding, the basic sterilization and disinfection procedures followed during periodontal surgical treatment can be discussed under the following headings,
1. Sterilization of instruments.
2. Sterilization of handpieces.
3. Dental chair disinfection.
4. Waterlines asepsis.
5. Suction / Evacuation system asepsis.
Sterilization of the instruments
Sterilization is the removal of all microorganisms and their spores and other pathogens from an object or surface by treating it with chemicals or subjecting it to high heat or radiation. All the instruments used during the surgical procedure should be sterilized adequately before every surgical procedure. There are various methods used for sterilization of instruments including,
High temperature/pressure sterilization (autoclave).
Chemical sterilization.
Radiation sterilization.
| Various sterilization techniques. | ||
|---|---|---|
| Technique | Commonly used method | Other methods |
| High Temperature/Pressure | Steam Autoclave | Dry heat oven |
| Chemical | Ethylene oxide gas Low-temperature hydrogen peroxide plasma (Sterrad®) Steris System 1® Cidex® OPA solution | Glutaraldehyde (Cidex Plus®, Nu Cidex®) VHP® MD Series Chlorine Dioxide Ozone |
| Radiation | γ radiation | Electron Beam (E-Beam) X-ray |
High temperature/pressure sterilization
All the critical and semi-critical items used during periodontal surgery, which can withstand steam/chemical vapor under pressure or dry heat should be sterilized using these techniques.
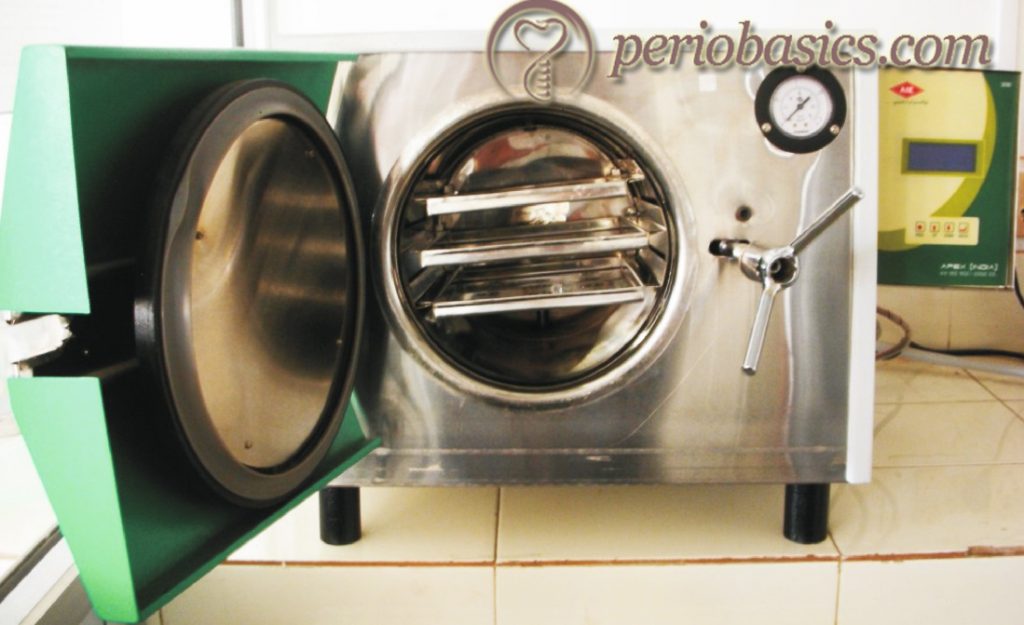
Steam autoclave:
The most common method used for sterilization is the application of steam under pressure. Steam in itself is inadequate for sterilization, therefore, a pressure greater than atmospheric pressure is necessary to increase the temperature of steam for the thermal destruction of microbial life. The mechanism of action of steam under pressure is by the denaturation and coagulation of proteins or the enzyme-protein system within the cells. Steam should reach the microorganisms to effectively kill them. Therefore, packaging used to store the instrument should allow passage of steam. A complete sterilization can be achieved by direct exposure to saturated steam at 121⁰ C for 20 minutes at 15 psi atmospheric pressure. Appropriate indicators must be used each time to make sure that complete sterilization has been accomplished. The sterilization time varies with the variations in temperature and pressure of the steam.
| Sterilization cycles for steam and dry heat sterilization. | |||
|---|---|---|---|
| Sterilization type | Temperature | Pressure | Time |
| Steam autoclave | 121°C | 15 psi | 20 minutes |
| Steam autoclave | 132°C | 30 psi | 10 minutes |
| Chemical vapor autoclave | 132°C | 20 - 40 psi | 20 minutes |
| Dry Heat | 170°C | - | 60 minutes |
| Dry Heat | 190°C | - | 12 minutes |
| Dry Heat | 121°C | - | 12 hours |
| Dry Heat | 150°C | - | 150 minutes |
| Dry Heat | 160°C | - | 120 minutes |
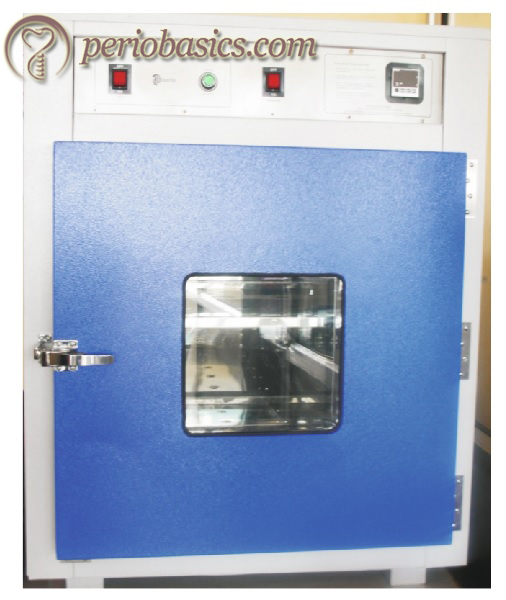
Dry heat:
In this method of sterilization, items are kept at 160-170°C for a minimum of two hours. Due to its high temperatures, its applicable use is limited. The sterilization time varies at different temperatures during dry heat sterilization.
Know More…
Biological indicators (BI’s) used to ensure sterilization:
Although, modern autoclaves have gauges or displays which indicate sterilization cycle time, temperature and pressure, the most authentic method to confirm complete sterilization is by the BI’s. The BI’s are used to ensure that complete sterilization has been achieved after the recommended sterilization cycle is complete. BI’s contain the bacterial spores of some of the most resistant bacteria: Geobacillus stearothermo-philus (for testing steam or chemical vapor sterilization) or Bacillus subtilis (for testing dry heat or ethylene oxide gas sterilization). Because these bacterial spores are more resistant than other bacterial spores and are present in larger numbers than common microbial contaminants found on patient care equipments, an inactivated BI indicates that other potential pathogens in the load have also been killed. Presently, these are used in two ways,
Spore strips: These are one-inch paper strips containing one or both types of monitoring spores. One control and one test strip are selected from the same lot. The test strip should be placed in the autoclave following the instruction of the manufacturer. After the sterilization cycle is complete, the test strip is aseptically removed from the autoclave and is taken out from its envelope. Then both test and control strips are placed in a tube of the appropriate Tryptic-soy broth medium that in turn is incubated for two to seven days at 55°C/131°F (for G. stearothermophilus) or at 37°C/98.6°F (for B. subtilis). If live bacteria are still present in the test strip, they will grow and produce cloudiness and/or change the color of the growth medium. Thus, a successful sterilization cycle is indicated by cloudiness and/or change in the color of control strip growth medium and no cloudiness and/or change in the color in the test strip growth medium. Cloudiness and/or change in the color of test and well as control growth mediums indicate incomplete sterilization. Lack of cloudiness and/or change in the color in both test and control media indicates that strips lack viable spore and that the lot is outdated.
Self-contained vial: Some manufacturers provide self-contained vials containing both a spore strip/disk and an ampule filled with growth medium. The plastic vial contains a vented cap to permit entrance of the sterilizing agent into the vial. The vial is placed in the autoclave as instructed by the manufacturer and after the sterilization cycle is complete, it is taken out and either the vial is squeezed or the cap is pushed down to break the internal ampule. It causes mixing of the growth medium with the sores. The vial is then placed in an incubator for two to seven days at 55°C/131°F. A change in color of the growth medium indicates sterilization failure.
The correct functioning of sterilization cycles should be verified for each sterilizer by the periodic (at least weekly) use of BI’s.
Chemical sterilization
Ethylene oxide gas:
Ethylene oxide can be used to sterilize items that are heat or moisture sensitive. It kills microorganisms, including spores, but the sterilization time is longer than steam sterilization and ranges from 16-18 hours for a complete cycle. Temperatures reached during sterilization are usually in the range of 50-60°C. Because ethylene oxide is highly inflammable, it is used in the explosion-proof sterilizing chamber in a controlled environment.
Low-temperature hydrogen peroxide plasma (Sterrad®):
This system uses hydrogen peroxide plasma as the active medium for sterilization. Plasma is an ionized gas made up of ions and electrons and is distinguishable from solid, liquid, or gas. This system works at a temperature range of 45-50°C with sterilization time ranging from 45-70 minutes. H2O2 is bactericidal and is capable of inactivating resistant bacterial spores. The sterilization cycle occurs in two stages. In first stage air from the sterilization chamber is removed and a vacuum …….. Contents available in the book …….. Contents available in the book …….. Contents available in the book …….. Contents available in the book ……..
Steris System 1®:
It is another low-temperature sterilization system that uses a peracetic acid solution (Steris 20™ Sterilant) to destroy potentially dangerous microorganisms. This process is achieved at a temperature of 50-56°C. The process of sterilization is carried out with a Steris 20™ sterilant concentrate mixed with sterile water to make a solution which is introduced into sterilization chamber. The sterilization cycle is completed in 12 minutes, followed by repetitive sterile water rinses to complete the process. The total sterilization procedure is completed in 30 minutes. The bactericidal action of peracetic acid is because of the presence of the extra oxygen atom attached to acetic acid, which reacts with most cellular components to destroy cells. Items which are immersible and which cannot be sterilized by heat or moist heat application are sterilized by this method.
Cidex® OPA solution:
It is a high-level disinfectant which contains orthophthalaldehyde (OPA) as the active ingredient. It provides a high level of disinfection at room temperature (20⁰ C) in 12 minutes. The solution is particularly active against mycobacteria, including glutaraldehyde-resistant strains of M. chelonae. The item to be sterilized should be thoroughly cleaned and dried before immersion into the solution. After immersion, the item should be thoroughly rinsed with sterile water. The Cidex® OPA solution is used more commonly than Nu-Cidex® (active ingredient: peracetic acid) and Cidex Plus® (active ingredient: glutaraldehyde) solutions due to their toxic concerns.
VHP® MD Series:
It is a Vaporized Hydrogen Peroxide (VHP) sterilization system. It uses the oxidation potential of H2O2 molecules to kill microorganisms.
Ozone Gas:
It is a form of oxygen that kills microorganisms by oxidation. It penetrates membrane of the cells and causes irreversible damage to the membrane, resulting in cell death. It is an unstable gas, which can be easily generated from oxygen. It is introduced into the sterilization chamber in 6 to 12 percent concentration. Its activity can be enhanced by adding humidity. At the completion of exposure time, oxygen is allowed to flow through the chamber to purge the ozone. A complete sterilization cycle may take up to 60 minutes, depending on the size of the chamber or load.
Radiation sterilization
Sterilization can also be achieved by the application of electromagnetic radiations. Two types of radiation are used for sterilization purpose: ionizing and non-ionizing. Ionizing radiations are high energy radiations with a good penetrative power. On the other hand, non-ionizing radiations have low energy and low penetrative power.
Non-ionizing radiations:
These are radiations with a longer wavelength than visible light. For space disinfection, radiations are used with wavelength ranging from 200-280 nm, with 260 nm being most effective. UV radiations are commonly used non-ionizing radiations for space disinfection. These are generated using a high-pressure mercury vapor lamp. UV rays induce formation of thymine-thymine dimers, which ultimately inhibits DNA replication. These rays inactivate micro-organisms such as bacteria, viruses, yeast, etc. within seconds. These are not capable of killing spores, so are used only for surface disinfection.
Ionizing radiations:
There are primarily two types of electromagnetic rays utilized for the purpose of sterilization: electron beams and γ-radiation. The electron beam is made up of high-speed electrons which are produced by a linear accelerator from a heated cathode. Electron beam has a poor penetration power and can be used for the sterilization of articles like syringes, gloves and dressing packs. γ-rays are produced by nuclear disintegration of certain radioactive isotopes such as (Co 60, Cs137). These have more penetration power as compared to an electron beam, but require a longer time of exposure. These radiations damage the nucleic acids of microorganisms, thus destroying them.
Sterilization of handpieces
Handpieces should be sterilized according to the manufacturer’s instruction. However, the following steps are commonly followed during handpiece sterilization,
Air-rotor handpiece:
After use, the first step in sterilization of the handpiece is lightly washing the handpiece under cool running water to remove excess debris. The air rotor handpiece is then lubricated by applying appropriate multiflex nozzle. A paper towel is put over the handpiece head for 20 seconds to expel excess lubricant. The handpiece is then connected to multiflex connection and is activated for 30-40 seconds. Bur is removed from the chuck of the handpiece. The external surface of the handpiece is cleaned with isopropyl alcohol. The handpiece is dried thoroughly and sterilized in the autoclave at maximum of 135⁰C. It is then allowed to dry thoroughly to complete the sterilization cycle.
Scaler handpiece:
After use on the patient, scaler inserts are soaked in a container containing 70% isopropyl alcohol. Inserts are then rinsed thoroughly in warm water to remove all chemicals. These are again replaced into the scaler handpiece and operated for 10 seconds at the maximum water flow setting to flush out any retained chemicals. After roughly drying, these are packaged in proper wraps, bags, pouches, trays, or cassettes followed by steam autoclaving for appropriate duration of time. The scaler handpiece is sterilized according to the manufacturer’s instructions. Most of the handpieces can be autoclaved at temperature not exceeding 135⁰C degrees.
Dental chair disinfection
Dental chair may be a potential source of infection dissemination and should be disinfected before and after the patient’s treatment. Preferably, dental chair should be foot controlled and should allow adjustment by food paddle at any point of time during the treatment. A barrier film must be placed over the hand controls on the chair. At the conclusion of an appointment, all the surfaces of the dental chair must be wiped clean with neutral detergent and water and/or detergent wipes. The single use barrier film may be used in addition to this procedure, but must not be used instead of this procedure. The light of the dental chair should be pre-adjusted and preferably should have sensor controlled non-touching device. Only the handles of the overhead light should be touched, and these must be covered with a barrier film. In between the appointments, the light handles should be wiped clean with neutral detergent and water and/or detergent wipes and new barrier film should be placed. The chair headrests and difficult to clean areas such as triple syringe buttons should also be covered with a barrier film.
Waterlines asepsis
The maintenance of waterlines is essential to ensure optimal water quality in the dental unit. It has been shown that the level of microorganisms in untreated dental unit waterlines is greater than 500 CFU/ml, which exceeds the drinking water standard. The microbial biofilm develops in the water tubing may put the patient at a risk of getting infected. CDC (1993) recommended flushing of dental waterlines at the beginning of the clinic day to reduce the microbial load. As a general rule water and suction lines must be flushed for a minimum of 2 minutes at the start of the day and for …….. Contents available in the book …….. Contents available in the book …….. Contents available in the book …….. Contents available in the book ……..
Suction / Evacuation system asepsis
The suction/evacuation lines of the dental unit should be cleaned every day with an evacuation system cleaner to remove blood and debris. An appropriate disinfectant should be run through the tubing of the evacuation system. A small amount of disinfectant should be used to disinfect the suction lines in between the patients. The manufacturer of the dental unit should be consulted regarding a compatible disinfectant with the suction/evacuation system. Chlorine-based products should not be used for this purpose because chlorine ions can cause corrosion of metal components of the dental unit. Presently, many dental units are installed with a suction/ evacuation system which has enzymes that facilitate cleaning of debris from the tubing. Examples of these are VacuKleen E2 from Heraeus Kulzer, BioPure from BioPure Products, Sani-Treet Green from Enzyme Industries, Sultan Purevac and Pro E-Vac from Certol, Vacusol Ultra from Biotrol, SlugBuster from Ramvac, and Vac Attak from Premier. One recent advancement in suction/evacuation system asepsis is shock treatment. It helps in the removal of those deposits which are not removed by daily cleaning. The examples of these systems are Bio-Pure System Restorative from Bio-Pure Products and VacuShock from TriCom Dental Products.
Management of instruments
Proper handling of the instruments before and after the surgical procedure minimizes the risk of infection transmission to the health care providers and the patients. Every dental office should have a separate instrument re-processing area. If instrument re-processing is done in the same room where the patient has to be treated, the risk of cross-contamination is increased. The following steps are followed during processing of instruments following periodontal surgery,
Cleaning of instruments:
Once the periodontal surgery is completed, the first step in instrument re-processing is mechanical cleaning of the instruments. The mechanical cleaning of instruments using hands should be done carefully and heavy-duty (utility) gloves, mask, eyewear and gown should always be worn while cleaning. Only one instrument should be cleaned at a time to reduce the risk of puncture injury.
Ultrasonic cleaners should be utilized for removing debris from the instruments. These use sound waves outside the human hearing range, resulting in the formation of oscillating bubbles by a process called cavitation. In some ultrasonic cleaners intermittent or sweeping sound waves are used to improve the cleaning efficacy of the device. Another equipment used for instrument cleaning is thermal instrument washer. It uses water at high temperature and chemical additives (disinfectants). Use of thermal instrument washer increases the safety of dental healthcare professional handling the instruments.
Instrument examination:
Following cleaning, instruments are visually inspected for their cleanliness, replacement or removal of damaged instruments should be done. The instruments are dried before packaging. Instruments can also be placed in metal cassettes after drying.
Packaging:
The individual instrument or instrument cassette is then wrapped with wrap paper/pouches, plastic pouches, combination paper/plastic pouches or nylon tubing. These packaging materials allow penetration of heat, steam or vapor so that adequate sterilization is achieved. Instruments are then sterilized by steam autoclaving as discussed in the previous sections. The instruments remain in the packaging after sterilization and the packaging is opened just before the treatment of the patient.
Universal precautions:
Universal precautions are the standard precautions meant to reduce the risk of transmission of blood-borne and other pathogens from both recognized and unrecognized sources. These precautions are mandatory and should be followed during periodontal surgical procedures. Following are the standard precautions followed,
-
- The hand hygiene should be taken care of regularly before gloving and after glove removal;
- Personal protective barriers such as gloves, masks, eye protection and gowns should be used during the procedure.
- Protective equipment should be worn during the clinical procedure and during cleaning of the instruments.
- The re-usable items should be processed appropriately to ensure their sterilization before the next procedure.
- Aseptic non-touch techniques should be used whereever indicated.
- Respiratory hygiene and cough etiquette should be maintained.
- The linen and clinical gowns should be processed adequately in between the procedures.
- Wherever possible, environmental barriers such as plastic coverings should be used on surfaces and items that may become contaminated and are difficult to clean.
- The contaminated waste should be disposed off as directed by medical waste disposal authorities.
Conclusion
The maintenance of proper sterilization and disinfection during periodontal surgeries is the fundamental principle of periodontal surgeries. Every effort should be made to adhere to the norms laid down by international agencies to maintain an aspetic surgical protocol. Hence, a periodontist should be well versed with all the basic procedures to acheive sterilization and disinfection in the dental operatory before, during and after the periodontal surgical procedure. In the next article we shall read about the remaining principles of periodontal surgeries.
References
References are available in the hard-copy of the website.
Periobasics: A Textbook of Periodontics and Implantology
The book is usually delivered within one week anywhere in India and within three weeks anywhere throughout the world.
India Users:
International Users:
Suggested reading
- Kohn WG, Collins AS, Cleveland JL, Harte JA, Eklund KJ, Malvitz DM. Guidelines for infection control in dental health-care settings-2003.
- Miller CH. Sterilization and disinfection: what every dentist needs to know. The Journal of the American Dental Association. 1992 Mar 1;123(3):46-54.
- Gurevich I, Dubin R, Cunha BA. Dental instrument and device sterilization and disinfection practices. Journal of Hospital infection. 1996 Apr 1;32(4):295-304.
- Miller CH. Cleaning, sterilization and disinfection: basics of microbial killing for infection control. The Journal of the American Dental Association. 1993 Jan 1;124(1):48-56.
- Holland MR. A review of sterilization and disinfection in dentistry. Oral Surgery, Oral Medicine, Oral Pathology. 1955 Aug 1;8(8):788-95.
- Kwok WM, Ralph WJ. The use of chemical disinfectants in dental prosthetics. Australian dental journal. 1984 Jun;29(3):180-3.