Introduction
The periodontal flap surgeries have been practiced for more than one hundred years now, since their introduction in the early 1900’s. There have been a lot of modifications and improvisations in various periodontal surgical techniques during this period. A detailed description of the historical aspect of various flap surgeries has been given in the previous chapter. In the present discussion, we shall study in detail, the current concepts and advances in various periodontal flap surgeries.
What is a periodontal flap?
A periodontal flap is a section of gingiva and/or mucosa surgically separated from the underlying tissue to provide visibility and access to the bone and root surfaces 1. The flap also allows the gingiva to be displaced to a different location in patients with mucogingival involvement.
Objectives of periodontal flap surgeries
The main objective of periodontal flap surgical procedures is to allow access for the cleaning of the roots of teeth and the removal of the periodontal pocket lining, as well as to treat the irregularities of the alveolar bone, so that when gingiva is repositioned around the teeth, it will allow for the reduction of pockets, infections, and inflammation. After healing, the resultant architecture of the area should enhance the ease and effectiveness of self-performed oral hygiene measures by the patient. The reduction of bacterial load and inflammation minimizes further loss of tooth-supporting structures and thus aid in the better prognosis of teeth, provided, the patient stays on a strict maintenance schedule. Another important objective of periodontal flap surgery is to regenerate the lost periodontal apparatus.
Periodontal flap surgeries are also done for the establishment of ……. Contents available in the book ……….. Contents available in the book …….. Contents available in the book …….. Contents available in the book …….
Periobasics: A Textbook of Periodontics and Implantology
The book is usually delivered within one week anywhere in India and within three weeks anywhere throughout the world.
India Users:
International Users:
Indications of periodontal flap surgery
- In case of periodontitis with active pockets 5-6 mm deep or greater, that do not respond satisfactorily to the initial therapy.
- Intra-bony pockets.
- Irregular bony contours.
- Deep craters.
- Pockets around the teeth in which a complete removal of root irritants is not clinically possible without gaining complete access to the root surfaces.
- For regenerative procedures, such as bone grafting and guided tissue regeneration.
- Grade II or III furcation involvement.
- Root resection / hemisection.
- Intrabony pockets on distal areas of last molars.
- Persistent inflammation in areas with moderate to deep pockets.
- Crown lengthening procedures to expose restoration margins.
- Recurrent periodontal abscess.
- Need to visually examine the area, to make a definite diagnosis.
Contraindications of periodontal flap surgery
- Uncontrolled medical conditions such as,
- Unstable angina.
- Uncontrolled diabetes.
- Uncontrolled hypertension.
- Myocardial infarction / stroke within 6 months.
- Poor plaque control.
- Pronounced gingival overgrowth, which is handled more efficiently by means of gingivectomy / gingivoplasty.
- Unrealistic patient expectations or desires.
Incisions for periodontal surgeries
Before we go into the details of the periodontal flap surgeries, let us discuss the incisions used in surgical periodontal therapy. Incisions can be divided into two types: the horizontal and vertical incisions 7.
Horizontal incisions
The horizontal incisions are used to separate the gingiva from the root surfaces of teeth. These incisions are made in a horizontal direction and may be coronally or apically directed. The coronally directed incision is designated as external bevel incision whereas the apically directed incisions are the internal bevel and sulcular incision.
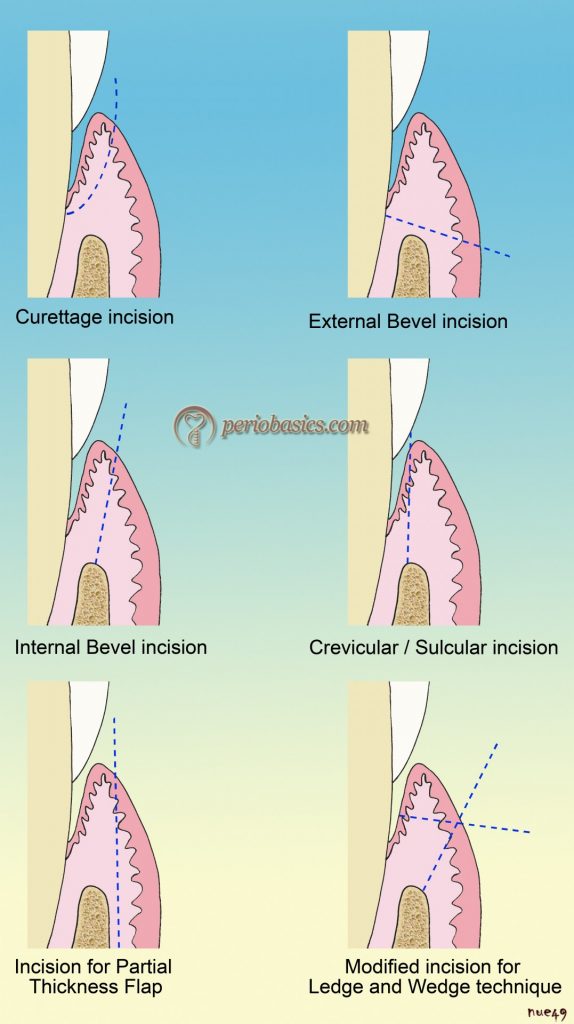
External bevel incision:
The external bevel incision is typically used in gingivectomy procedures. This incision causes extensive loss of tissue and is indicated only in cases of gingival overgrowth.
Internal bevel incisions:
The internal bevel incisions are typically used in periodontal flap surgeries. The internal bevel incision is also known as reverse bevel incision because its bevel is in the reverse direction from that of the gingivectomy incision. The internal bevel incision may be a marginal incision (from the top of gingival margin) or para-marginal incision (at a distance from the gingival margin). Following is the description of marginal and para-marginal internal bevel incisions,
Marginal incision:
This incision is made from the crest of the gingival margin till the crest of alveolar bone. Practically, it is very difficult to put this incision because firstly, it is very difficult to keep the cutting edge of the blade at the gingival margin and secondly, the blade easily slips down into the pocket because of its close proximity to the tooth surface. This incision is not indicated unless the margin of the gingiva is quite thick.
Para-marginal incision:
This internal bevel incision is placed at a distance from the gingival margin, directed towards the alveolar crest. This is a commonly used incision during periodontal flap surgeries. The distance of the incision from the gingival margin (thickness of the incision) varies according to the pocket depth, the thickness of the gingiva, width of the attached gingiva, shape and contour of gingival margins and whether or not the operative area is in the esthetic zone. The incision is made ……. Contents available in the book ……….. Contents available in the book …….. Contents available in the book …….. Contents available in the book …….
This incision is always accompanied by a sulcular incision which results in the formation of a collar of gingival tissue which contains the periodontal pocket lining. During crown lengthening, the shape of the para-marginal incision depends on the desired crown length. In non-esthetic areas with moderate to deep pockets and for crown lengthening, this incision is indicated. It is contraindicated in areas where the width of attached gingiva would be reduced to < 3 mm. The para-marginal internal bevel incision accomplishes three important objectives.
- It removes the pocket lining.
- It conserves the relatively uninvolved outer surface of the gingiva.
- It produces a sharp, thin flap margin for adaptation to the bone-tooth junction.
This incision is indicated in the following situations,
- Areas with sufficient band of attached gingiva.
- For the correction of bone morphology (osteoplasty, osseous resection).
- In areas with deep periodontal pockets and bone defects.
- In cases of crown lengthening.
A crescent-shaped incision is sometimes used during the crown lengthening procedure. This incision is made on the buccal aspect of the tooth till the desired level, sparing the interdental gingiva.
Sulcular/ crevicular incision:
This incision is placed through the gingival sulcus. The blade is introduced into the sulcus or pocket and is inserted as far as possible into the interdental space around the tooth, keeping it close to the crown. The blade is pushed into the sulcus till resistance is felt from the crestal bone crest. With this incision, the gingiva containing pocket lining is separated from the tooth surface. The granulation tissue and the pocket lining may be then separated from the inner surface of the reflected flap with the help of surgical scissors and a scalpel. This incision is indicated in the following situations,
- For access flap.
- Access flap for guided tissue regeneration.
- In areas with a narrow width of attached gingiva.
- In areas with thin gingiva and alveolar process.
- In areas with shallow periodontal pocket depth.
- In the esthetic zone.
This incision, together will the para-marginal internal bevel incision, forms a V-shaped wedge ending at or near the crest of bone, containing most of the inflamed and ……. Contents available in the book ……….. Contents available in the book …….. Contents available in the book …….. Contents available in the book …….
Vertical incisions:
Vertical incisions increase flap mobility, thus facilitating better access to the operative area. A vertical incision may be given unilaterally (at one end of the flap) or bilaterally (on both ends of the flap). Placement of the vertical incisions is absolutely essential in cases where the flap has to be re-positioned coronally (coronally displaced flap) or apically (apically displaced flap) from its original position. The vertical incision must extend beyond the mucogingival line, reaching the alveolar mucosa, to allow for the release of the flap to be displaced.
The base of the flap should be wider than the flap margin so that the blood supply to the flap is not jeopardized. This is mainly because of the reason that all the lateral blood supply to ……. Contents available in the book ……….. Contents available in the book …….. Contents available in the book …….. Contents available in the book …….
The vertical incision should always be placed at the line angles of the teeth and never (except rare instances, such as a double papilla flap) over the height of contour of the root. The reasons for placing vertical incisions at line angles of the teeth are,
- It protects the interdental papilla adjacent to the surgical site.
- It allows the vertical incision to be sutured without stretching the flap over the cervical convexity of the tooth.
- The vertical incision should be made in such a way that interdental papilla is completely preserved. Under no circumstances, the incision should be made in the middle of the papilla. An intact papilla should be either excluded or included in the flap.
- While doing laterally displaced flap for root coverage, the vertical incision is made at an acute angle to the horizontal incision, in the direction toward which the flap will move, placing the base of the pedicle at the recipient site. This is termed ‘cutback incision’.
Classification of periodontal flaps
Periodontal flaps can be classified as follows,
A. According to flap reflection or tissue content:
a. Full-thickness flap.
b. Split-thickness flap.
B. According to management of papilla:
a. Conventional flap.
b. Papilla preservation flap.
C. According to flap placement after surgery:
a. Non-displaced flap.
b. Displaced flap:
Apically displaced flap.
Coronally displaced flap.
Laterally displaced flap.
Following is the description of these flaps,
Full-thickness flap:
In this flap procedure, all the soft tissue, including the periosteum is reflected to expose the underlying bone. It is also known as the mucoperiosteal (mucosal tissue + periosteum) flap. It is indicated where complete access to the bone is required, for example, in the case of osseous resective surgeries. It is contraindicated in the areas where treatment for an osseous defect with the mucogingival problem is not required, in areas with thin periodontal tissue with probable osseous dehiscence or osseous fenestration and in areas where the alveolar bone is thin.

Split-thickness flap:
It is also known as a partial-thickness flap. In this flap, only epithelium and the underlying connective tissue are reflected, leaving the periosteum intact. It is indicated when the flap has to be positioned apically and when the exposure of the bone is not required.
Conventional flaps:
Flaps in which the interdental papilla is split beneath the contact of two approximating teeth, allowing the reflection of buccal and lingual flaps, are described as the conventional flaps. These are indicated in cases where interdental spaces are too narrow and when the flap needs to be displaced. Conventional flaps include the
Modified Widman flap,
Modified flap operation,
Undisplaced flap,
Apically displaced flap, and
Flap for regenerative procedures.
Papilla preservation flaps:
In these flaps, the entire papilla is incorporated into one of the flaps. The surgical approaches that split the papilla cause shrinkage and decrease in the height of the interdental papilla leading to the exposure of interproximal embrasures. This drawback of conventional flap techniques led to the development of this flap technique which intended to spare the papilla instead of splitting it.
Non-displaced flaps:
When the flap is returned and sutured in its original position.
Displaced flaps:
When the flap is placed apically, coronally or laterally to its original position.
In the following discussion, we shall study in detail, the surgical techniques that are followed in various flap procedures.
Modified Widman flap
As already discussed in, “History of surgical periodontal pocket therapy and osseous resective surgeries” the original Widman flap was presented to the Scandinavian Dental Association in 1916 by Leonard Widman which was later published in 1918. Ramfjord and Nissle 8 in 1974, modified the original Widman flap procedure ……. Contents available in the book ……….. Contents available in the book …….. Contents available in the book …….. Contents available in the book …….
The primary goal of this flap procedure is not necessarily pocket elimination, but “healing” (by regeneration or by the formation of a long junctional epithelium) of the periodontal pocket with minimum tissue loss. Because the alveolar bone is partially exposed, there is minimum post-operative pain and swelling. This flap procedure allows complete access to the root surfaces allowing their mechanical debridement and decontamination under direct vision. In this flap procedure, no ostectomy is performed; however, minor osetoplasty may be done to modify the undesired bony architecture. After debridement, flaps are closely adapted around the teeth in close approximation, allowing healing by primary intention.
Indications:
- The modified Widman flap is indicated in cases of perio-dontitis with pocket depths of 5-7 mm.
- It can be used in combination with other procedures such as osseous resection, regenerative procedures, hemisection procedure and procedures involving wedge excision.
Contraindications:
- The presence of thin gingiva which does not allow placement of adequate initial internal bevel incision.
- The narrow width of attached gingiva which may further reduce post-operatively.
- Osseous surgical procedures with very deep osseous defects and irregular bone loss, facially and lingually/ palatally.
Clinical procedure:
The modified Widman flap procedure involves placement of three incisions: the initial internal bevel/ reverse bevel incision (first incision), the sulcular/crevicular incision (second incision) and the horizontal/interdental incision (third incision). After these three incisions are made correctly, a triangular wedge of the tissue is obtained containing the inflamed connective ……. Contents available in the book ……….. Contents available in the book …….. Contents available in the book …….. Contents available in the book …….
Following is the description of step by step procedure followed while doing a modified Widman flap surgery,
- After the patient has been thoroughly evaluated and pre-pared with non-surgical periodontal therapy, quadrant or area to be operated is selected.
- Local anesthesia is administered to achieve profound anes-thesia in the area to be operated.
- The area is then irrigated with an antimicrobial solution.
- The area to be operated is then isolated with the help of gauge.
- The primary incision or the internal bevel incision is then made with the help of No. 11 or 15c blade. The location of the primary incision is based on the thickness of the gingiva, width of attached gingiva, the contour of the gingival margins, surgical objectives, and esthetic considerations. The incision is started from the greatest scallop of the gingiva around the tooth, which is usually present little distal to the mid-axis of the tooth in case of maxillary incisors and canines. The incision is then carried out till the line angle of the tooth blending it into the gingival crevice. In other words, we can say that ……. Contents available in the book ……….. Contents available in the book …….. Contents available in the book …….. Contents available in the book …….
- A full-thickness flap is then elevated to expose 1-2 mm of the marginal bone. Our main aim of doing so is to get complete access to the root surfaces of the teeth and bone defects around the teeth. A small periosteal elevator or Molt 2/4 curette can be used for this purpose.
- After this, the second incision or the sulcular incision is made from the bottom of the pocket to the crest of the alveolar bone. The incision is made around the entire circumference of the tooth using blade No. 15c, 11 or 12d.
- The horizontal or interdental incision is then made using a small knife (Orban 1 or 2), severing the supracrestal gingival fibers. Some clinicians prefer curettes (Molt 2 curette) or chisels (Ochsenbein No. 2) by pushing the instrument in the interdental area and twisting it to remove the infected granulomatous tissue.
- Then sharp periodontal curettes are used to remove the granulomatous tissue and tissue tags. As soon the granulation tissue is removed, the clear bone margins and root surfaces are visible. The granulation tissue is highly vascularized, so it bleeds profusely. After it is removed there is minimum bleeding from the flaps as well as the exposed bone.
- The clearly visible root surfaces and osseous defects are then debrided with the help of hand (curettes) and ultrasonic (ultrasonic scalers) instruments.
- After thorough debridement, the area is then inspected for any remaining deposits on the root surfaces, granulation tissue or tissue tags.
- To facilitate the close approximation of the flap, judicious osteoplasty, if required, is performed.
- The area is then irrigated with normal saline and flaps are adapted back in position.
- Suturing is then performed to stabilize the flaps in their position. Most commonly done suturing is the interrupted suturing. This suturing causes the apical positioning of the facial papilla, thus creating open gingival embrasures (black holes). Hence, this suturing is mainly indicated in posterior areas where esthetics ……. Contents available in the book ……….. Contents available in the book …….. Contents available in the book …….. Contents available in the book …….
- After suturing, the flap is adapted around the neck of the teeth with the help of moistened gauze. Any excess blood is expressed and an intimate adaptation of the flap to the teeth and the alveolus is ensured.
- At last periodontal dressing may be applied to cover the operated area. It must be noted that if there is no significant bleeding and flaps are closely adapted, periodontal dressing is not required. The operated area will be cleaner without dressing and will heal faster.
After one week, the sutures are removed and the area is irrigated with normal saline solution.
Click this link to watch video of the surgery: “Modified Widman Flap surgery”
Un-displaced flap
This flap procedure may be regarded as internal bevel gingivectomy because the first incision or the internal bevel incision given during this procedure is placed at the level of pocket depth (Figure 62.1), thus including all the soft tissue containing and supporting periodontal pocket.
Indications:
- Areas where greater probing depth reduction is required.
- Enough width of attached gingiva.
- Areas which do not have an esthetic concern.
Contraindications:
- Areas of esthetic concern.
- Deep intrabony defects.
- Less width of attached gingiva.
- Severe hypersensitivity.
Clinical technique:
- After the area to be operated is irrigated with an anti-microbial solution, local anesthesia is applied and the area is isolated after profound anesthesia has been achieved.
- The pockets are then measured and bleeding points are produced with the help of a periodontal probe on the outer surface of the gingiva, indicating the bottom of the pocket.
- The first incision or the internal bevel incision is then made from the bleeding points directed at an apical level to the alveolar crest. The thickness of the gingiva ……. Contents available in the book ……….. Contents available in the book …….. Contents available in the book …….. Contents available in the book …….
- After this, the second or the sulcular incision is made from the bottom of the pocket till the crest of the alveolar bone.
- The flap is then elevated with the help of a small periosteal elevator.
- The interdental incision is then made to severe the inter-dental fiber attachment.
- The triangular wedge of the tissue made by the above three incisions is then removed with the help of curettes.
- The granulation tissue, as well as tissue tags, are then removed. The deposits on the root surfaces are removed and root planing is done.
- The area is re-inspected for any remaining granulation tissue, tissue tags or deposits on the root surfaces.
- The margins of the flap are then placed at the root bone junction. In case, where osseous recontouring is done the flap margins may be re-scalloped and trimmed to adapt to the root bone junction.
- Suturing is then done using a continuous sling suture. The continuous sling suture has an advantage that it uses tooth as an anchor and thus, facilitates to hold the flap edges at the root-bone junction.
- The periodontal dressing is not required if the flap has been adapted adequately to cover the interdental area. Otherwise, the periodontal dressing may be placed.
- Sutures are removed after one week and the area is irrigated with normal saline.
Apically displaced flap
Apically displaced flap can be done with or without osseous resection. For the treatment of periodontal pockets with minimal osseous defects, a procedure without or minimal osseous resection is done, whereas, in case of moderate osseous defects and crown lengthening procedures, osseous resection is done with the flap procedure. This procedure cannot be done on the palatal aspect as it has attached gingiva which cannot be displaced apically.
This flap procedure is indicated in areas that do not have esthetic concerns and areas where a greater reduction in pocket depth is desired. The apically displaced flap is ……. Contents available in the book ……….. Contents available in the book …….. Contents available in the book …….. Contents available in the book …….
Periobasics: A Textbook of Periodontics and Implantology
The book is usually delivered within one week anywhere in India and within three weeks anywhere throughout the world.
India Users:
International Users:
Indications:
1. Areas where greater probing depth reduction is required.
2. Areas which do not have an esthetic concern.
3. Areas where post-operative maintenance can be most effectively done by doing this procedure.
4. Short anatomic crowns in the anterior region.
5. Clinical crown lengthening in multiple teeth.
6. To preserve the present attached gingiva or even to establish an adequate strip of it, where it is narrow or absent.
Contraindications:
1. Periodontal pockets in severe periodontal disease.
2. Periodontal pockets in areas where esthetics is critical.
3. Deep intrabony defects.
4. Patients at high risk for caries.
5. Severe hypersensitivity.
6. Tooth with marked mobility and severe attachment loss.
7. Tooth with extremely unfavorable clinical crown/root ratio.
Advantages:
1. This flap procedure causes the greatest probing depth reduction.
2. It enhances the potential for effective periodontal maintenance and preservation of attachment levels.
Disadvantages:
1. May cause esthetic problems due to root exposure.
2. Flap reflection till alveolar mucosa to mobilize the flap causes more post-operative pain and discomfort.
3. May cause attachment loss due to surgery.
4. May cause hypersensitivity.
5. May increase the risk of root caries.
6. Unsuitable for treatment of deep periodontal pockets.
7. Possibility of exposure of furcations and roots, which complicates postoperative supragingival plaque control.
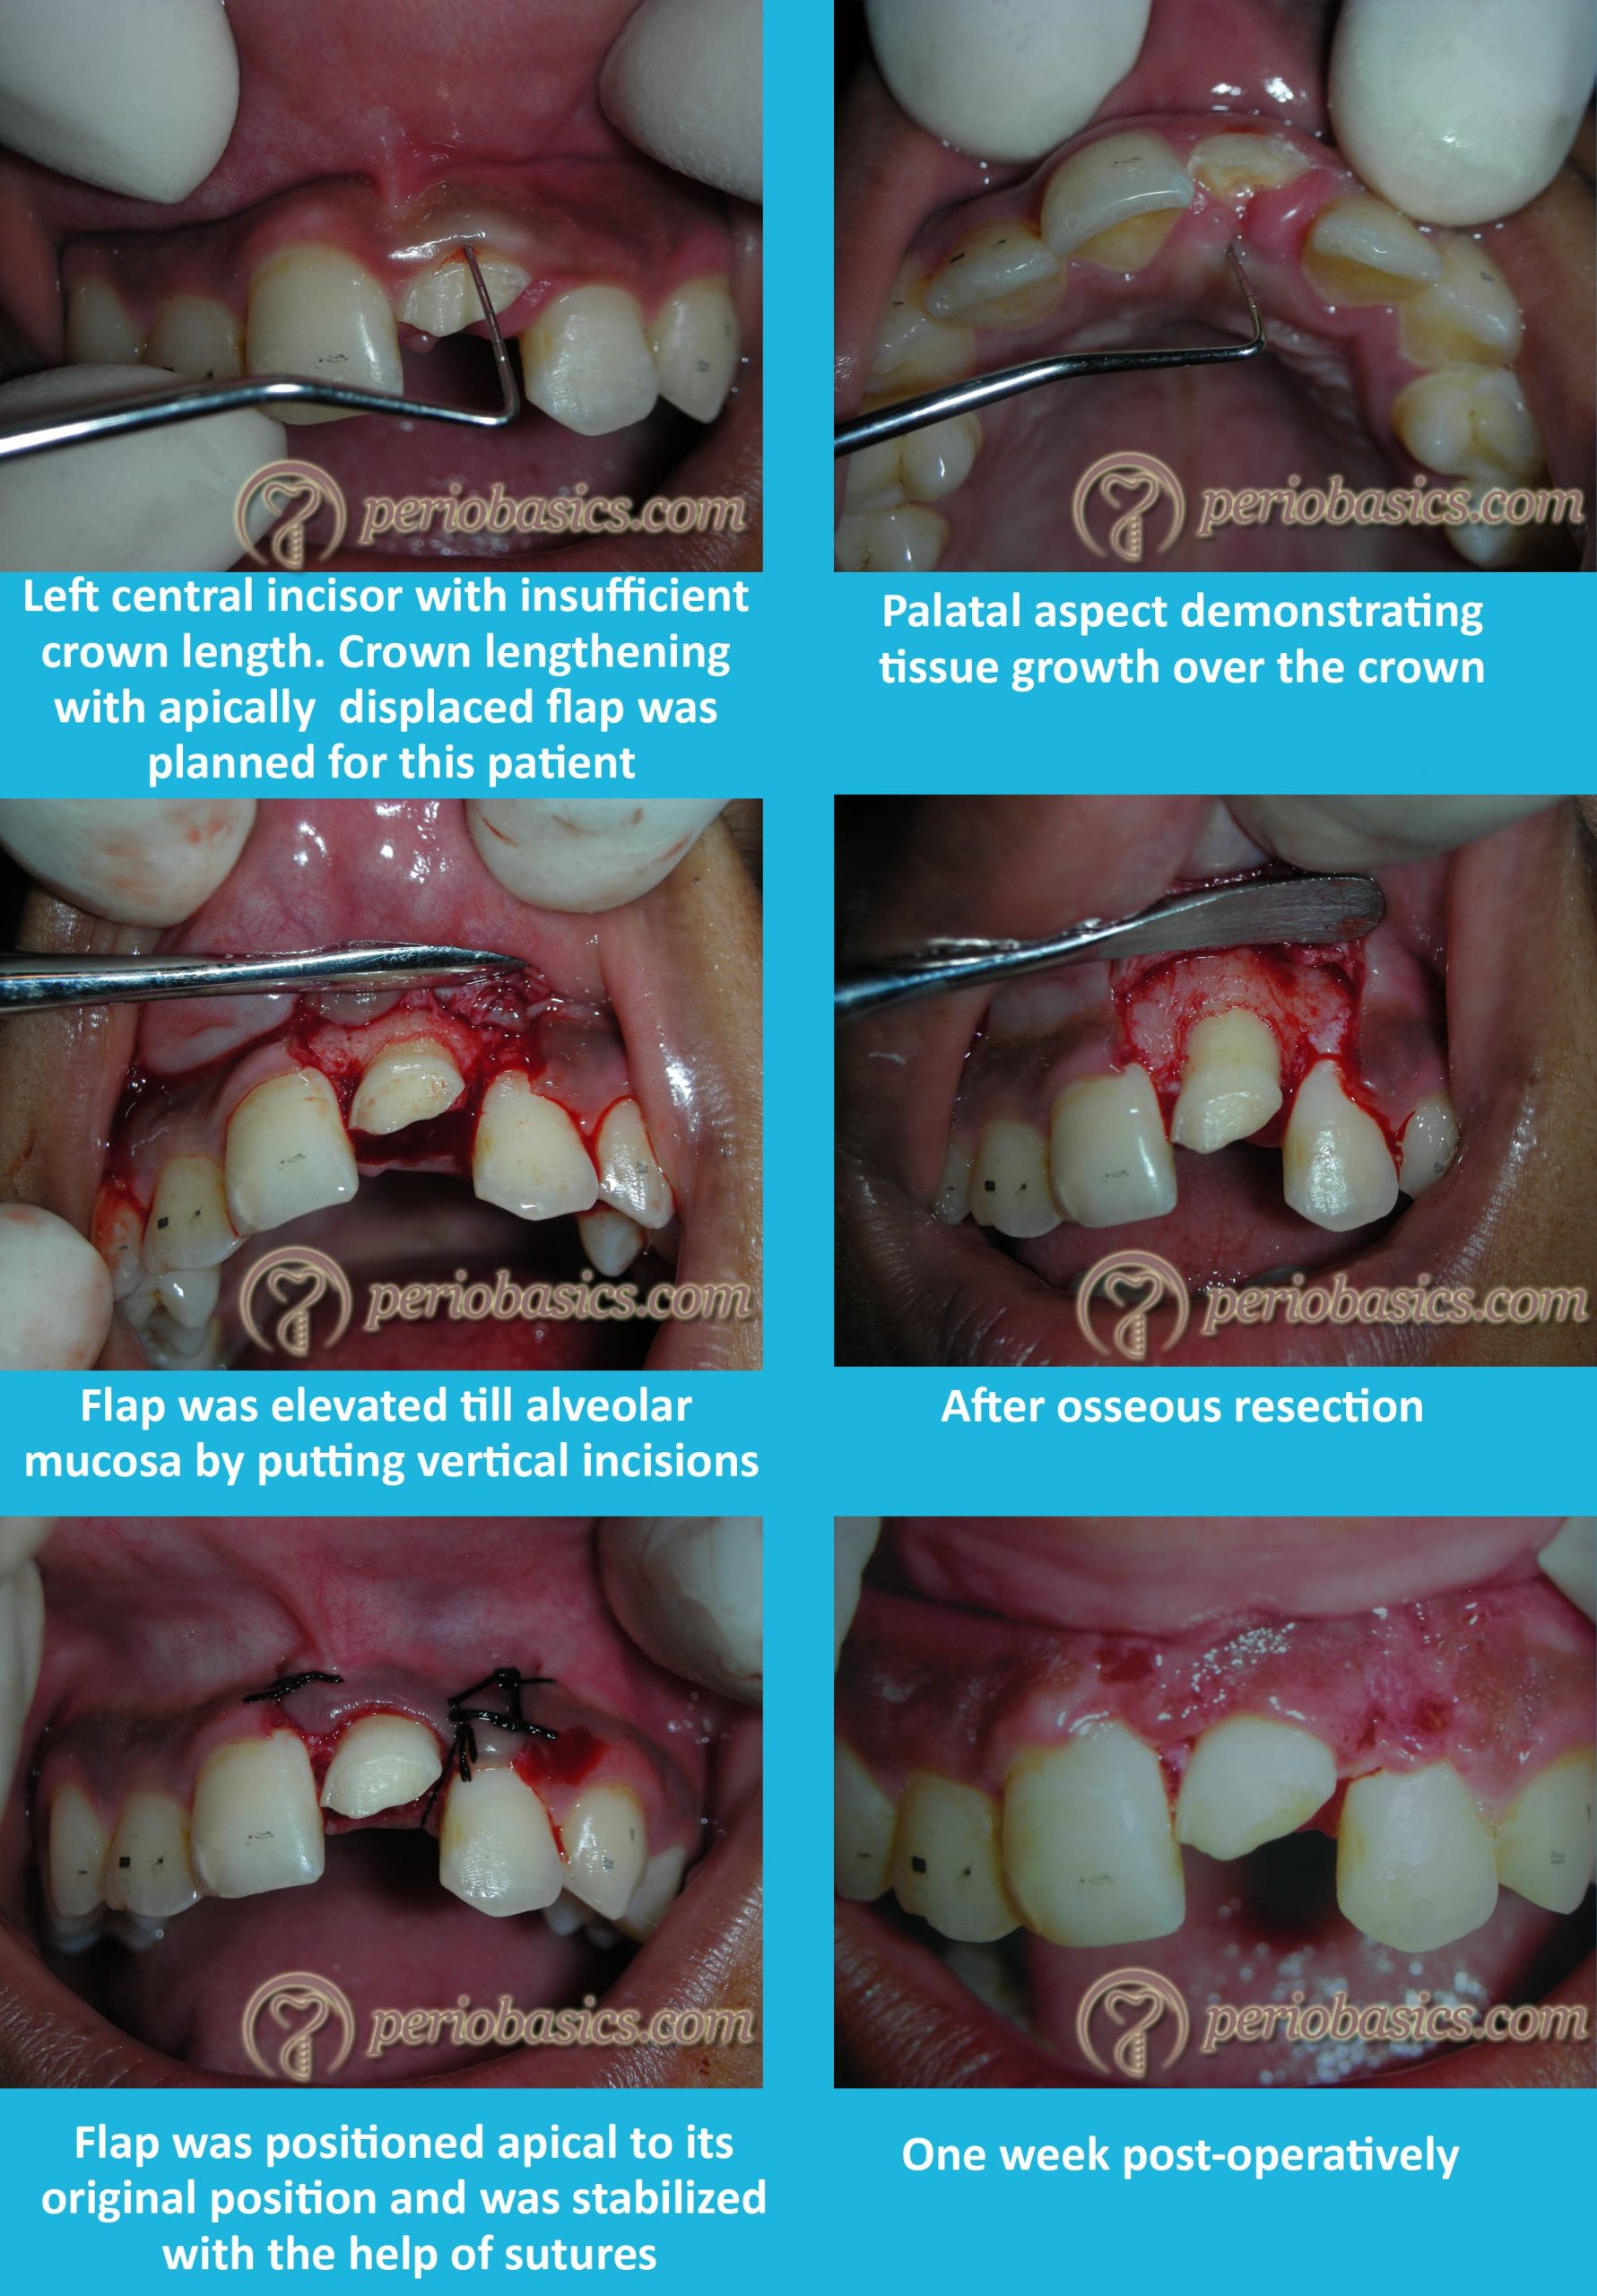
Clinical technique:
The basic clinical steps followed during this flap procedure are as follows,
- After the area to be operated has been irrigated with an antimicrobial solution and isolated, the local anesthetic agent is delivered to achieve profound anesthesia.
- The incisions given are the same as in case of modified Widman flap procedure. The initial or the first incision is the internal bevel incision given not more than 1 mm from the crest of the gingiva and directed to the crest of the bone. The scalloping of the incision may not be accentuated as the flap has to be apically displaced and is not adapted interdentally.
- After this, partial elevation of the flap is done with the help of a small periosteal elevator.
- The crevicular incision is then placed from the bottom of the pocket till the alveolar crest. The interdental incision is then given to remove the wedge of tissue that contains the pocket wall.
- As the flap is to be placed in an apical position, vertical incisions are made extending beyond the mucogingival junction. Full-thickness or partial thickness flap may be elevated depending on the objectives of the surgery. A full-thickness flap is elevated with the help of a periosteal elevator whereas partial-thickness flap is elevated using sharp dissection with a Bard-Parker knife.
- The granulomatous tissue is then removed and the deposits on the root surfaces are removed by scaling. Root planing is done followed by osseous surgery if needed.
- Re-inspection of the operated area is done to check for any deposits on the root surfaces, remaining granulation tissue or tissue tags which are removed, if detected.
- The flaps are then apically positioned to just cover the alveolar crest. If a full-thickness flap has been elevated, the sutures are placed along the mesial and the distal vertical incision lines to ……. Contents available in the book ……….. Contents available in the book …….. Contents available in the book …….. Contents available in the book …….
- Flap adaptation is then done with the help of moistened gauze and any excess blood is expressed.
- Placing periodontal depressing is optional. If the dressing has to be placed, a dry foil is first placed over the flap before covering it with the dressing so that the displacement of the pack under the flap is prevented.
- After one week, the sutures are removed and the area is irrigated with normal saline solution.
Palatal flap procedures
The flap procedures on the palatal aspect require a different approach as compared to other areas because the palatal tissue is composed of a dense collagenous fiber network and there is no movable mucosa on the palatal aspect. As described in “History of surgical periodontal pocket therapy and osseous resective surgeries” the palatal approach for ……. Contents available in the book ……….. Contents available in the book …….. Contents available in the book …….. Contents available in the book …….
Clinical technique:
After administration of local anesthesia, bone sounding is done to assess the thickness of gingiva and underlying osseous topography. This is especially important because, on the palatal aspect, osseous deformities such as heavy bone ledges and exostoses are commonly seen. Once the bone sounding has been done and the thickness of the gingiva has been established, the design of the flap is decided. The key point to be remembered here is, more the thickness of the gingiva more scalloped is the incision. If extensive osseous recontouring is planned, an exaggerated incision is given. As already stated, depending on the thickness of the gingiva, any of the following approaches can be used,
Full-thickness flap:
The full-thickness mucoperiosteal flap procedure is the same as that described for the buccal and lingual aspects. The first, second and third incisions are placed in the same way as in case of modified Widman flap and the wedge of the infected tissue is removed. Minor osseous recontouring may be done and the flap is then adapted into the interdental areas. Sutures are placed to secure the flaps in their position.
Partial-thickness palatal flap:
This approach was described by Staffileno (1969) 23. As already stated, this technique is utilized when thicker gingiva is present. This flap procedure utilizes two incisions referred to as primary and secondary incisions which contain tissue which has to be removed. After the administration of local anesthesia, bone sounding is performed to identify the exact thickness of the gingiva. Then, it is decided that how much tissue has to be removed so that the appropriate thickness of the gingiva is achieved at the end of the procedure.
- The primary incision is placed with the help of 15c blade, but in case of limited access, blade 12 d can be used. The distance of the primary incision from the gingival margin depends on the thickness of the gingiva. More is the thickness of the gingiva, farther is the incision placed to include more tissue which needs to be removed. The blade should be kept on the vertical height of the alveolus so that palatal artery is not injured. The incision is usually started at the disto-palatal line angle of the last molar and continued forward using a scalloped, inverse-beveled, partial-thickness incision to create a thin partial-thickness flap.
- After the primary incision, tissue can now be retracted with the help of rat-tail pliers. Now, after the completion of the partial-thickness flap, the scalpel blade is directed from the base of this incision towards the bone to give a scoring incision. By doing this, the periosteum is cut and it becomes easy to remove the secondary flap from the bone. The secondary ……. Contents available in the book ……….. Contents available in the book …….. Contents available in the book …….. Contents available in the book …….
- During this whole procedure, the placement of the primary incision is very important because if improperly given it may become short, leaving exposed bone or may become longer requiring further trimming which is difficult.
- After the removal of the secondary flap, scaling and root planing is done and the flap is adapted to its position. If the incisions have been made correctly, the flap will be at the crest of the bone with the scalloped papillae positioned interproximally, thus permitting its primary closure. Interrupted or continuous sling sutures are then placed to secure the flaps in their place. The secondary flap removed, can be used as an autogenous connective tissue graft.


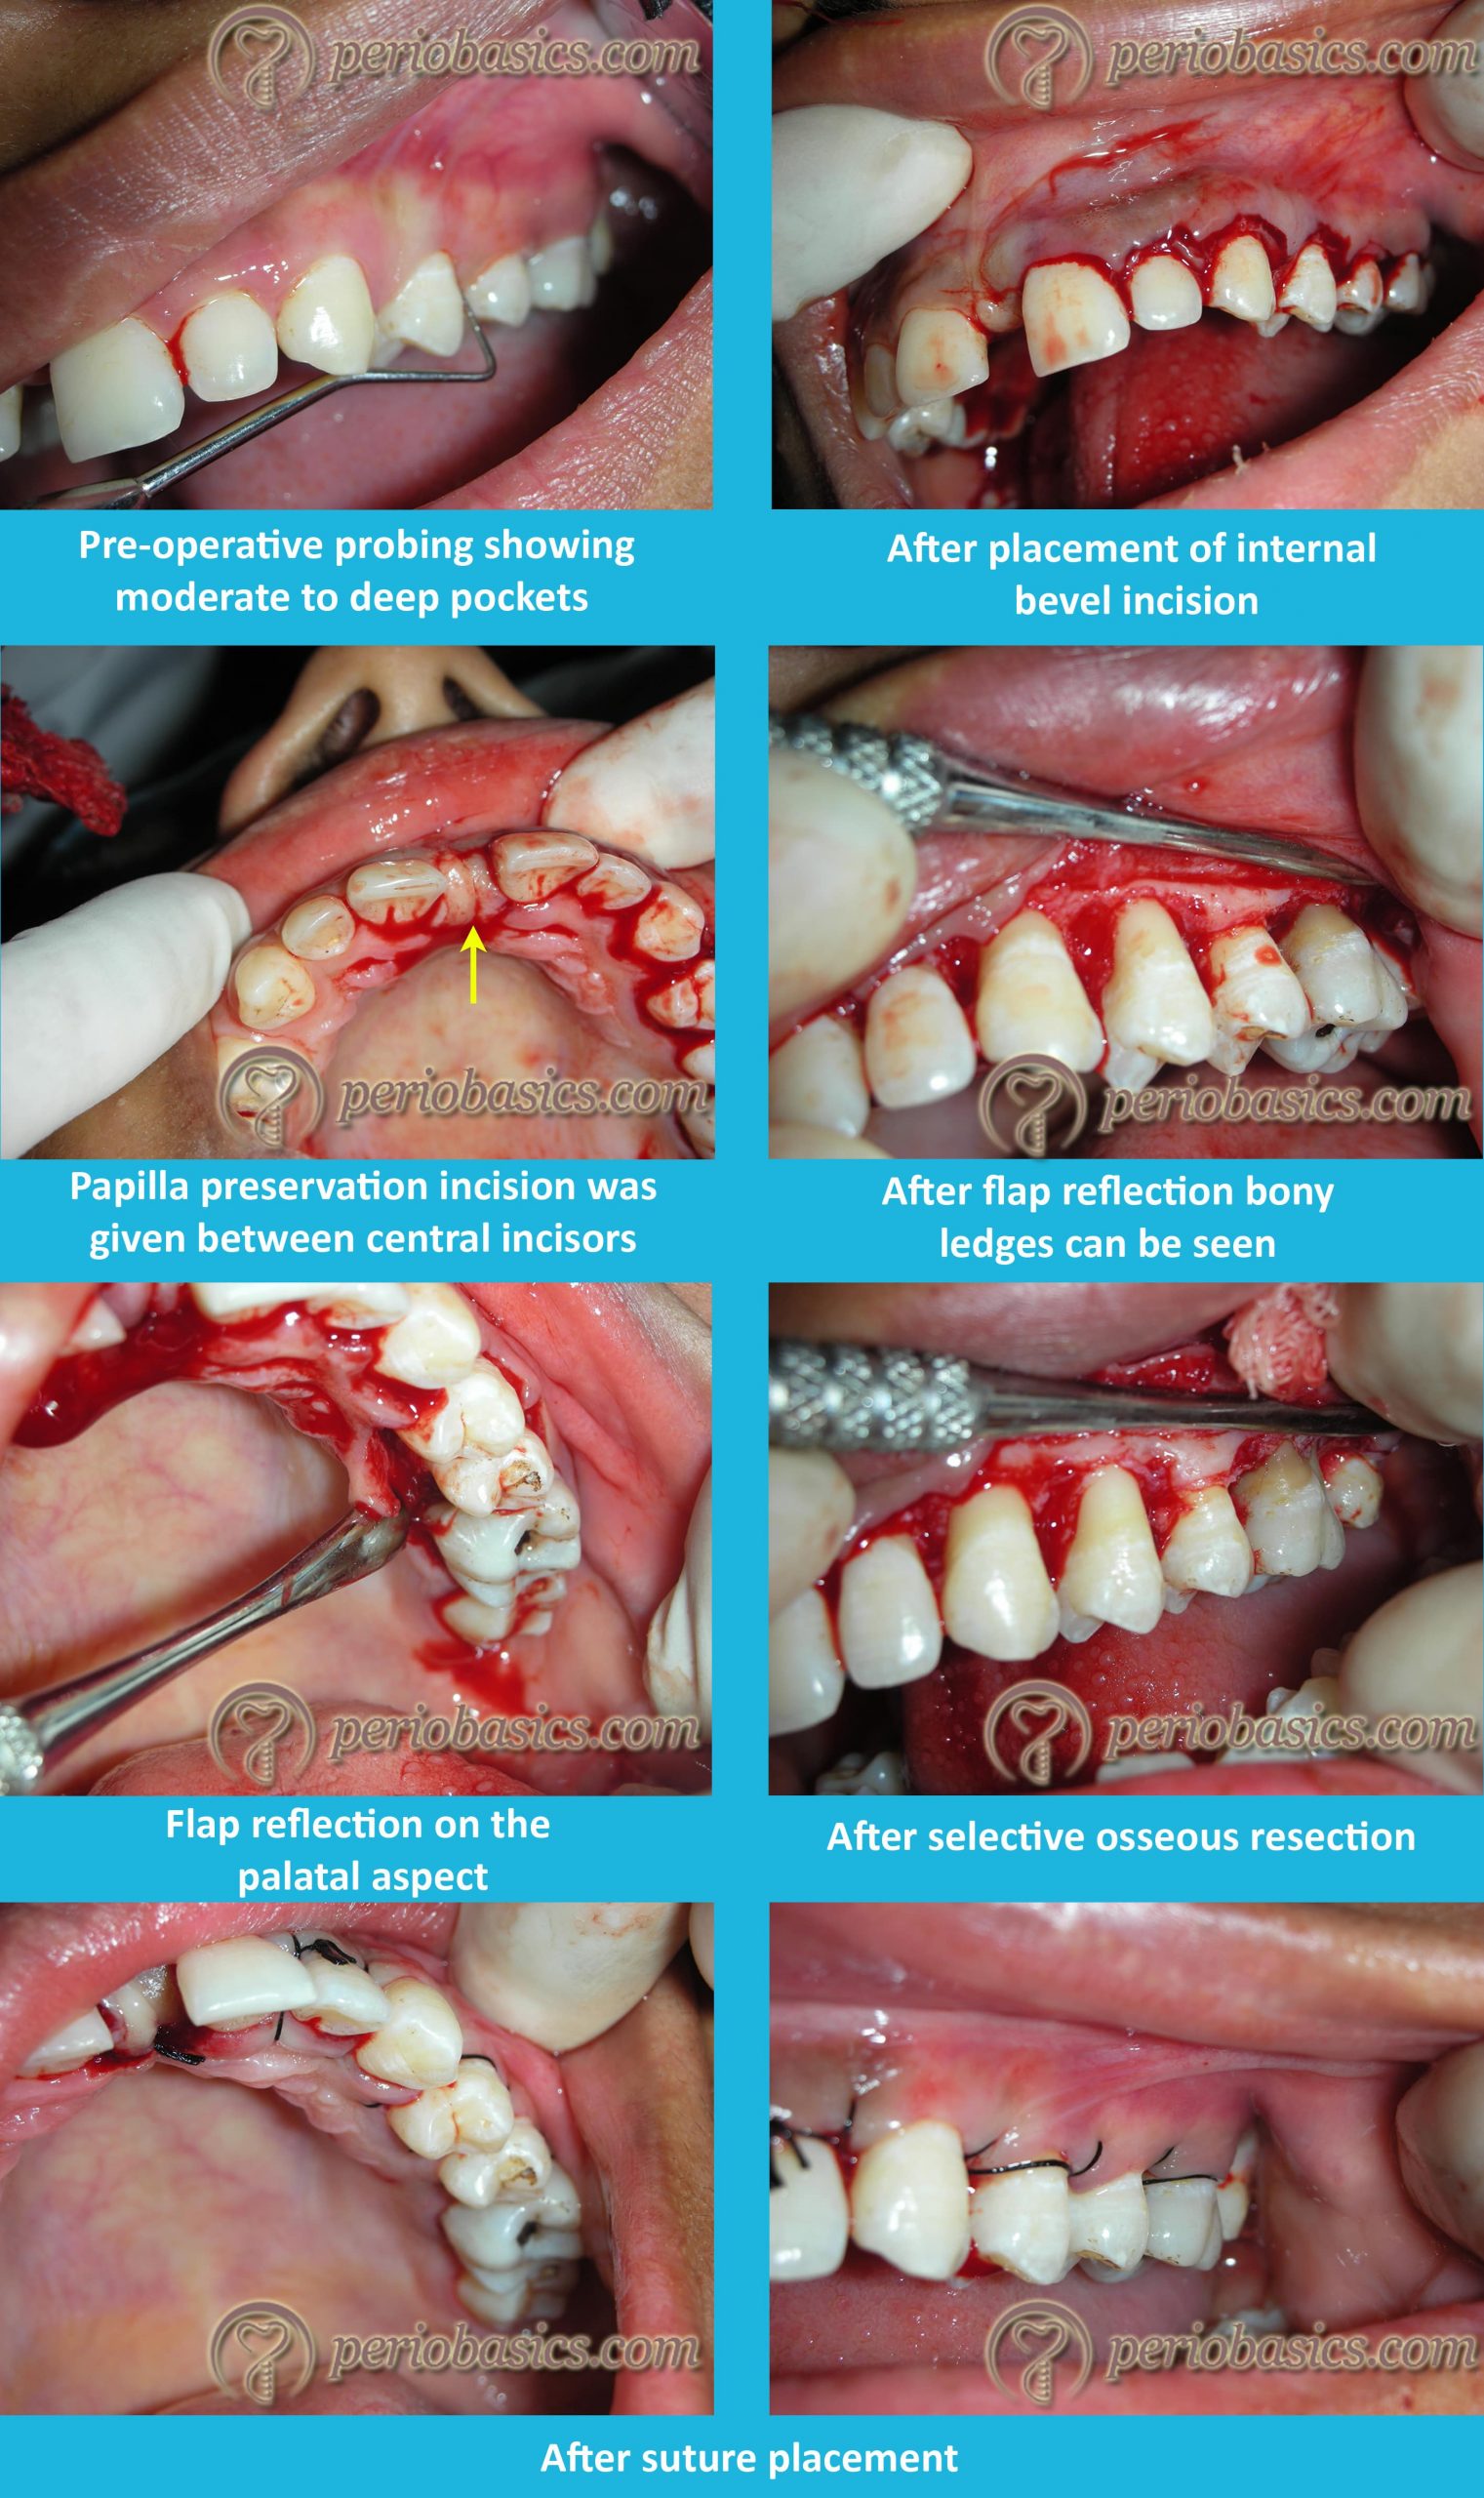
Modified partial-thickness palatal flap:
This is a modification of the partial thickness palatal flap procedure in which gingivectomy is done prior to the placement of primary and the secondary incision. This is also known as “Ledge-and-wedge technique”. Following are the steps followed during this procedure,
- The area is anesthetized and bone sounding is done to evaluate the osseous topography, pocket depth, and thickness of the gingiva.
- Once bone sounding has been done, a gingivectomy incision without bevel is given using a periodontal knife to remove the tissue above the alveolar crest. Along with removing the tissue above the alveolar crest, this incision also reveals the thickness of the soft tissue. In case where the soft tissue is quite thick, this incision ……. Contents available in the book ……….. Contents available in the book …….. Contents available in the book …….. Contents available in the book …….
- After the gingivectomy incision, primary and the secondary incisions are placed in the same way as described in the partial-thickness flap procedure.
- The primary incision is placed at the outer margin of the gingivectomy incision starting at the disto-palatal line angle of the last molar and continued forward. The soft tissue is then retracted with tissue forceps and the scoring incision is given to separate the periosteum from the bone.
- The secondary incision is given from the depth of the periodontal pocket till the alveolar crest.
- With the help of Ochsenbein chisels (no. 1 and 2), the secondary inner flap is removed.
- Scaling, root planing and osseous recontouring (if required) are carried out.
- The flap is sutured with interrupted or continuous sling sutures.
The main disadvantage of this procedure is that healing in the interdental areas takes place by secondary intention. So, this procedure cannot be employed when modified Widman flap, excisional new attachment procedure and regenerative procedures such as osseous grafting are done because these procedures require primary closure.
Papilla preservation flap
Periodontal flap surgery with conventional incision commonly results in gingival recession and loss of interdental papillae after treatment. This is especially important in maxillary and mandibular anterior areas which have a prime esthetic concern. To overcome the problem of recession, papilla preservation flap design is used in these areas.
The first documented report of papilla preservation procedure was by Kromer 24 in 1956, which was designed to retain osseous implants. In 1973, App 25 reported a similar technique and termed it as ‘Intact Papilla Flap’ which retained the interdental gingiva in the buccal flap. This procedure was aimed to provide maximum protection to osseous and transplant recipient sites. Evian et al. (1985) 26 modified this procedure to preserve anterior esthetics after flap surgery. Genon and Bender in 1984 27 also reported a similar technique indicated for esthetic purpose. Takei et al. in 1985 28 introduced a detailed description of the surgical approach reported earlier by Genon and named the technique as “Papilla Preservation Flap”. Later on Cortellini et al. (1995, 1999) 29, 30 described ……. Contents available in the book ……….. Contents available in the book …….. Contents available in the book …….. Contents available in the book …….
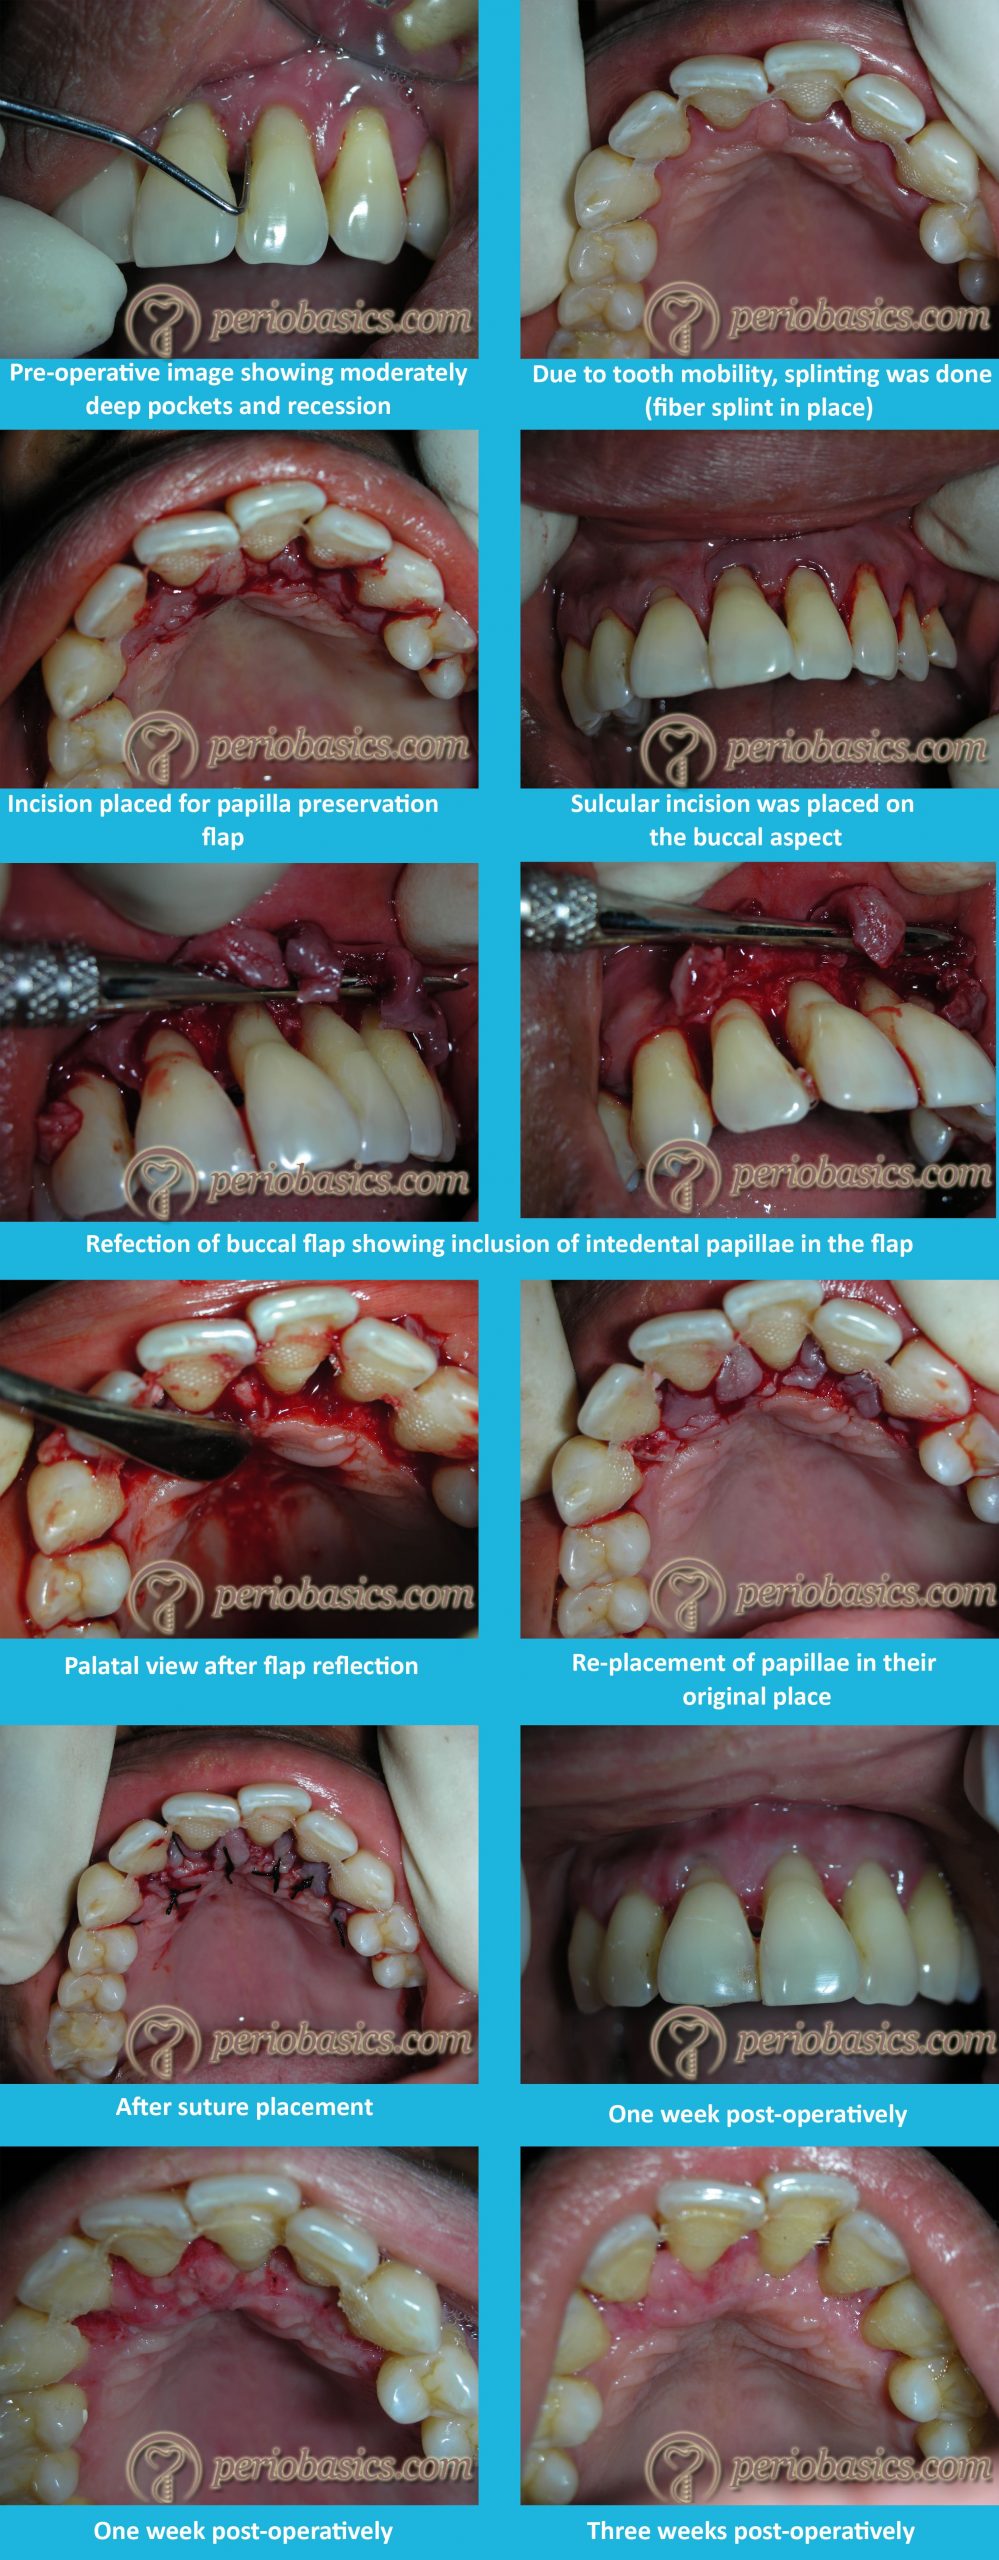
Clinical procedure:
- The area to be operated is irrigated with an antimicrobial solution and isolated. The local anesthetic agent is delivered to achieve profound anesthesia.
- An intrasulcular incision is given all around the teeth to be involved in the surgical procedure. No incision is made through the interdental papillae.
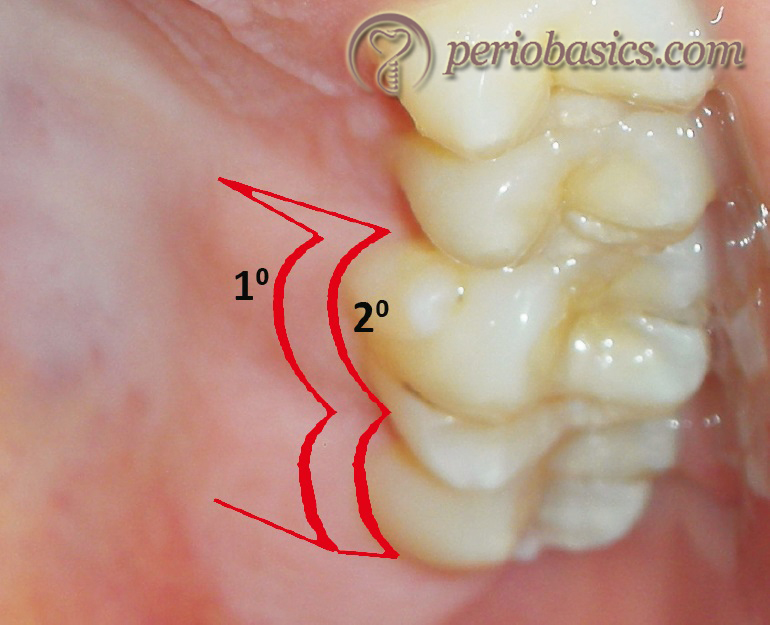
- There are two types of incisions that can be used to include interdental papillae in the facial flap:
One technique includes semilunar incisions which are ……. Contents available in the book ……….. Contents available in the book …….. Contents available in the book …….. Contents available in the book …….
In another technique, vertical incisions and a horizontal incision are placed. The vertical incisions are made from the center of palatal/lingual surfaces of teeth extending palatally/lingually. The vertical incisions are extended far enough apically so that they are at least 3 mm apical to the margin of the interproximal bony defect and 5 mm from the gingival margin. These vertical incisions are now joined with a horizontal incision as shown in the following figure,
- The interdental papilla is then freed from the underlying bone and is completely mobilized.
- Once the interdental papilla is mobile, a blunt instrument is used to carefully push the interdental papilla through the embrasure.
- After pushing the papillae buccally, both the flap and the papilla are reflected off the bone with a periosteal elevator.
- The granulation tissue is removed from the area and scaling and root planing is done.
- The area is then re-inspected for any remaining granulation tissue, tissue tags and deposits on root surfaces. If detected, they are removed.
- The papillae are then carefully pushed back through the interdental embrasures to palatal or lingual aspect.
- Papillae are then sutured with interrupted or horizontal mattress sutures.
- The patient is recalled after one week for suture removal.
Modified flap operation
It was described by Kirkland in 1931 31. It is an access flap for the debridement of the root surfaces. The main advantages of this procedure are the preservation of maximum healthy tissue and minimum post-operative discomfort to the patient.
Clinical procedure:
- After administrating local anesthesia, profound anesthesia is achieved in the area to be operated. The area is then irrigated with an antimicrobial solution.
- The intrasulcular incision is given using No. 15c or No. 12 blade on both the buccal and the lingual/palatal aspects continuing it interdentally extending it in the mesial and distal direction.
- The buccal and the lingual/palatal flaps are then elevated to expose the diseased root surfaces and the marginal bone.
- The area is then debrided for all the granulation tissue present and scaling and root planing of the root surfaces are carried out.
- All the pocket epithelium and granulation tissue from the inner surfaces of the flaps is then eliminated using sharp curved scissors or Castroviejo scissors.
- Minor osteoplasty may be carried out if osseous irregulari-ties are observed.
- The flaps are then replaced to their original position and sutured using interrupted or continuous sling sutures.
- The patient is then recalled for suture removal after one week.

See video of the surgery at: “Modified flap operation”
Distal molar surgery
The periodontal pockets on the distal aspects of last molars, both in maxillary and the mandibular arches present a unique situation for which specific surgical designs have been advocated. These ……. Contents available in the book ……….. Contents available in the book …….. Contents available in the book …….. Contents available in the book …….
Historically, gingivectomy was the treatment of choice for these areas until 1966, when Robinson 32 addressed this problem and gave a separate surgical procedure for these areas which he termed “distal wedge operation”. Following shapes of the distal wedge have been proposed which are,
1. Triangular
2. Square, parallel, or H design
Triangular wedge:
The triangular wedge technique is used in cases where the adequate zone of attached gingiva is present and in cases of short or small tuberosity. In this technique no. 12 or no. 15 scalpel blade is used to make a triangular incision distal to the molar on retromolar pad area or the maxillary tuberosity. The triangular wedge of the tissue, hence formed is removed. After removing the wedge of the tissue the margins of the flap are undermined with the help of scalpel blades ……. Contents available in the book ……….. Contents available in the book …….. Contents available in the book …….. Contents available in the book …….
Square, Parallel, or H Design:
In this technique, two incisions are made with the help of no. 12 or no. 15 scalpel blade, parallel to each other beginning at the distal end of the edentulous area, continued to the tooth. The incisions made should be reverse bevel to achieve thinning of tissue so that an adequate final approximation of the flaps can be achieved. One incision is now placed perpendicular to these parallel incisions at their distal end. Sulcular incision is now made around the tooth to facilitate flap elevation. The buccal and palatal/lingual flaps are reflected with the help of a periosteal elevator. The square ……. Contents available in the book ……….. Contents available in the book …….. Contents available in the book …….. Contents available in the book …….
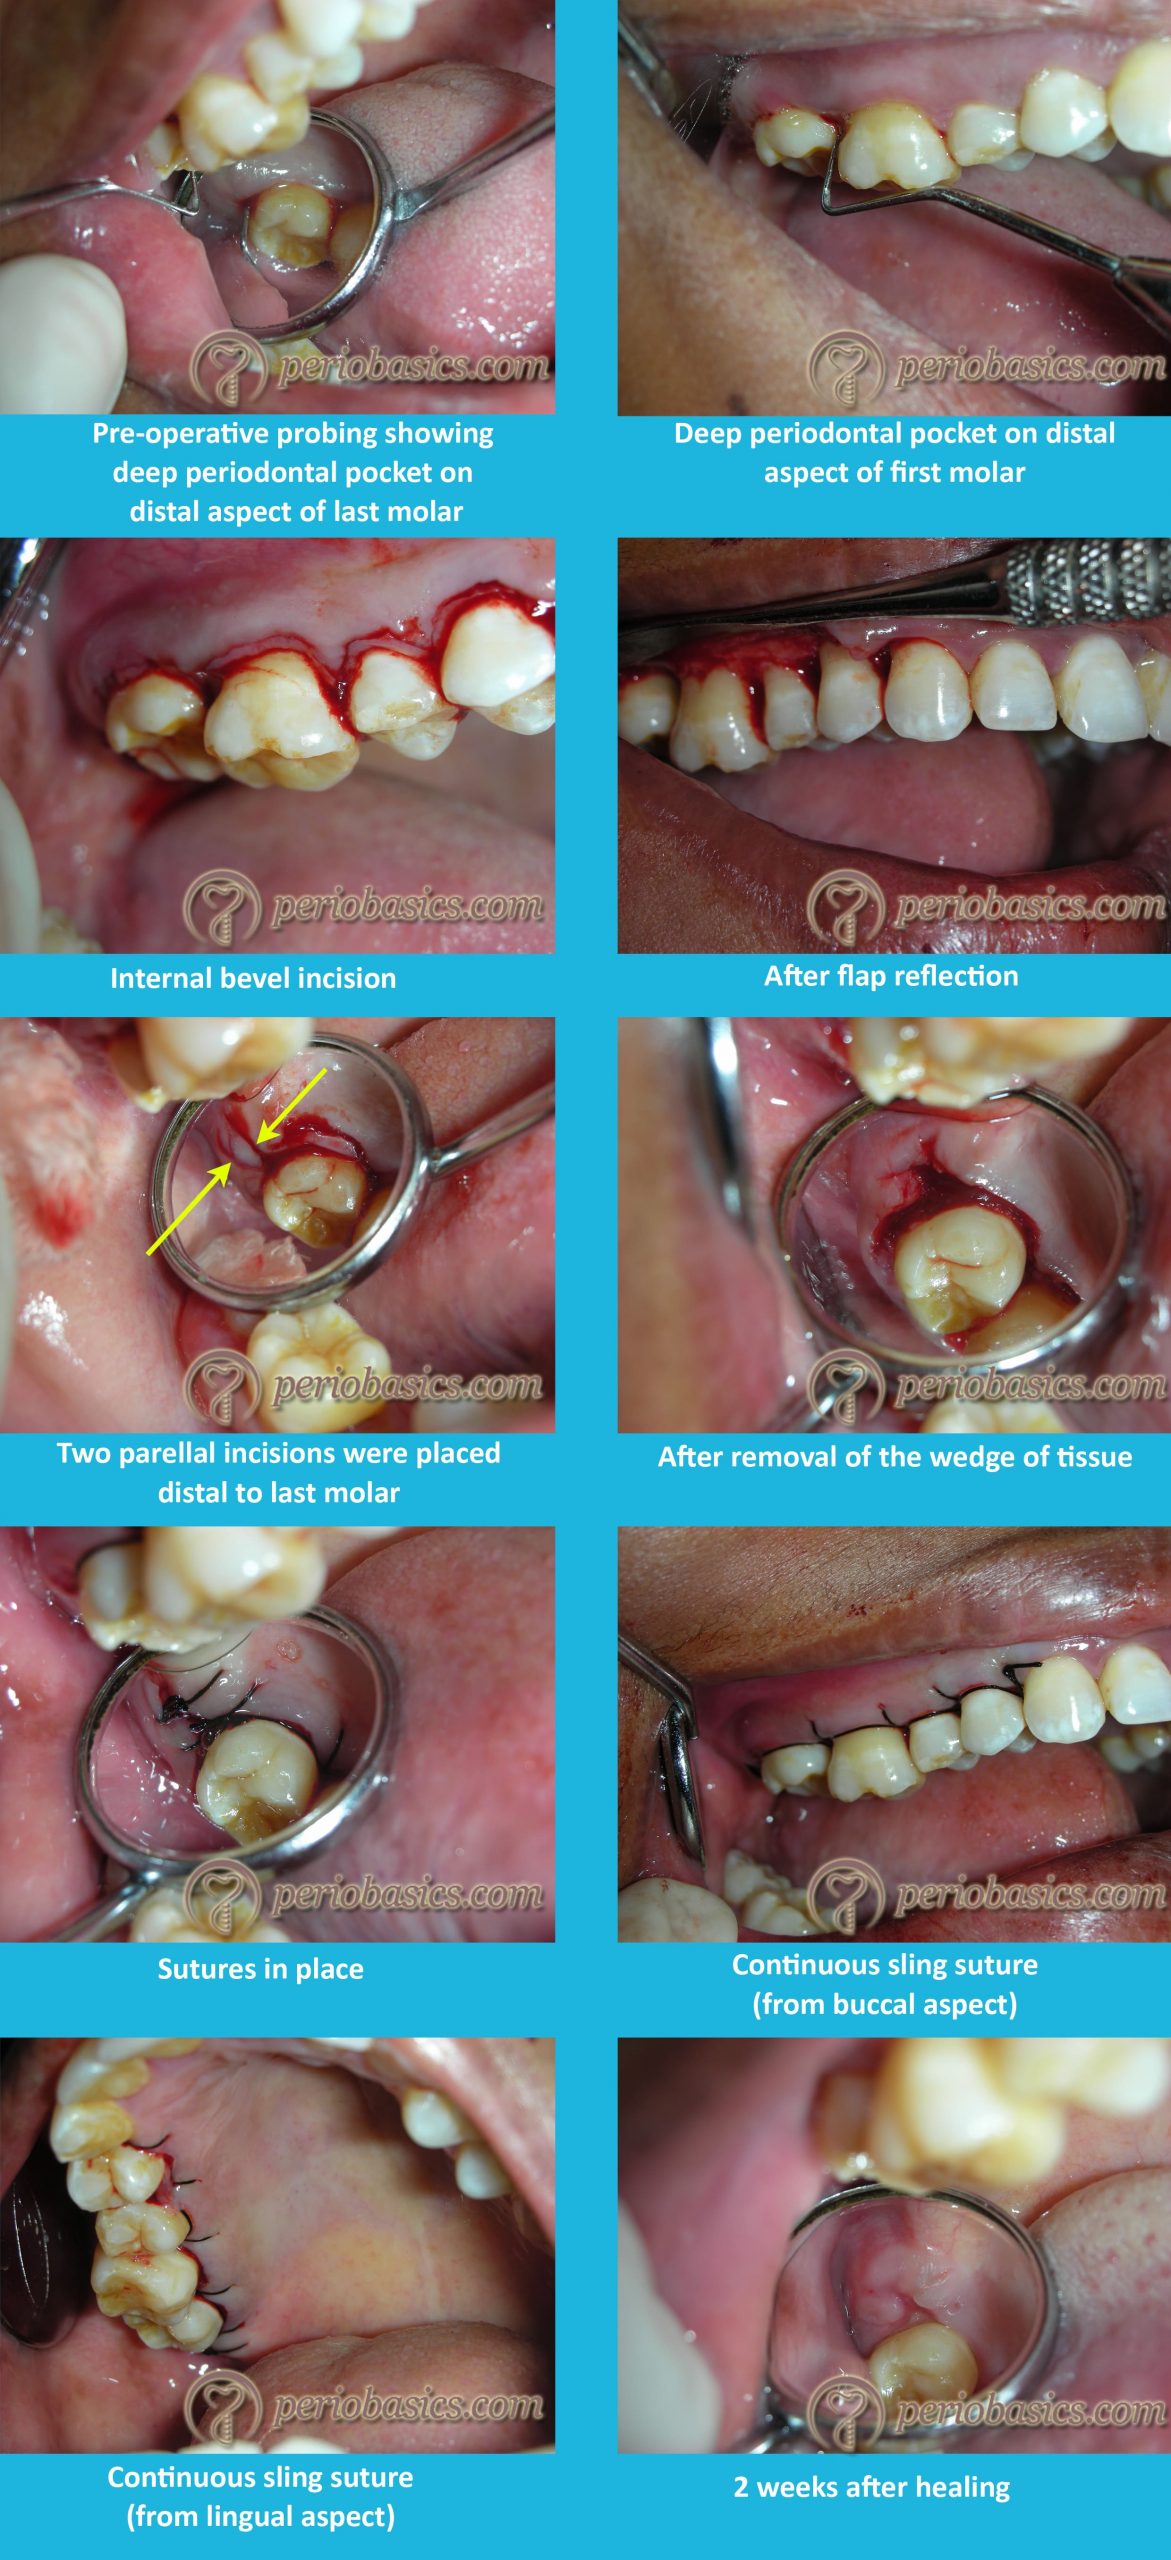
The main advantages of this procedure are maximum conservation of the keratinized tissue, maximum closure of the flaps and greater access to the underlying bony topography and the distal furcation.
Healing events after flap surgery
Irrespective of performing any of the above stated surgical procedures, periodontal wound healing always begins with a blood clot in the space maintained by the closed flap after suturing 36. During the initial phase of healing, inflammatory cells are attracted by platelet and complement derived mediators and aggregate around the blood clot. The most abundant cells during the initial healing phase are the neutrophils. Within the first few days, monocytes and macrophages start populating the area 37. The blood clot provides a framework for the proliferation and migration of cells from surrounding tissues including gingiva, periodontal ligament (PDL), cementum, and alveolar bone 38. With the migration of these cells in the healing area, the process of re-establishment of the dentogingival unit progresses. The process of healing progresses through various phases of ……. Contents available in the book ……….. Contents available in the book …….. Contents available in the book …….. Contents available in the book …….
Post-operative complications after periodontal flap surgery
Post-operative bleeding:
One of the most common complication after periodontal flap surgery is post-operative bleeding. The bleeding may range from a minor leakage or oozing, to extensive or frank bleeding at the surgical site. The main causes for the bleeding include intrinsic trauma to the operated site, even after repeated instructions patients tend to play with the area of surgery with their tongue and dislodge the blood clot, tongue may also cause suction of blood by creating small negative pressures that cause secondary bleeding, presence of foreign bodies, infection, salivary enzymes may lyse the blood clot before it gets organized and slippage of suture.
Hemorrhage occurring after 7-14 days is secondary to trauma or surgery. It is most commonly caused due to infection and sloughing of blood vessels. Signs and symptoms may include continuous flow, oozing or expectoration of blood or copious pink saliva. The bleeding is frequently associated with pain. The first step ……. Contents available in the book ……….. Contents available in the book …….. Contents available in the book …….. Contents available in the book …….
Swelling:
Swelling is another common complication after flap surgery. It reduces mouth opening, is commonly associated with pain and causes difficulty in mastication. Swelling hinders routine working life of patient usually during the first 3 days after surgery 41. The factors that are associated with post-operative swelling include the type of the incision, its extension, tissue manipulation during the surgery and the duration of surgery. Smaller incisions usually cause less postoperative swelling and pain as compared to larger incisions. Rough handling of the tissue and long duration of the surgery commonly result in post-operative swelling.
Trismus:
Trismus is the inability to open the mouth. It is caused by trauma or spasm to the muscles of mastication. The most likely etiologic factor is local anesthetic, secondary to an inferior alveolar nerve block that penetrates the medial pterygoid muscle. Also, complicated or prolonged surgical procedures that require full-thickness mucoperiosteal flaps with resultant edema can lead to trismus. Normal interincisal opening is approximately 35-45 mm, with mild ……. Contents available in the book ……….. Contents available in the book …….. Contents available in the book …….. Contents available in the book …….
Spared of infection to distant sites:
As discussed in, “Periodontal treatment of medically compromised patients”, antibiotic prophylaxis is must in patients with medical conditions such as rheumatic heart disease. The antibiotics should be started before the surg-ical procedure so that appropriate antibiotic levels are there in blood at the time of surgery to prevent spread of infection.
Conclusion
The primary objective of the flap surgeries is to gain access to the root surfaces and bone defects so that the deposits on the root surfaces can be eliminated and the granulation tissue can be removed. Furthermore, the access to the bone defects facilitates the execution of various regenerative procedures. In the present discussion, we discussed various flap procedures that are used to achieve these goals. In the upcoming chapters, we shall read about various regenerative procedures which are aimed at achieving regeneration of lost periodontal structures.
References
References are available in the hard-copy of the website.
Periobasics: A Textbook of Periodontics and Implantology
The book is usually delivered within one week anywhere in India and within three weeks anywhere throughout the world.