Introduction to implant design
The knowledge of implant components and current concepts in implant designing are quintessential, to understand dental implants from a clinical point of view. A lot of modifications in implant shape and design have taken place during the last few decades owing to a lot of research work done in this field. The development of different implant systems has been discussed in detail in the previous chapter. In this chapter, we shall discuss in detail the components of the implant as well as the recent concepts in implant design.
Components of implant design
Diameter of implant
The implant diameter is the dimension measured from the peak of the widest thread to the same point on the opposite side of the implant 1. The diameter of the implant is more important in load distribution as compared to the length of the implant. The present literature suggests that at least 3.25 mm implant diameter is required to ensure adequate implant strength and most implants are approximately 4 mm in diameter 1. The reason for this biomechanical stability is that wider implants allows an engagement of maximal amount of bone and theoretically improved distribution of stress in the surrounding bone 2. The increase in diameter leads to increased surface area and hence increased engagement of bone, providing increased initial stability and resistance to stresses 3. Misch et al. 4 have reported that ……Contents available in the book……Contents available in the book……Contents available in the book……Contents available in the book……….
Presently, implant diameters vary from mini-implants with a diameter ranging from 1.2 to 2 mm, to wide diameter implants with a diameter up to 7 mm. Narrow diameter implants carry a risk of fracture under load whereas wide-diameter implants are less commonly used due to the unavailability of sufficient bone. Narrow diameter implants are usually placed in a low-stress bearing area, usually in the esthetic zone.

Implant length
The implant length is the distance between the implant platform to the apex of the implant. Usually, an implant length of 8 to 13 mm is commonly used. There has been a long-standing perception in implant dentistry that longer implants have long-term stability, though there is no proven linear relationship between implant length and success rate of the implant 1. The use of shorter implants is not recommended from a biomechanical point of view because occlusal forces must be dissipated over a larger implant surface area to prevent excessive stresses at the interface 6. Research done on mechanical analysis of implants with different lengths have supported the view that increasing the implant length may increase success rate only to a certain extent 7.
Implant threads
Threads are designed to maximize initial contact, enhance the surface area, and facilitate the dissipation of stresses at the bone-implant interface. These manage (dissipate and distribute) biomechanical loads to optimize the implant-supported prosthesis function 8. Implant thread configuration plays an important in the biomechanical optimization of dental implants 9-11. Most implants in the market today have a serrated thread to enhance initial stability and increase the surface contact area.
Implants can have a uniform thread design or a step thread design. Thread patterns in dental implants currently range from microthreads near the neck of the implant (Astra Tech, Lexington, MA) to broad macrothreads on the mid-body (Biohorizons, Birmingham, AL; Steri-Oss, Nobel Biocare) and a variety of altered pitch threads to induce self-tapping and bone compression 12. Thread shapes in dental implant designs include square, V-shape, and buttress 8. All these shapes have a different pattern of load distribution.
Basic thread terminology
The threads have been incorporated into implants to improve initial stability 13,14, enlarge the implant surface area and distribute stress favorably. It is important to understand the basic thread terminology to understand the surface modifications of dental implants. In threaded implants, the crest of the thread is the outer edge of the thread and the root is the inner edge of the thread as demonstrated in the diagram. The major diameter refers to the diameter of implant measured from crest to crest of the opposite sides of the implant. The minor diameter refers to the diameter of implant measured from root to root of the opposite sides of the implant. The mean diameter is the diameter of the implant measured from the center of thread diameter of the implant on opposite surfaces.
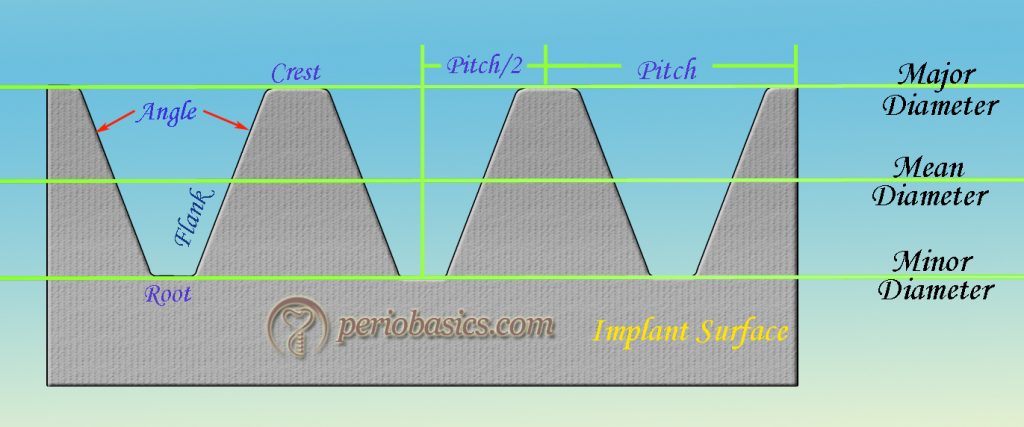
The angle of the thread refers to the angle of the V-shaped groove made between two threads. Flank is the distance between the crest and the root of a thread. Pitch stands for the number of threads per unit length. The smaller pitch denotes more threads on the implant body for a given unit length, thus creating more surface area per unit length of the implant. Also, more rotations are required to insert per unit length of the implant. It is measured as the distance between two consecutive crests of the threads on the same surface. Pitch/2 is the distance between the crest and the root of the same thread. Improvement in the contact area between bone and implant were shown by decreasing pitch and increasing depth between individual threads 15. But, an excessive decrease in pitch can lead to the biomechnical weakening of thread design.
Implant collar
Usually, the implants which have been modified by surface treatment, for example, hydroxyapatite (HA) coated implants have an implant collar at the superior aspect of the crest module. Crest module is that part of the implant, which is designed to retain the prosthetic component in a two-piece system. This is an important part of the implant as it makes the area of transition of the implant from the bone to the soft tissue. Usually, the implant collar is made ……Contents available in the book……Contents available in the book……Contents available in the book……Contents available in the book……….
Periobasics: A Textbook of Periodontics and Implantology
The book is usually delivered within one week anywhere in India and within three weeks anywhere throughout the world.
India Users:
International Users:
Implant-abutment attachments
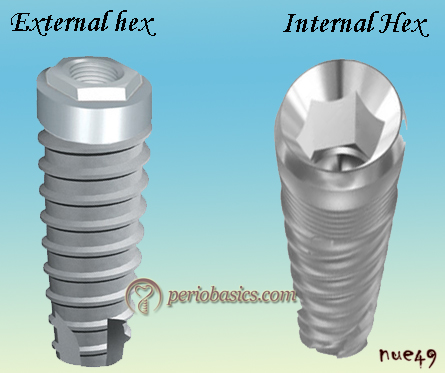
The part of the implant that gives attachment to the superstructure is known as the implant abutment attachment. The implant/abutment interface determines joint strength, and lateral and rotational stability. There are different types of prosthetic attachment: the external hex, spline attachment, internal hex, and internal taper (morse taper). The most important requirements of a prosthetic attachments are: firstly, it should allow complete security in the union and the ability to replace components in exactly the same orientation at any time. Secondly, it should also allow for a variety of prosthetic components and have a means of providing for alignment correction in cases of mal-placement.
External hex
External hex prosthetic connection was introduced as Brånemark protocol for restoring completely edentulous arches where implants were connected together via a metal bar with a fixed prosthesis 16,17. The external hex design was introduced to connect the superstructure to the implant and also as an anti-rotational device to keep the superstructure in its exact place. This external hex, which was only 0.7 mm in height, was not designed to withstand the forces directed on the crowns intraorally 18-21. The drawbacks of the original external hex connection were overcome by the manufacturers by changing the type of screw used (e.g., geometry, height, surface area), the precision of the fit over the hex, and the amount of torque used to secure the new screws. The external hex modifications are now available in heights of 0.7, 0.9, 1.0 and 1.2 mm and with a width of 2.0, 2.4, 2.7, 3.0, 3.3, 3.4 mm depending on implant platform 22. Presently, external hex connections are used widely with more predictable results in implant therapy.
Tapered hexagon attachment (Hex Lock)
This hexagon connection was designed to improve the fit of the implant and abutment. A 1.5-degree taper was introduced into hex flat and the corresponding hexagonal abutment. This type of design had an advantage of greatly reduced rotational freedom thereby reduced loosening of the screw. This design was first introduced by Swede-Vent TL (Paragon implant Co. Encino, CA). It was claimed that by making a tapered connection between implant and abutment, a friction fit is achieved which provides improved stability. A study also showed zero micro-motion at the implant-abutment interface of the tapered hexagonal implant 23.
It is important to note that as the implant-abutment connection incorporates more sides, i.e. trigonal-tetragonal-pentagonal-hexagonal-octagonal, we get more freedom to place the abutment in different directions. For example, in trigonal attachment, the abutment can be placed only in three fixed positions on the implant whereas in the case of octagonal attachment the implant can be placed in eight possible positions on the implant.
External octagon attachment
It involved an external eight-sided octagon attachment. It allows 45⁰ rotation of the abutment on the implant. The manufacturer claimed a good rotational and lateral resistance, but studies supporting this claim are not available. One major disadvantage of this tall octagon connection is that it is not compatible with angled abutments. The rotational resistance of this connection is also questionable because, as the sides of the implant-abutment connection increase the rotational resistance decreases.
Spline attachment
Various kinds of connections between an implant and prosthesis have been designed by the interlocking of different types of polygons, mainly hexagons, and octagons. In spline connection interdigitating projections and slots allow the implant and the abutment to form a precise lock, reducing joint failure. This new interface is composed of six one-millimeter-high projections (splines), providing stabilization to the prosthesis by slip fitting.
This connection was first introduced by Calcitek (Calcitek, Carlsbad. CA) in 1992 24. Implant consisted of ……Contents available in the book……Contents available in the book……Contents available in the book……Contents available in the book……….
Internal hex
The internal hex was designed for more stability and strength of the implant-abutment connection. The initial internal hexed implant was designed with a 1.7 mm deep hex below a 0.5 mm wide, 45° bevel 25, 26. The reasons for this specific internal hex design were the distribution of intraoral forces deeper within the implant to protect the retention screw from excess loading 26, 27, and to reduce the potential of microleakage 28.
This design offers a reduced vertical height platform which helps in the attachment of the prosthetic component. The greater stability of internal hex attachment is due to its longer hex. One major disadvantage is a possible fracture of the thin fixture head. It is also more expensive as compared to the external hex. The internal hex connection may be passive fit or friction fit (morse taper).
Passive fit internal hex implants
3-point internal trigon
In this design the internal tripod allows abutment to fit only in three possible positions on the implant with a rotation of 120⁰. This system was introduced by Nobel Biocare (Replace select system). This implant system was color-coded for the ease of identification and available in diameters of 3.5, 4.3, 5 and 6 mm. The hexagon attachment was preferred over the tripod attachment because of its more degree of freedom of rotation. Further, the stress distribution on off-axis load application was found to be more favorable with the hexagonal connections 29.
6-point internal hexagon attachment
This is the most common type of commercially available internal hex design. In this design, the abutment can be placed at six different positions over the implant with a rotation of 60⁰ which allows a high degree of freedom for abutment placement. Due to long internal screw attachment, the forces are distributed deep into the implant. It has been demonstrated that this design allows the distribution of forces deep within the implant as well as better implant-abutment joint stability as compared to the external hex design 25, 26. The Frialit-2 system from Dentsply has an internal hexagon connection. This connection has a better lateral force distribution.
12 -point internal hexagon attachment
The advantage of this design is the freedom of 30⁰ rotation during placement of the abutment. This is especially useful in case of angled abutments. The examples of commercially available 12 point internal hex implants are Osseotite Certain, manufactured by 3i implant innovations Inc., Palm beach gardens, Florida.
Because this design has 12 point rotations, it may compromise the mechanical properties of the implant. However, research has demonstrated that the stress distribution as well as the stability of the 12 point internal hex connection is better as compared to external hexagon connection 30. Still, further research is required to find out the mechanical stability of this design under lateral and rotational forces.
Internal taper (“morse” taper)
With the introduction of internal hex design, more and more advancements were done and a new internal taper (morse taper) design was introduced. The concept of morse taper was first utilized by the ITI group in Switzerland 31. In this kind of attachment, a tapered abutment post is inserted into the nonthreaded shaft of a dental implant with the same taper 32, 33. Here, the abutment is friction seated into the head of the implant fixture. This type of attachment is simple to use and uses no screws, but there is no way to accurately re-seat an abutment. Another problem is the possibility of fixture head fracture.
Research has demonstrated that the morse-taper connection of the ITI® Dental Implant System with an internal angle of 8° results in the removal torque moment, which is 10 to 20% ……Contents available in the book……Contents available in the book……Contents available in the book……Contents available in the book……….
Other implant components
Transfer coping
The duplication of the implants on the master cast is necessary for the fabrication of the prosthetic component in the laboratory. Transfer coping is required to transfer the position of the implant as an implant analog in the master cast. Implant analog is used to replicate the retentive portion of the implant in the master cast. There are two methods to make an impression of the transfer copings fixed to implants,
Indirect transfer coping (Closed impression)
In this impression technique, the transfer coping is screwed into the implant and impression is made with impression material having elastic properties. The coping is not removed from the implant throughout the impression making procedure. Once the impression is set, it is removed from the mouth. The indirect copings are usually parallel-sided or a little tapered to allow the easy removal of the impression as well as flat sides or smooth undercuts for reorientation and re-placement of the coping in impression once it is removed. Once the impression is out of the mouth, coping is removed from the implant, and is re-oriented and placed back in the impression.
Direct transfer coping (Open impression)
This technique is used when multiple implants have been placed and many of them or all are oriented in different directions i.e. not parallel to each other. It utilizes a hollow transfer component with a long central screw. Holes are incorporated in the impression tray to allow the long screws to pass through. The screws are accessible to the clinician throughout the impression making procedure projecting out of the impression tray. In this case, the impression material having rigid properties is used. Once the impression is set, the screws are removed from the abutment transfer coping. Now the copings are free from implants and impression can be easily removed from the mouth along with transfer coping.
Implant abutments
The prosthetic part of implant therapy requires the knowledge of duplication of the implants on cast model and fabrication of prosthetic component which are functionally and esthetically acceptable. The basic steps of making a final impression for an implant restoration remain consistent with all implant systems. Let us try to understand what all kinds of abutments are used in implant dentistry.
Prefabricated abutments
These are pre-designed and machine-made abutments with a specific shape and specifications. These are provided by the implant manufacturer companies in various shapes, sizes, and angulations but they cannot be used in each and every case. The use of a prefabricated abutment is contraindicated in:
- Cases with insufficient interocclusal space.
- Cases where implant requires an angle of correction greater than 15⁰.
- Where collar height (the distance between the implant platform and the gingival margin) is more than 1 mm than the largest collar height offered by the manufacturer.
- In cases where the clinician wants to achieve parallelism between three or more implants placed in a quadrant and prosthesis is designed splinting the implants together.
Before placing a pre-fabricated abutment following para-meters are recorded 36,
- The diameter of the implant platform.
- The collar or cuff height (the distance between the implant platform and the gingival margin) at the mesial, distal, buccal, and lingual locations.
- The interocclusal height (the distance between the implant platform and the opposing dentition).
- Need for a straight or angled abutment.
Pre-fabricated angled abutments
Ideally, implants should be placed parallel to each other and to adjacent teeth and should be aligned vertically with axial forces. However, in many cases, achieving this may not be possible owing to deficiencies in the ridge anatomy. To overcome these problems one of the options is to use angled abutments. Pre-fabricated angled abutments are designed by the manufacturers with a defined angulation and design. It must be remembered that an angled abutment can only be used if the correction is within 15⁰ with the exception of Straumann synOcta which provides both 15⁰ and 20⁰ corrections. These are especially useful in the maxillary anterior area where the long axis of the implant usually guides the crown placement in a more buccal position.
In some implants like Nobel Biocare’s Replace® Select Implant, the internal mechanism uses a three-lobed triangle, thereby allowing only three possible positions to angle the abutment. In that case, a custom made abutment is designed according to the requirements of the situation. This problem is less with hexagon or octagon attachment which provides rotation of the abutment over the implant in six or eight positions, respectively. Many implants like ……Contents available in the book……Contents available in the book……Contents available in the book……Contents available in the book……….
Periobasics: A Textbook of Periodontics and Implantology
The book is usually delivered within one week anywhere in India and within three weeks anywhere throughout the world.
India Users:
International Users:
Modifications in these abutments are done according to the requirements by transferring them on a cast model and cutting the required surface with the help of metal cutting burs. It should be remembered that direct cutting of abutment attached to implant should not be done as heat that is produced even in the presence of ample water supply and the potential sparking of the hard titanium metal may be detrimental to both the success of the implant and safety of the patient.
Custom Abutments
A custom abutment is one which is designed by the practitioner for an individual patient. Here, the practitioner must make either a tissue or a bone-level impression of the implant with the help of a transfer impression coping. All the contraindications for a pre-fabricated abutment given above become indications for the custom-made abutments. It is the most efficient way to restore an implant crown; however, it is also the most costly. Custom made abutments are designed when the angulation required is more 15⁰ and relative parallelism is difficult to achieve. The main advantage of this abutment is that the clinician has all the freedom to fabricate the design of abutment according to the restrictions present in a particular patient.
Healing abutment
During the second stage of implant surgery, the implant is exposed to the oral cavity for fabrication of prosthetic attachment. A healing abutment is temporarily placed on the implant for a few days to achieve a natural contour of the gingiva. These abutments may be pre-fabricated or customizable healing abutments. Pre-fabricated abutments have a specific shape which cannot be modified by the practitioner. On the other hand, customizable healing abutments are made up of polymer material which allows for easy and quick chair-side modification.
After a healing period of 7-10 days, a nicely contoured gingival collar is achieved. After placement of the superstructure, it gives an impression of a natural tooth coming out of gingiva.
Temporary abutments
These are used for short term and are usually not used in the mouth for longer than 6 months. These are usually made up of polymer material which allows for easy and quick chair-side modification. These are used for screw- or cement-retained temporary crowns or cement-retained temporary bridges.
Ball abutments for implant-supported over-denture
The use of ball abutments has traditionally been in the mandible, utilizing two implants for implant-supported over-denture. Here, the ball is attached to the implant and its corresponding socket is placed in the denture. So, when we place the denture in the mouth, the ball and socket snap-fit with each other and support the denture. The problem with this attachment is that with the passage of time the ball and socket joint become loose and demands a replacement.
Locator attachment of implant-supported overdentures
Due to the problems associated with the ball abutments, a new system for implant-supported overdentures has been introduced known as the locator system. In this system, a metal housing which is encapsulated within the prosthesis retains a resilient nylon liner (male component) which allows for attachment to the abutment head. The abutments have a self-aligning feature which helps the denture removal by the patient without damage to the nylon component. Various sizes of the abutments are available. The minimum height of abutment head above the surrounding soft tissue should be 1.5 mm. The male component is available in various color codings. If the divergence of implants is less than 20⁰, clear, pink and blue male components are used. They have different levels of retention with clear having highest retention of around 1.5 Lbs. The male component is designed to rotate on the abutment head as well as within the walls of the metal housing. For implant angulations more than 20⁰, extended male components with green and red color coding are used. The nylon liner may be changed after few years, as with due course in time, the attachment may become loose.
Conclusion
A thorough knowledge of implant design and its components is required to facilitate its clinical application. In the present discussion, the present concepts in the implant design were discussed. As more and more research is going on in the field of implantology, new implant designs and implant components are being introduced frequently. The shape, size, the thread design and surface properties all affect the mechanical stability of an implant. Presently, many implant manufacturers are coming up with a cortico-cancellous thread design i.e., different thread design for the cortical bone and the cancellous bone. In future, many advances in this field are expected.
References
References are available in the hard-copy of the website.
Periobasics: A Textbook of Periodontics and Implantology
The book is usually delivered within one week anywhere in India and within three weeks anywhere throughout the world.