Introduction
The most important factors determining the long-term success of dental implant treatment are an accurate diagnosis, a well-designed treatment plan, and a well-performed surgical protocol. The surgical protocol is developed after gathering detailed data which includes complete medical and dental history, clinical findings, photographs, mounted diagnostic casts and radiographs. It must be noted here that while determining the surgical protocol, consultation with other specialists such as an oral surgeon, orthodontist, endodontist or prosthodontist should be done so that best possible post-operative results can be achieved.
Surgical protocol
The endosseous implant systems can be categorized as two-stage (submerged) or one-stage (non-submerged).
Two-stage implant system:
In this procedure, the implant is placed and covered with soft tissue to allow the osseointegration for a particular duration of time. As the implant is completely under the soft tissue, the system is also called as submerged implant system. A second stage surgery is then done to expose the implant on which a healing screw is attached. Once the healing of soft tissue occurs around the healing screw, the abutment is placed and super-structure is fabricated. This approach is indicated when there is an excessive bone loss at the implant site or there is poor bone quality or when ridge augmentation has been performed along with implant placement.
One-stage implants system:
In this procedure, the implant is kept exposed to the oral environment throughout the healing period. The major advantage of this technique is that mucogingival and esthetic management around the implant is easy in many cases. Furthermore, the patient’s acceptance is more because only one surgical procedure is required in one stage implant system.
Flap design
Incision:
The clinician should be well versed with the important anatomical landmarks and location and path of the blood vessels and nerves. All the vital structures should be preserved and protected during the surgical procedure. After a thorough evaluation of the surgical area, the incision is placed to expose the underlying bone.
During implant surgeries, two most commonly used incisions are crestal or para-crestal incision. If the alveolar crest is wider (Division A) and overall ridge shape is normal, the crestal incision is used. It starts at the distal end of the mid-crestal region of the ridge and is extended mesially. On the other hand, if the ridge is deficient, a para-crestal incision is given, buccal to the crest of the ridge. In the case where there is reduced quantity of keratinized tissue, the crestal incision should be placed towards the palatal aspect; the area where more keratinized tissue is available. It is recommended that ……..Contents available in the book…….Contents available in the book…….Contents available in the book…….Contents available in the book…..
When ridge augmentation has been planned using bone graft and membrane placement, the relieving incisions should be placed at least one tooth proximal to the area of augmentation. Furthermore, during augmentation procedure, if it is anticipated that vital structures such as incisive nerve may get damaged, then wider flap design which includes adjacent papillae is recommended.
Flap reflection:
The full-thickness flap is reflected buccally and lingually to get an adequate access to the underlying bone. However, it should be remembered that periosteum is the major source of blood supply to the bone, so the maximum amount of periosteum should be preserved over the bone. If any papilla is involved, it should be completely involved in the flap and should not be bisected. The flap tissue should not be manipulated excessively because it can lead to necrosis as well as can lead to deleterious esthetic results. The flap should be kept moist during the complete duration of the surgery. In longer surgical procedure when a high degree of hemostasis has been achieved, the flap tissue may become dry. Intermittent saline irrigation should be done on the surgical site to keep it moist and prevent excessive heat production.
Preparation of osteotomy site:
Although, many experienced clinicians do not use a surgical stent for a single implant or few implant placement, but it is recommended that for an accurate preparation of osteotomy site a surgical stent should be used. The size of the implant is selected according to the mesiodistal and buccolingual dimensions of the ridge and proximity to vital structures. The osteotomy site is prepared with the help of physiodispenser and implant kit which is provided by various implant companies for placing their implants.
Physiodispenser:
Physiodispenser is a machine which is used to prepare the osteotomy site for implant placement. It is equipped with a motor in the central unit which provides high torque at varying rpm, handpiece attachment, foot paddle and a peristaltic pump for irrigation. The rpm, as well as torque values, can be adjusted on the machine. Most of the presently available physiodispensers can provide a torque up to 70-80 Nm. The foot paddle attached to the unit has press buttons for various functions and settings. Most of the presently available physiodispensers are equipped with memory function, where the rpm and required torque for each subsequent drill can be stored. Along with this, they also have an auto-off function by which the rotation stops if ……..Contents available in the book…….Contents available in the book…….Contents available in the book…….Contents available in the book…..
Periobasics: A Textbook of Periodontics and Implantology
The book is usually delivered within one week anywhere in India and within three weeks anywhere throughout the world.
India Users:
International Users:
Surgical implant kit:
A surgical implant kit is provided by all the implant manufacturers along with their implant system. The drills provided in implant system correspond to the diameter of the implant. While placing the implant of a particular diameter, drills are used in a particular sequence as specified by the manufacturer.
Preparation of osteotomy and implant placement
Although, the drills in implant kit vary from manufacturer to manufacturer but following is the usual sequence of using the drills,
Stage I surgery:
1. The first drill to be used at the site of osteotomy is small round bur or spiral drill which is used to mark the site where the implant has to be placed. This drill is used after placing the stent in its position and the cortical plate is punctured. It must be remembered that a continuous saline irrigation should accompany the drilling, throughout the surgical procedure. As already stated in “Biological aspect of dental implants”, heating of the bone is not desired because osteocytes damage occurs above 47⁰C.
2. After this, a 1.5 diameter drill is used at 2500 rpm with which drilling is done 2 mm shorter to the desired depth and axis of drilling is established. It must be remembered that while drilling for implants, finger rest should not be taken because the axis of drilling may change along the axis of finger rest. The drilling depth is kept 2 mm short of the final osteotomy depth to make sure that the vital structures such as the mandibular canal or maxillary sinus floor are at a safe distance, which is confirmed by taking a radiograph.
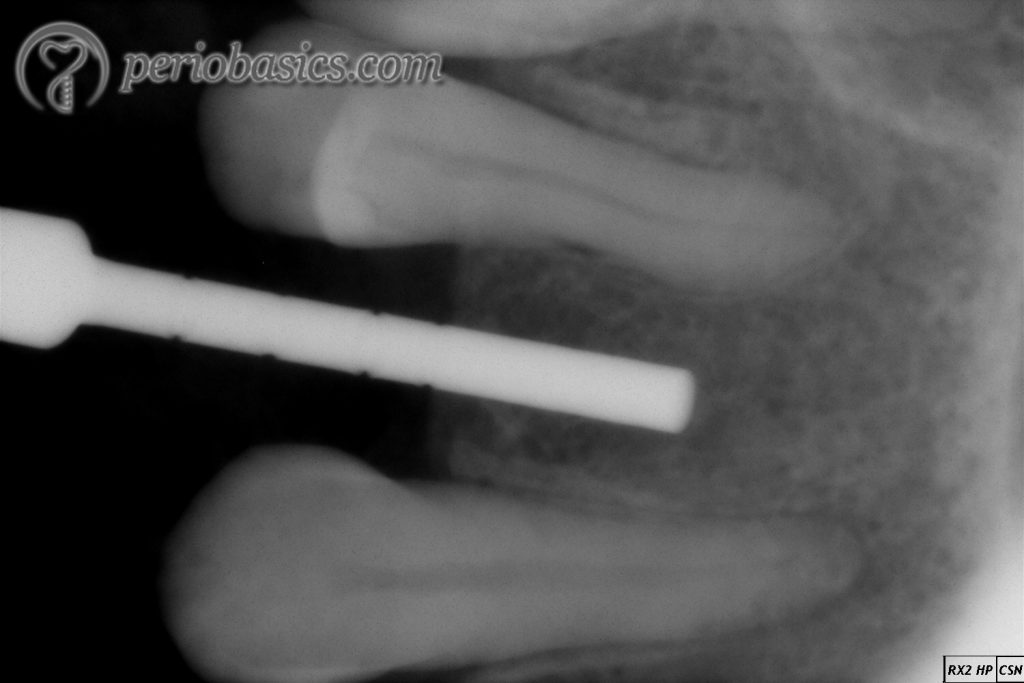
3. Once the drilling with 1.5 mm drill has been done 2 mm shorter than the desired depth, paralleling pin/pins (guiding pins) are placed in the osteotomy. Their diameter is same as that of the previous drill. A radiograph is then taken to verify the position of the paralleling pins placed inside osteotomy. The relative parallelism of the pins to each other and to the neighboring teeth is checked. If the angulation is not correct, it is changed with the use of the next drill with a larger diameter. Safe distance from vital structures is ensured.
4. If the angulation and parallelism are found to be accurate and vital structures are at a safe distance, final depth of drilling is achieved with 1.5 mm drill.
5. A larger diameter drill is then used to increase the diameter of the osteotomy. If the angulation was not correct with 1.5 mm drill, it is corrected with this drill. It must be remembered that while drilling, the rotating drill should be inserted and removed from the osteotomy site. The drill should be intermittently moved in and out of the osteotomy site, facilitating appropriate irrigation of the site and removal of the bone debris.
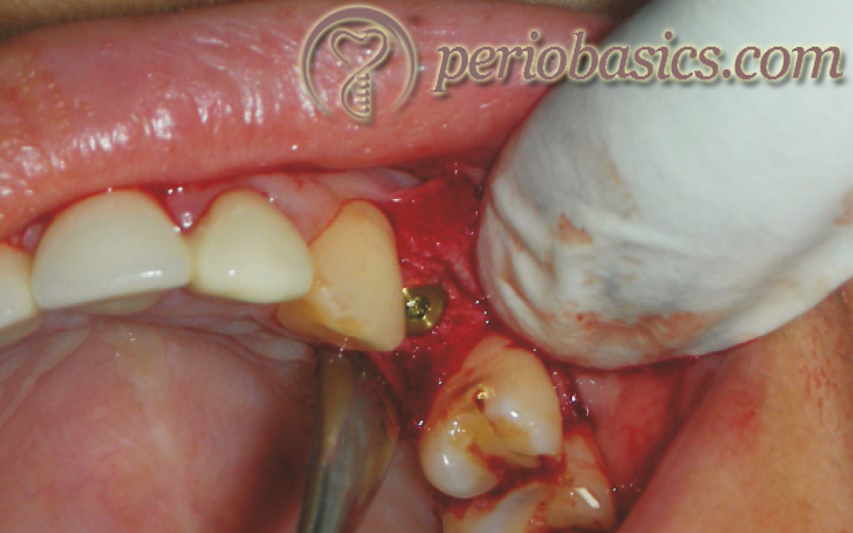
6. Drills with increasing diameter are then used with less rpm (500-600) until the final diameter corresponding to the diameter of the implant is achieved. The final drill should be inserted and removed in one go so that the final diameter of the osteotomy is precise. It must be ensured that after placement, the implant is covered with 1.5-2 mm of bone all around. When placing multiple implants the length of the edentulous span should be carefully estimated and position of implants in this span is determined to make sure that a minimum of 1.5-2 mm bone surrounds the implants. Two implants should be positioned at least 3-4 mm away from each other to provide space for super-structure (crowns) and for adequate maintenance of oral hygiene.
7. In the case of high-density bone (D1 or D2), countersink drill is used to widen the entrance of the osteotomy.
8. A tap may be used to create screw threads in the osteotomy to facilitate easy implant placement.
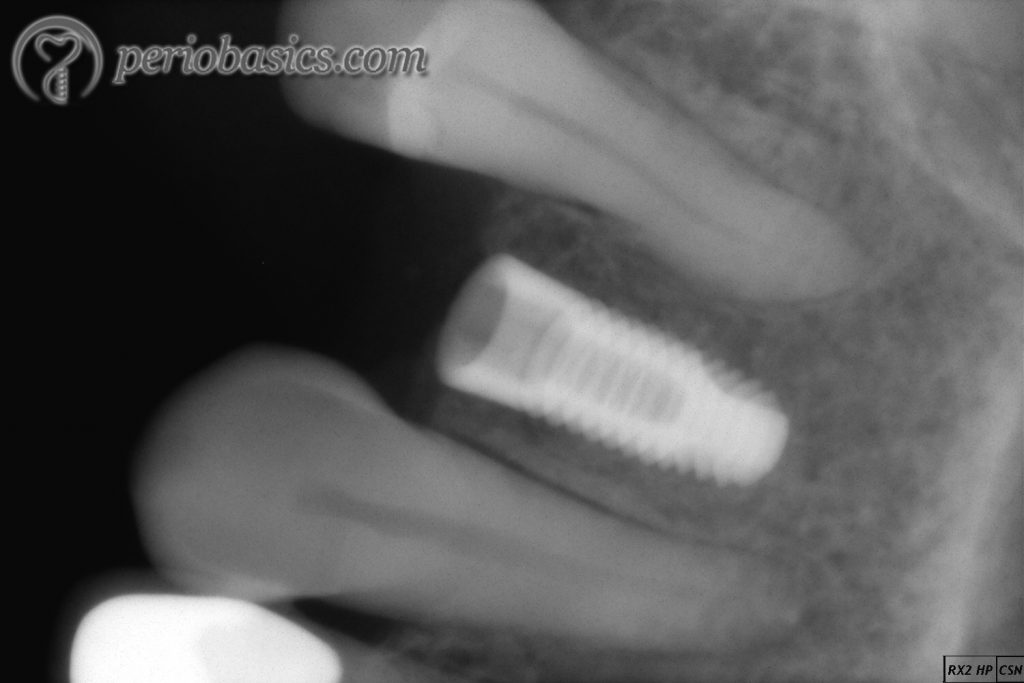
9. Finally, the implant is engaged with manual or handpiece attachment and is placed in the osteotomy site. Implant placement is done with low speed (25 rpm) with hand-piece or by hand with a wrench. An implant insertion torque of ~ 45 Ncm should be achieved during implant placement.
Clinical tips
The standard implant surgical procedure may be modified according to the clinical situation under consideration.
1. While making osteotomy, sometimes the final drill hits the bottom of osteotomy before it reaches the desired depth. This problem can be avoided by making the osteotomy 0.5 mm deeper to the desired depth with a smaller diameter drill. The narrow drill does not remove the bone from the lateral walls, thus facilitating the implant to reach the final depth without compromising the primary stability.
2. While placing multiple implants, the inappropriate axial orientation of the implants can be avoided by placing a direction indicator (Figure 91.2 a) on the adjacent site. A surgical guide is very useful in these cases. When a single implant has to be placed, adjacent teeth can be used as a guide for implant orientation.
3. If the bone is soft (with loose trabecular bone), under preparation of the site is helpful in achieving final stability. The final drill should be used to a shallower depth than the previous drill. It avoids removal of much of bone and increased stability of implant is achieved.
4. While performing bone expansion in the anterior maxilla, osteotomy should be made around 0.5 mm palatal to the usual mid-crest position. This is because the major movement is in the labial plate while expansion. If the labial plate is kept thin, there are more chances of its fracture during the expansion process. Furthermore, labial periosteum should be reflected to a minimum when the bone expansion is planned. This is because bone gets its blood supply primarily from the periosteum. If it is detached from the bone, slight bone resorption usually results.
5. As a general rule, the implant should be placed preferably in tooth position. Because of resorption pattern of maxilla and mandible, starting point of osteotomy in mandible should be towards the buccal side of the alveolar crest and towards the palatal side of the alveolar crest in the maxilla.
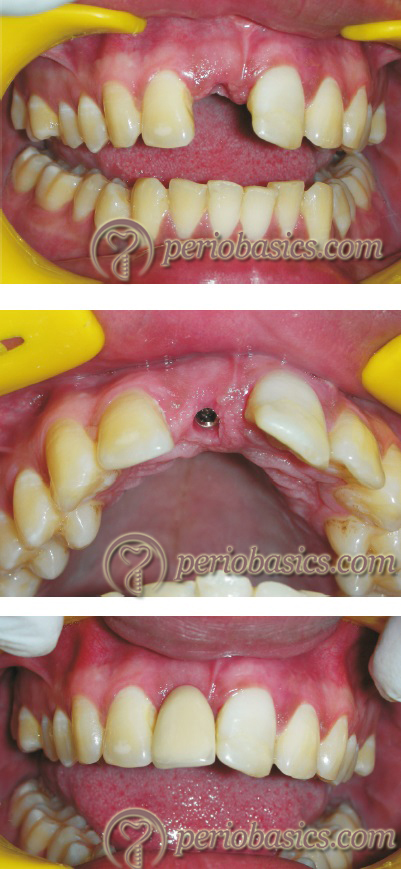
6. While planning implant for maxillary central incisor with adequate space, it should be placed slightly distal to the center of the final mesiodistal length of the crown. It allows appropriate angulation of the crown of the central incisor.
7. It must be remembered that occlusal loads distributed most effectively when forces are applied in an axial direction. The posterior teeth are oriented perpendicular to the curve of Wilson, the lateral curve of the occlusal table formed by the inclination of the posterior teeth. As already stated, implant placement should be done as close as possible to the natural orientation of the teeth. As the implant angulation reaches 25⁰ or more, the supporting bone is severely compromised.
8. It is recommended that in partially edentulous areas at least three implants should be placed instead of two to ensure that implants are not overloaded. It has been reported that the rate of implant failure is more with two implants than with three of more implants 2.
9. Placement of the implant platform at, below or above alveolar crest level has been a matter of controversy. However, Misch 3 suggests that the implant platform should be kept at or slightly above the level of the alveolar crest. Reason suggested is, the placement of the implant platform below alveolar crest results in increased probing depth which may contribute to peri-implantitis.
10. If the alveolar ridge is sharp where the implant has to be placed, the sharpness of the ridge should be reduced and then osteotomy should be made till the desired depth. It must be noted here that the depth of osteotomy will increase due to crestal bone removal. However, excessive bone removal is not recommended. According to Lindhe 4, as a general rule, no bone should be removed from the start, except when the alveolar crest is very thin.
11. If possible, implants should be placed in a tripod arrangement rather than in a straight line to minimize transmission of bending forces on to each individual implant.
12. Implants should never be placed in the midline of maxilla or mandible because it may result in the expansion of the suture resulting in bone related and/or esthetic problems.
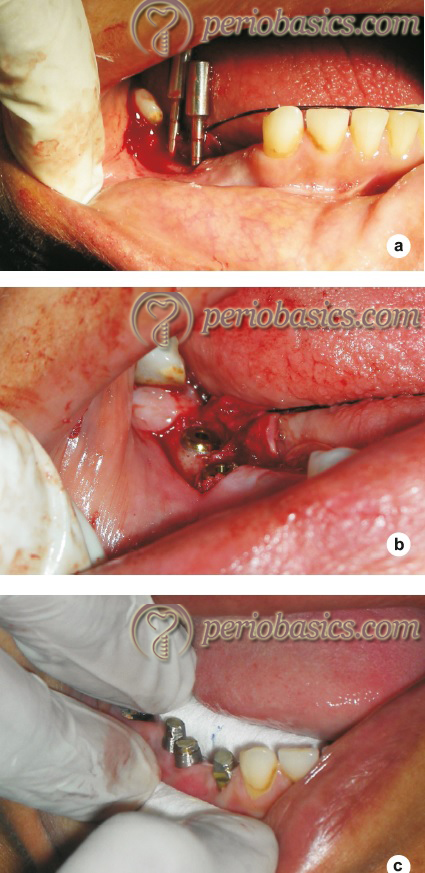
Stage II surgery:
In two-stage implant placement, a second surgery is required to expose the implant. The implant is exposed under local anesthesia by placing a small incision over the mucosa where the implant has been placed. After exposing the implant, the cover screw is removed and a healing screw or gingival former is attached to the implant. If necessary, sutures are ……..Contents available in the book…….Contents available in the book…….Contents available in the book…….Contents available in the book…..
The exposure should be planned, keeping in mind the final tissue architecture. If soft tissue architecture achieved is not esthetically acceptable, soft tissue augmentation procedure can be carried out. To achieve a proper emergence contour, gingivoplasty can be done with a coarse diamond bur. On the other hand, if the interdental papillae are deficient, the subepithelial connective tissue graft can be placed to compensate for the soft tissue deficiency. Gingival former/healing screw is placed over the implant after removing cover screw and left in place for one week. After one week an adequately healed area can be seen around the gingival former once it is removed.
Healing period
The most important factor that determines the duration of time required before the implant is loaded is the quality of bone in which implant has been placed. The general rule is, softer the bone more is the time required for healing. For a good quality of bone the healing period for mandible is 3-4 months and for maxilla, it is 5-6 months 8, 9. If the bone quality is poor (D3 or D4), the healing period should be extended by a month or two. It must be remembered that bone density may not be similar in either jaws or different portions of the same jaw. In such cases, the healing period is decided by implant placed in the bone with least density 9. To analyze the stability of the implant in bone, resonance frequency analysis can be done. It can provide us useful information regarding initial implant stability as well as during the healing period without using any invasive technique. It has been suggested that an implant stability quotient value of 60 or above indicates the suitability of implant for loading 10.
Complex situations
Availability of the bone is the primary factor determining the treatment planning for implant placement. However, when excessive resorption of the ridges has taken place, implant placement requires bone augmentation. Bone deficiency can be encountered as,
Vertical bone deficiency in anterior maxilla:
Bone resorption in the anterior maxilla poses difficulty for implant placement as well as may adversely affect the esthetic result in partially edentulous cases. Bone augmentation procedures are done to increase the bone height in these areas. Two procedures are commonly done to augment the deficient bone,
1. Onlay bone grafting
2. Distraction osteogenesis
In onlay bone grafting autogenous block of bone can be taken from either intraoral sites (ramus or chin) or extraoral site (iliac crest or calvaria) 11. The greater the defect, more the bone is required. Depending on the quantity of bone required, the donor site is selected. For most of the cases, intra-oral bone graft from intraoral sites is sufficient. For larger defects, extra-oral grafts may be taken. However, extra-oral sites require general anesthesia and increase the risk of morbidity. After the graft has been harvested, it is ……..Contents available in the book…….Contents available in the book…….Contents available in the book…….Contents available in the book…..
Periobasics: A Textbook of Periodontics and Implantology
The book is usually delivered within one week anywhere in India and within three weeks anywhere throughout the world.
India Users:
International Users:
Lack of horizontal width in anterior maxilla:
The bone resorption pattern in anterior maxilla creates a knife edge ridge or ridge that is too thin due to concavities. Furthermore, the incisive foramen is sometimes large, restricting the implant placement in the maxillary central incisor positions. If the deficiency is borderline, spreading the bone with osteotomes can be utilized to expand the bone and the desired diameter implant can be placed. However, when the deficiency is more, bone grafting has to be done to increase the bone volume. The ridge expansion using osteotomes is indicated only when at least ≥ 4 mm of buccal to palatal ridge width is available. After achieving profound anesthesia, an incision is placed over the ridge crest without reflecting the flap or elevating the flap. A surgical stent is placed and 1.5 mm drill is used to make initial osteotomy till desired depth. The smallest osteotome is then inserted into the ……..Contents available in the book…….Contents available in the book…….Contents available in the book…….Contents available in the book…..
The best suitable treatment of maxillary knife edge ridge is veneer grafting where an onlay intra-oral block of the cortico-cancellous autogenous graft is fixed with fixation screws on the labial surface of the ridge. It is a quite predictable method of increasing the labio-lingual dimensions of bone. Another method that can be used to treat maxillary knife edge ridge is guided bone regeneration (GBR). The procedure may utilize autogenous graft or non-autogenous grafts. In case autogenous graft is used, an intra-oral block is harvested from the ramus or otherwise a scraping device (Safescraper, 3i Palm Beach, Florida, USA or Ebner 502 grafter, Maxillon Lab Inc. Hollis, NH. USA) can harvest scrapings off the ramus cortical plate which can then be mixed with an osteoconductive material to create a particulate graft. The principles and procedure of GBR are described in “Guided bone regeneration”. The bone graft is then stabilized in position by using a titanium-reinforced membrane. This membrane also functions for space maintenance 13.
Another technique used for treating narrow ridges is split ridge technique. The technique is usually done in cases where the alveolar ridge is as wide as 3-5 mm and as high as 8-10 mm 14. The procedure involves splitting the alveolar ridge into two cortical plates as buccal and palatal/lingual in corono-apical direction. The buccal/labial and palatal/lingual plates are not completely separated from each other and their apical connection is maintained in the form of green stick fracture. The technique is preferably used in the maxilla and less commonly preferred in mandible due to the highly cortical structure of the lower jaw. The implant placement can be done in a one-step procedure or in a two step procedure. In one step procedure, the splitting of ridges and placement of implants is done during the same surgery. On the other hand, in a two-step procedure, the splitting of ridges is followed by a waiting period of 4-6 months and after the augmentation has been achieved, implant placement surgery is done in the second step. Initially, the splitting of ridges was done with the help of bone cutting burs but presently most preferred device for this purpose is the piezoelectric surgical device. It uses micrometric ultrasonic vibrations to cut the bone producing a precise cut in the bone. Furthermore, it offers a clear vision of the surgical site due to its cavitation effect and also does not damage the soft tissue. It has been shown that bone tissue heals more quickly and seamlessly following ridge split made by piezosurgery device 15, 16. The survival rate of implants inserted in ridge split alveolar ridges is reported between 86% and 97% 17, 18.
Know More…
Rule of 5 for obtaining autogenous graft from mandibular symphysis:
Our primary goal while obtaining a graft from the mandibular symphysis is to obtain sufficient bone, so the entire bone defect/augmentation dimensions are completely filled with the harvested graft. The preferable site for harvesting an autogenous graft from the mandible is mandibular ramus. The primary advantages while harvesting graft from ramus include,
Ease of harvesting the graft,
Less postoperative discomfort,
Less neurosensory complications,
Less incision line opening,
Less requirement of local anesthetic agent to achieve profound anesthesia, and
Less concern of changes in facial morphology.
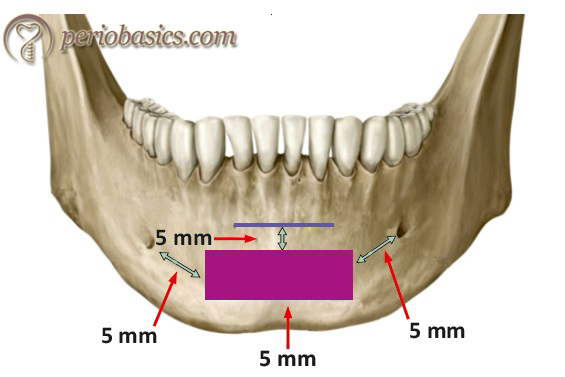
The primary disadvantage of harvesting graft from the ramus area includes less width of bone in some patients. As a result, when inadequate bone is present in the ramus site, attention is brought to the mandibular symphysis region. In such situation, the mandibular symphysis area becomes primary choice to harvest a graft. The average interforaminal distance is greater than 4 cm, thus a graft with adequate dimensions can be harvested from this site. The basal bone thickness of an anterior mandible ranges from 5 to 15 mm below the roots of the anterior teeth. To harvest a graft from the mandibular symphysis area, we follow the rule of 5. According to this rule, it has been recommended to stay at least 5 mm mesial to the mental foramen on each side for a donor bone harvest. Along with this, there should be minimum 5 mm distance from the base of the mandible and 5 mm from the root apices of the mandibular anterior teeth.
Vertical bone deficiency in posterior maxilla:
From the beginning of implant dentistry, deficient posterior maxilla has been one of the most challenging areas for the implant placement. Tooth loss is common in this area due to furcation involvement 19. The bone loss following extraction in this area results in limited bone for implant placement due to sinus proximity. Furthermore, the bone is also usually soft (D3 or D4 type) which further compromises the situation. To stabilize implants in this area, maxillary sinus lift techniques have been described.
Maxillary sinus lift
As already stated, loss of teeth and progressive pneumatization of the maxillary sinus results in insufficient vertical bone volume in the posterior maxilla. The sinus lift procedure was introduced by Tatum at an Alabama dental implant conference in 1976 and was subsequently described by Boyne and James in 1980 20, 21. Augmentation of the sinus floor can be done by crestal approach or lateral approach. As already stated, the indication for maxillary sinus lift is severely atrophic maxilla with insufficient residual bone height (less than 10 mm of bone height) for implant placement. However, there are certain conditions where the maxillary sinus lift is contraindicated,
- Any pathology such as tumor or cyst associated with maxilla.
- Systemic conditions such as uncontrolled diabetes mellitus.
- Acute / chronic maxillary sinusitis.
- Heavy smoker.
- Alcohol abuse.
- Recent irradiation of maxilla.
- Severe allergic rhinitis.
- Oro-antral fistula.
There are various procedures to achieve sinus lift. These include,
1. Sinus augmentation using crestal approach:
a. Osteotome mediated sinus floor elevation.
b. Piezoelectric internal sinus elevation.
c. Hydrodynamic piezoelectric internal sinus elevation.
d. Balloon-mediated internal sinus lift.
2. Sinus augmentation using lateral window approach.
Sinus augmentation using crestal approach:
Osteotome mediated sinus floor elevation:
In the technique, the sinus floor is elevated with the help of osteotome and a surgical mallet. A crestal incision is placed over the ridge and full thickness flap is raised to expose the bone. A pilot drill is used to make osteotomy 1-2 mm short of the sinus floor to accommodate osteotome to sinus floor. However, if the bone thickness is less than 2 mm, the osteotome is used directly without the prior use of a pilot drill. A small osteotome is placed at the site of implant placement and is tapped with a mallet. The thin bone covering the sinus floor is then broken and sinus floor is pushed. Osteotome with larger size is then used to expand the alveolus and compress the bone. To elevate the sinus floor indirectly and to provide buffering, bone graft is taken up in an amalgam dispenser and is placed in the osteotomy. This additional pressure exerted by bone graft causes the elevation of the membrane. After the desired amount of bone graft is inserted and sinus floor has been raised, implant, slightly larger in diameter than the osteotomy is inserted into the osteotomy site 22, 23. Generally, if 3-4 mm of sinus elevation is required, grafting material should be placed 4 to 6 times with osteotome insertion. In case where 5-7 mm sinus elevation is required, the procedure is repeated 7 to 10 times.

Advantages and disadvantages:
The advantages of this procedure include its simplicity and post-operative patient comfort. However, there are many disadvantages also associated with this procedure. This procedure is commonly associated with the perforation of Schneiderian membrane. Although drilling should be done approximately 2 mm short of sinus floor, sometimes the drill perforates the membrane and the procedure has to be stopped. The approximate depth of drilling is determined by radiographs but conventional radiographs may have enlargement of the area, thus miscalculation of the drilling depth may occur 24. The sinus floor is fractured with tapping using an osteotome and surgical mallet, but sometimes because of the presence of slope or a septum (Underwood’s septa), the fracturing of sinus floor becomes difficult and more traumatic. Benign positional paroxysmal vertigo (BPPV) can result from the excessive tapping of the sinus floor due to damage to internal ear 25-27.
Piezoelectric internal sinus elevation:
This technique of sinus elevation was introduced by Vercellotti et al. in 2001 28. In this technique, use of surgical mallet is eliminated and instead ultrasonic piezoelectric vibration based bone cutting is used. The advantage is that technique is free from postoperative vertigo. However, bone compaction is required to elevate the sinus floor. The procedure involves making a window in the alveolar bone with the help of bone scalpels, which work with ultrasonic modulating vibrations. The piezoelectric device automatically ceases the surgical action when the scalpel comes in contact with non-mineralized tissue, which is a ……..Contents available in the book…….Contents available in the book…….Contents available in the book…….Contents available in the book……
Hydrodynamic piezoelectric internal sinus elevation:
The technique is similar to that explained in the previous section, except the sinus elevation is achieved by applying water pressure instead of using the osteotome to push the graft. The piezoelectric device is equipped with an internal irrigation device which puts hydropneumatic pressure with the physiologic solution over the membrane, gently elevating it 29. The hydraulic pressure with irrigant should be applied for several seconds to detach sinus membrane from sinus floor. Once the membrane has been elevated, the surgeon can observe the up and down movement of the membrane concomitant with breathing. The procedure achieves a broad elevation of the Schneiderian membrane. It has been reported that this procedure is associated with dramatically reduced incidences of intraoperative bleeding and membrane perfora-tion than do rotary diamond burs 30.
Balloon mediated internal sinus lift:
This technique is similar to the hydrodynamic sinus lift except that in this technique, an elastic catheter is used and saline is forced in the catheter. As the balloon swells, it pushes the membrane, lifting the membrane. The main advantage of this technique is that it is safe with predictable results.

Sinus augmentation using lateral window approach:
In this approach, the window is prepared in the lateral wall of the maxillary sinus. The procedure is started with the placement of crestal or para-crestal incision on the alveolar ridge 20. A full-thickness flap is then raised to expose the lateral wall of the maxillary sinus. A round bur is then used to create a U-shaped trapdoor on the lateral wall of the maxilla. The width and height of the trapdoor should be ……..Contents available in the book…….Contents available in the book…….Contents available in the book…….Contents available in the book…..
In one-stage technique during surgery, the osteotomy is then made in the ridge and implant of the desired length is placed. After implant placement, its apical portion which is in sinus below the elevated Schneiderian membrane is packed with bone graft. The window is then covered with the membrane and the area is closed. On the other hand, in two stage surgery only desired amount of bone graft is placed and the area is allowed to heal for up to 12 months. Once the graft gets integrated and matures implant placement is done following the regular procedure of implant placement. It must be remembered that overfilling of bone graft may lead to membrane necrosis 20, 22.

Patient instructions after maxillary sinus lift:
Both oral, as well as written instructions, should be given to the patient 31. The patient should be asked to apply ice at the site of surgery after surgery, keep the head elevated and take rest 3. The patient should be asked to avoid smoking because it adversely affects healing. Several studies have shown higher failure rates among smokers 32-35. The patient should be told to avoid all those actions which create a negative pressure in the oral cavity such as sucking through a straw or blowing the nose, especially during the first post-operative week. Sneezing is a natural reflex, but after the sinus lift procedure, the patient should be asked to keep the mouth open while sneezing so that minimal pressure is exerted within the sinus 31. The patient should not try to look at the operated site in the mirror by pulling the lip because it may open the surgical incision line. The patient should be told about the symptoms that may appear shortly after surgery, including slight bleeding from the operated site, swelling, pain and discomfort. Small bone granules may also come in the mouth or from the nose, which is not unusual 3. The patient should regularly take medications as prescribed by the surgeon.
Bone deficiency in anterior mandibular region
The bone deficiency in the anterior mandibular region may be horizontal or vertical. The procedure for bone augmentation is selected according to the type of bone deficiency. The mandible area anterior to mental foramen is considered as a safe zone because there is no limiting neurovascular structure present in this area and implants can be ……..Contents available in the book…….Contents available in the book…….Contents available in the book…….Contents available in the book…..
Periobasics: A Textbook of Periodontics and Implantology
The book is usually delivered within one week anywhere in India and within three weeks anywhere throughout the world.
India Users:
International Users:
Bone deficiency in posterior mandibular region
The bone deficiency in the posterior mandibular area is a common problem faced during planning for implants. Mandibular molars are commonly lost due to periodontal bone loss and furcation involvement.
Mandibular nerve lateralization:
The inferior alveolar nerve enters the mandibular canal, accompanied by the corresponding blood vessels, forming the inferior dental plexus. This plexus provides nerve and blood supply to the lower teeth and gingival tissue. Hence, the mandibular canal acts as a limiting factor for implant placement. One method of placing implants in the atrophic posterior mandible is repositioning the inferior dental plexus on the lateral surface of the implant. The procedure of inferior alveolar nerve repositioning was published in 1977 by Alling 36 describing prosthetic rehabilitation in patients with severe atrophy where the emergence of the nerve was close to the alveolar crest. For osseointegrated implants, this procedure was first described by Jensen and Nock in 1987 37.
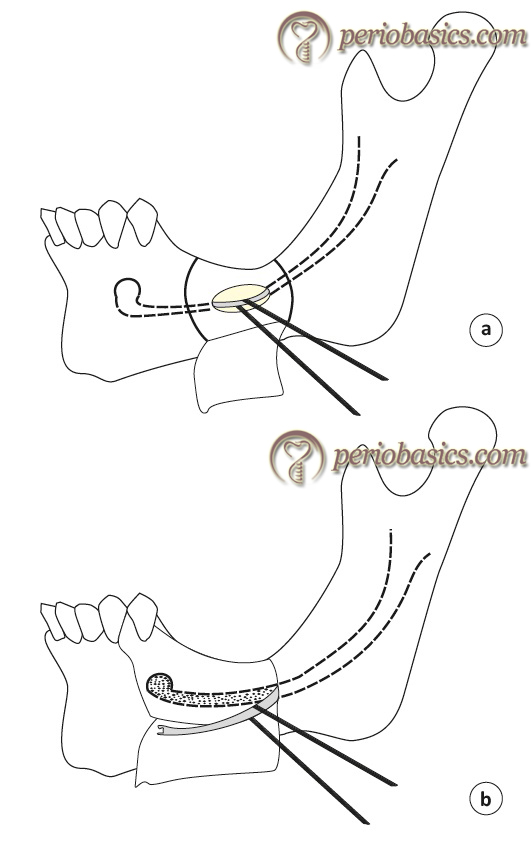
Surgical procedure:
There are two techniques which have been described for this purpose: lateralization and fenestration. Both the procedures start with the application of the local anesthetic agent and achieving a profound anesthesia. Crestal incision is placed according to the area to be exposed. Minimum of the lingual flap should be elevated to preserve the periosteum on the bone.
Lateralization technique:
In this technique, the osteotomy is performed at the mental foramen to expose the neurovascular bundle. The window made to expose the nerve may be extended 5 mm anterior to the mental foramen so as to protect the nerve from any injury. The cortical bone is then removed posteriorly over the trajectory of the mandibular canal to expose the nerve. To completely mobilize the nerve, incisal branch which is present at around 5 mm distance from the mental foramen is sectioned. The nerve is then completely lateralized and implants are placed in direct vision, most preferable to engage both upper and lower cortical plates. Once the implants are placed, the nerve is positioned laterally on the implant surfaces. The autogenous bone removed during the procedure is placed alone or in combination with bone grafting material at the surgical site and the area is then closed.
Fenestration technique:
In this technique, there is no need for sectioning of the terminal branches of the nerve. The window is prepared posterior to the mental foramen where the implant/implants have to be placed. Once the neurovascular bundle is carefully freed, the implant ……..Contents available in the book…….Contents available in the book…….Contents available in the book…….Contents available in the book…..
Advantages of nerve lateralization 37, 39-43:
1. Implants of greater length can be placed in the same surgical step.
2. Because of the bi-cortical mandibular fixation of implants, greater primary implant stability can be achieved.
3. No sophisticated radiographic examination is required.
4. Increased protection of the dental neurovascular bundle is afforded during implant placement.
5. No bone grafting is needed, and donor site morbidity is avoided.
6. The option for immediate loading for the enhancement of masticatory function, dramatically improving the patient’s quality of life.
Disadvantages of nerve lateralization:
The most important disadvantage of nerve lateralization is that any injury to the neurovascular bundle may result in permanent paresthesia in the area supplied by the affected portion of the nerve. Peleg et al. (2002) 44 has recommended the use of cylindrical non-threaded implants during the nerve lateralization procedure because threaded implants in close contact with the nerve may cause neurosensory problems. However, it may be a disadvantage because non-threaded implants have a lower surface area as compared to threaded implants, which is directly related to the degree of osseointegration. The procedure results in a ……..Contents available in the book…….Contents available in the book…….Contents available in the book…….Contents available in the book…..
Conclusion
The success of implant therapy depends on an appropriately osseointegrated implant and its appropriate prosthetic rehabilitation. There are many difficulties which are encountered during implant placement in deficient bone. Since the introduction of implants in dentistry, surgical techniques have been introduced to manage the problems associated with deficient bone. Above is the description of well-described and investigated techniques for implant placement in various situations. However, new innovative surgical techniques are being introduced in the field of implant dentistry and one should constantly be in touch with the research going on in this field to adopt new techniques into the clinical practice.
References
References are available in the hard-copy of the website.
Periobasics: A Textbook of Periodontics and Implantology
The book is usually delivered within one week anywhere in India and within three weeks anywhere throughout the world.